Image Galleries are a great way to showcase a series of images within your microapp. Tiled allows you to create a gallery of images in your microapp that your viewers will be able to browse through without changing to a different microapp page through the use of a Gallery Tile. You can configure the Gallery Tile to show the images like a slideshow, allow the user to manually navigate through the images, or both.
How to add an Image Gallery Tile
To create a Gallery Tile, navigate to the desired page of your microapp in the Microapp Builder. Drag a Gallery Tile from the Tiles panel to the desired location on the page, where you can resize it to your specifications or needs.
Individually drag your image assets from the Assets Panel to the Gallery Tile or the outline section of your Gallery settings. The first asset is displayed in the Gallery Tile, and all subsequent assets are displayed as thumbnails in the Gallery settings.
Gallery Tile settings
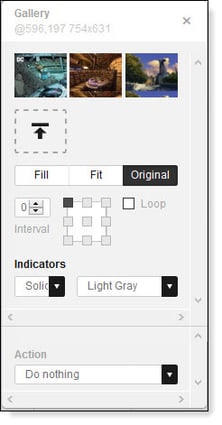
The Gallery settings allows you to configure the following options for your gallery.
Change order of images
To change the order of the images, you must move them individually. Click the left or right arrows to change the order of the image. Repeat until the images display in the desired order.
Remove an image from the gallery
To remove an image, hover over the desired thumbnail in the Gallery settings until the Trash Can (and arrow) icons appear at the bottom. Click the X icon to remove it from the gallery.
Note: Removing an image from the gallery does not delete it from your list of assets.
Alter images in your gallery
You can change how the image is displayed in the gallery.
Additionally, you can select the positioning squares to specify where the main focus of the image should be. The center square is selected by default.
Specify a Slideshow Interval
By default, the Gallery Tile is configured to only change when a viewer interacts with the tile, which is selected when the Interval is set to 0.
To configure the Gallery Tile to automatically change the displayed images like a slideshow, increase the Interval setting to specify the time before the image changes to the next in the sequence. Specifying higher numbers increases the time that the image is displayed in the Tile, and specifying lower numbers decreases the time.
Looping the images in your gallery
If you want the Gallery Tile to redisplay the first image after the last image is displayed, ensure that the Loop checkbox is selected.
Specifying gallery indicators
If you want your viewers to know the number of images in your gallery, you can configure the Gallery Tile to display small graphic markers at the bottom of the image (highlighted in red at the bottom of the graphic).

Click the Indicators dropdown list and select the desired shape, Solid or Ring, or None if you do not want any indicator at all. Click the color dropdown list to select the color of your indicator shape (Light Gray, White, Black, or Accent Color).
Note: You can define the Accent Color for your microapp using the Microapp Settings.
Enlarge the Gallery
You can give your viewers the option to enlarge the gallery view, so they can view the images in the gallery in full screen. From the Action dropdown list, ensure that Fullscreen is selected.
When viewers click the picture, it enlarges so that the image is as large as the microapp page. When finished viewing the Gallery Tile in full screen, click the X icon in the upper left corner to return to standard view.
Note
If the images in the Gallery Tile advance with user interaction (when Interval is set to 0), and the Fullscreen setting is selected, then the gallery cannot be advanced by a Viewer until the gallery is made fullscreen.