The Hotspot Tile is foundation of building interactivity into your microapp. In the Tiled Builder, you can easily create hotspots on your microapp pages that allow you to link other microapp pages, overlays, page states, external websites, external files, phone numbers, or email addresses.
Create a Hotspot
1. From the Microapp Builder, navigate to the desired page or overlay. Be sure the desired design element (for example, a company logo or navigation icons) to be associated with the hotspot has been included in the design of the page.
2. Click and drag the Hotspot Tile from the tile panel to the desired location on the page.
3. The Hotspot Tile appears as a colored square in editing mode that is not visible to recipients when the microapp is shared. Once placed, you can move and resize the Tile as needed.
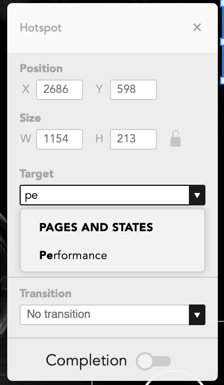
4. Once you have placed the Hotspot Tile, you can then specify its desired target. Click the hotspot to open the Hotspot menu, and click the Select a target dropdown list.
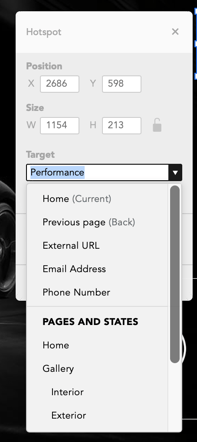
You can specify the following types of targets:
| Target | Description |
|---|---|
| Microapp pages or Overlays | Tiled lists all the available microapp pages, overlays, and page states to link to by name in sequential order. Select the desired screen to link it. |
| External Page / File |
You can link to an external web page or an external file that you want opened (like a PDF) or downloaded. Select External page/file from the dropdown list. Paste the link to the webpage or file in the URL field. When selected, Tiled opens the location in a web browser. |
| Phone Number | Tiled allows you to link the Hotspot to a phone number. Select Phone Number from the dropdown list, and enter the desired number. When selected, the viewer’s device attempts to call the telephone number using the configured default application. |
| Tiled allows you to link the Hotspot to an email address. Select Email from the dropdown list, and enter the desired email address. When selected, the viewer’s device attempts to create an email message using the default email application, with the specified address in the TO field. |
HINT: Target drop-downs have a search ahead feature to allow users to search for their desired target quickly and easily.
Create a Multi-Hotspot
- If you design a microapp page where you want to link multiple elements that are grouped together side-by-side or on top of each other, you can create a multi-hotspot.
- Place the hotspot as normal, creating the initial link, and then adjust it so that it covers all of the elements you want linked.
- Ensure that the hotspot is selected, and repeatedly click the button on the Hotspot menu until you equal the number of desired links. The Tiled Editor divides the hotspot into equal partitions. Specify destinations for each partition as desired.
- By default, the Tiled Builder divides the hotspot into vertical partitions. Click Horizontal to change them to horizontal partitions.
To delete a partition, hover over the partition name and select Delete.
Create a Transition
If you want a transition for your link, such as a fade, click the Transition dropdown list and select the desired transition. No Transition is selected by default.
Hotspot as a Completion event
You can configure the hotspot as a completion event, so that when the viewer selects the link, Tiled records it as a completion event for the microapp. To set the hotspot as a completion event, move the Completion slider to the right.
Completion events are associated with the entire hotspot. If Completion is selected for a multi-hotspot, then all links activate the completion event.