---
title: Managing Microapp Categories
description: This article covers topics related to managing and organizing microapps within a Tiled Library. You will find that managing your microapps into categories, is a great way to organize your library. Cat
---
[Skip to content](https://support.tiled.co/managing-categories#main-content)
English
Show submenu for translations
[Submit a request](https://support.tiled.co/kb-tickets/new)
![logo-horizontal\_w.png\]](https://support.tiled.co/hs-fs/hubfs/logo-horizontal_w.png?height=30&name=logo-horizontal_w.png)
Open main navigation
Close main navigation
- English
Show submenu for translations
- [Submit a request](https://support.tiled.co/kb-tickets/new)
Hi, how can we help you?
- There are no suggestions because the search field is empty.
1. [Support](https://support.tiled.co/)
2. [Getting Started](https://support.tiled.co/getting-started)
3. [Tiled Library](https://support.tiled.co/getting-started#tiled-library)
# Managing Microapp Categories
## Let’s walk through categories — the simplest way to keep a growing microapp Library organized. Whether you have a handful of microapps or hundreds, categories make everything easier to find.
This article covers topics related to managing and organizing microapps within a Tiled Library. You will find that managing your microapps into categories, is a great way to organize your library.
1. [Microapp Categories](https://support.tiled.co/managing-categories#microapp-categories)
1. [Create a microapp category](https://support.tiled.co/managing-categories#create-a-category)
2. [Edit a microapp category name](https://support.tiled.co/managing-categories#edit)
3. [Delete a microapp category](https://support.tiled.co/managing-categories#delete)
4. [Reorder microapp categories](https://support.tiled.co/managing-categories#reorder)
2. [Managing Microapps](https://support.tiled.co/managing-categories#managing-microapps)
1. [Add a microapp to a category](https://support.tiled.co/managing-categories#add)
2. [Remove a microapp from a category](https://support.tiled.co/managing-categories#remove)
### **How Categories Work**
Categories group related Microapps together inside a Tiled Library. Every new Microapp starts out in Uncategorized until you assign it elsewhere, and a single Microapp can belong to more than one category at a time.
[](https://support.tiled.co/hubfs/Microapp%20Categories%20Callouts-1_how_categories_work.png)
### **Creating a Microapp Category**
1\. **Open Edit Categories** — select the category icon on your Library page.
2\. **Start a new category** — select New Category.
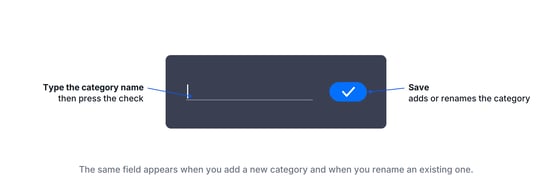
3\. **Name it** — type a name into the field.
[](https://support.tiled.co/hubfs/tiled-category-name-callouts@2x.png)
4\. **Confirm** — select the checkmark. Tiled automatically assigns the category a color, which then appears on every Microapp icon assigned to it.
5\. **Exit editing** — select Done Editing when you’re finished.
[](https://support.tiled.co/hubfs/Microapp%20Categories%20Callouts-2_create_a_category.png)
| **Pro Tip:** Category colors are assigned automatically and can’t be customized, but they’re a fast visual way to spot which Microapps belong to which category right from the Library grid. |
| --- |
### **Renaming a Microapp Category**
1\. **Select the category** — to open it for editing.
2\. **Select the category name** — to make it editable.
3\. **Type the new name** — replacing the existing text.
4\. **Confirm** — select the checkmark to save.
[](https://support.tiled.co/hubfs/Microapp%20Categories%20Callouts-3_rename_a_category.png)
### **Delete a Microapp category**
1\. **Select the category** — to open it for editing.
2\. **Select Delete Category** — at the bottom of the panel.
3\. **Confirm** — select OK in the confirmation window. The category is removed from the Library.
[](https://support.tiled.co/hubfs/Microapp%20Categories%20Callouts-delete_a_category.png)
| **Heads Up:** Deleting a category does not delete the microapps inside it. Any microapp that was only assigned to the deleted category automatically returns to Uncategorized. |
| --- |
### **Reordering Microapp Categories**
Select and drag a category to move it to a new position. The order you set is reflected in how categories appear across the Library.
[](https://support.tiled.co/hubfs/Microapp%20Categories%20Callouts-5_reorder_categories.png)
### **Managing Which Microapps Belong to a Category**
### **Adding a Microapp to a Category**
Select a Microapp icon and drag it onto the category you want to assign it to. Once assigned, that category’s color appears on the Microapp icon.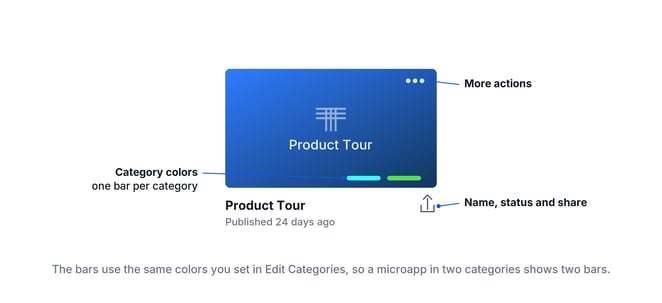
Once assigned, that category’s color appears on the Microapp icon.[](https://support.tiled.co/hubfs/Microapp%20Categories%20Callouts-6_add-a-microapp-to-a-category.png)
### **Removing a Microapp from a Category**
1\. **Select the category** — to open it for editing.
2\. **Select the X** — next to the microapp’s name. The microapp is removed from that category.
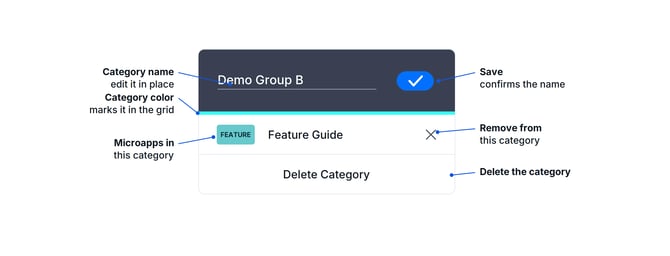If the Microapp isn’t assigned to any other category, it returns to Uncategorized automatically.
[](https://support.tiled.co/hubfs/Microapp%20Categories%20Callouts-7-remove-a-microapp-from-a-category.png)
| **Try It Yourself:** Create a test category, drag two microapps into it, then remove one using the X. Seeing the full cycle once makes the whole system click. |
| --- |
**Related Articles**
• **[Navigating the Tiled Library Overview](https://support.tiled.co/tiled-library-overview)** — A tour of the Library and its navigation.
• [**Managing Libraries**](https://support.tiled.co/managing-libraries)— Creating and organizing entire libraries.
• [**Searching for Microapps**](https://support.tiled.co/searching-for-microapps)— Finding content quickly in a large library.
- [Getting Started](https://support.tiled.co/getting-started#main-content)
- [Intro to Tiled](https://support.tiled.co/getting-started#intro-to-tiled)
- [Tiled Library](https://support.tiled.co/getting-started#tiled-library)
- [Tiled Builder](https://support.tiled.co/tiled-builder#main-content)
- [Tiled Builder](https://support.tiled.co/tiled-builder#tiled-builder)
- [Microapp Tiles](https://support.tiled.co/tiled-builder#microapp-tiles)
- [Personalization](https://support.tiled.co/tiled-builder#personalization)
- [Asset Library](https://support.tiled.co/tiled-builder#asset-library)
- [Best Practices](https://support.tiled.co/tiled-builder#best-practices)
- [Tiled Tiles](https://support.tiled.co/tiled-tiles)
- [Settings](https://support.tiled.co/settings#main-content)
- [Account Settings](https://support.tiled.co/settings#account-settings)
- [Library Settings](https://support.tiled.co/settings#library-settings)
- [Microapp Settings](https://support.tiled.co/settings#microapp-settings)
- [Sharing & Analytics](https://support.tiled.co/sharing-analytics#main-content)
- [Microapp Analytics](https://support.tiled.co/sharing-analytics#microapp-analytics)
- [Personalization](https://support.tiled.co/sharing-analytics#personalization)
- [Sharing Microapps](https://support.tiled.co/sharing-analytics#sharing-microapps)
- [Useful Resources](https://support.tiled.co/useful-resources#main-content)
- [Additional Guides](https://support.tiled.co/useful-resources#additional-guides)
- [Developer Tools](https://support.tiled.co/useful-resources#developer-tools)
- [Accessibility](https://support.tiled.co/useful-resources#accessibility)
- [Tiled Mobile App](https://support.tiled.co/useful-resources#tiled-mobile-app)
- [Seismic](https://support.tiled.co/useful-resources#seismic)
- [Authentication & Security](https://support.tiled.co/useful-resources#authentication-security)
- [Builder 2.0](https://support.tiled.co/builder-2-0#main-content)
- [Tiled Builder 2.0](https://support.tiled.co/builder-2-0#tiled-builder-2-0)
- [Microapp Tiles 2.0](https://support.tiled.co/builder-2-0#microapp-tiles-2-0)
- [Personalization 2.0](https://support.tiled.co/builder-2-0#personalization-2-0)
- [Asset Panel 2.0](https://support.tiled.co/builder-2-0#asset-panel-2-0)
- [Layers & Settings 2.0](https://support.tiled.co/builder-2-0#layers-settings-2-0)
- [FAQ](https://support.tiled.co/builder-2-0#faq)
- [Tiled Plugins](https://support.tiled.co/tiled-plugins#main-content)
- [Figma Plugin](https://support.tiled.co/tiled-plugins#figma-plugin)
- [Adobe XD Plugin](https://support.tiled.co/tiled-plugins#adobe-xd-plugin)
- [Sketch Plugin](https://support.tiled.co/tiled-plugins#sketch-plugin)
- [Integrations](https://support.tiled.co/integrations#main-content)
- [CRM & Marketing Automation](https://support.tiled.co/integrations#crm-marketing-automation)
- [Content & Asset Management](https://support.tiled.co/integrations#content-asset-management)
- [Collaboration & Communication](https://support.tiled.co/integrations#collaboration-communication)
- [New Releases](https://support.tiled.co/new-releases#main-content)
- [v66.0.0](https://support.tiled.co/new-releases#v66-0-0)
- [v65.0.0](https://support.tiled.co/new-releases#v65-0-0)
- [v64.0.0](https://support.tiled.co/new-releases#v64-0-0)
- [v63.0.0](https://support.tiled.co/new-releases#v63-0-0)
- [v62.0.0](https://support.tiled.co/new-releases#v62-0-0)
- [v61.0.1](https://support.tiled.co/new-releases#v61-0-1)
- [v60.0.0](https://support.tiled.co/new-releases#v60-0-0)
- [v59.0.0](https://support.tiled.co/new-releases#v59-0-0)
- [v58.0.0](https://support.tiled.co/new-releases#v58-0-0)
- [v57.0.0](https://support.tiled.co/new-releases#v57-0-0)
- [v56.0.0](https://support.tiled.co/new-releases#v56-0-0)
- [v55.0.1](https://support.tiled.co/new-releases#v55-0-1)
- [v54.0.0](https://support.tiled.co/new-releases#v54-0-0)
- [v53.0.0](https://support.tiled.co/new-releases#v53-0-0)
- [v52.0.0](https://support.tiled.co/new-releases#v52-0-0)
- [v51.0.0](https://support.tiled.co/new-releases#v51-0-0)
- [v50.0.0](https://support.tiled.co/new-releases#v50-0-0)
- [Uncategorized](https://support.tiled.co/uncategorized)
[](https://tiled.co)
Copyright © 2026, Tiled
```json
{
"@context" : "https://schema.org",
"@type" : "VideoObject",
"contentUrl" : "https://4720090.fs1.hubspotusercontent-na1.net/hubfs/4720090/video_assets/223844362007/inherited/web_optimized.mp4",
"dateModified" : "2026-10-07T16:01:20.127Z",
"duration" : "PT41S",
"height" : 1080,
"name" : "Microapp Categories Animation",
"thumbnailUrl" : "https://4720090.fs1.hubspotusercontent-na1.net/hubfs/4720090/Microapp%20Categories%20Animation.mp4/medium.jpg",
"uploadDate" : "2026-10-07T16:01:20.124Z",
"width" : 1920
}
```