![logo-horizontal_w.png]](https://support.tiled.co/hs-fs/hubfs/logo-horizontal_w.png?height=30&name=logo-horizontal_w.png)
How Libraries Work
|
|
How It Works |
|
Who can add libraries |
Account Admins only. |
|
Who sees a library |
Users assigned to it. Account Admins see every library automatically. |
|
Roles |
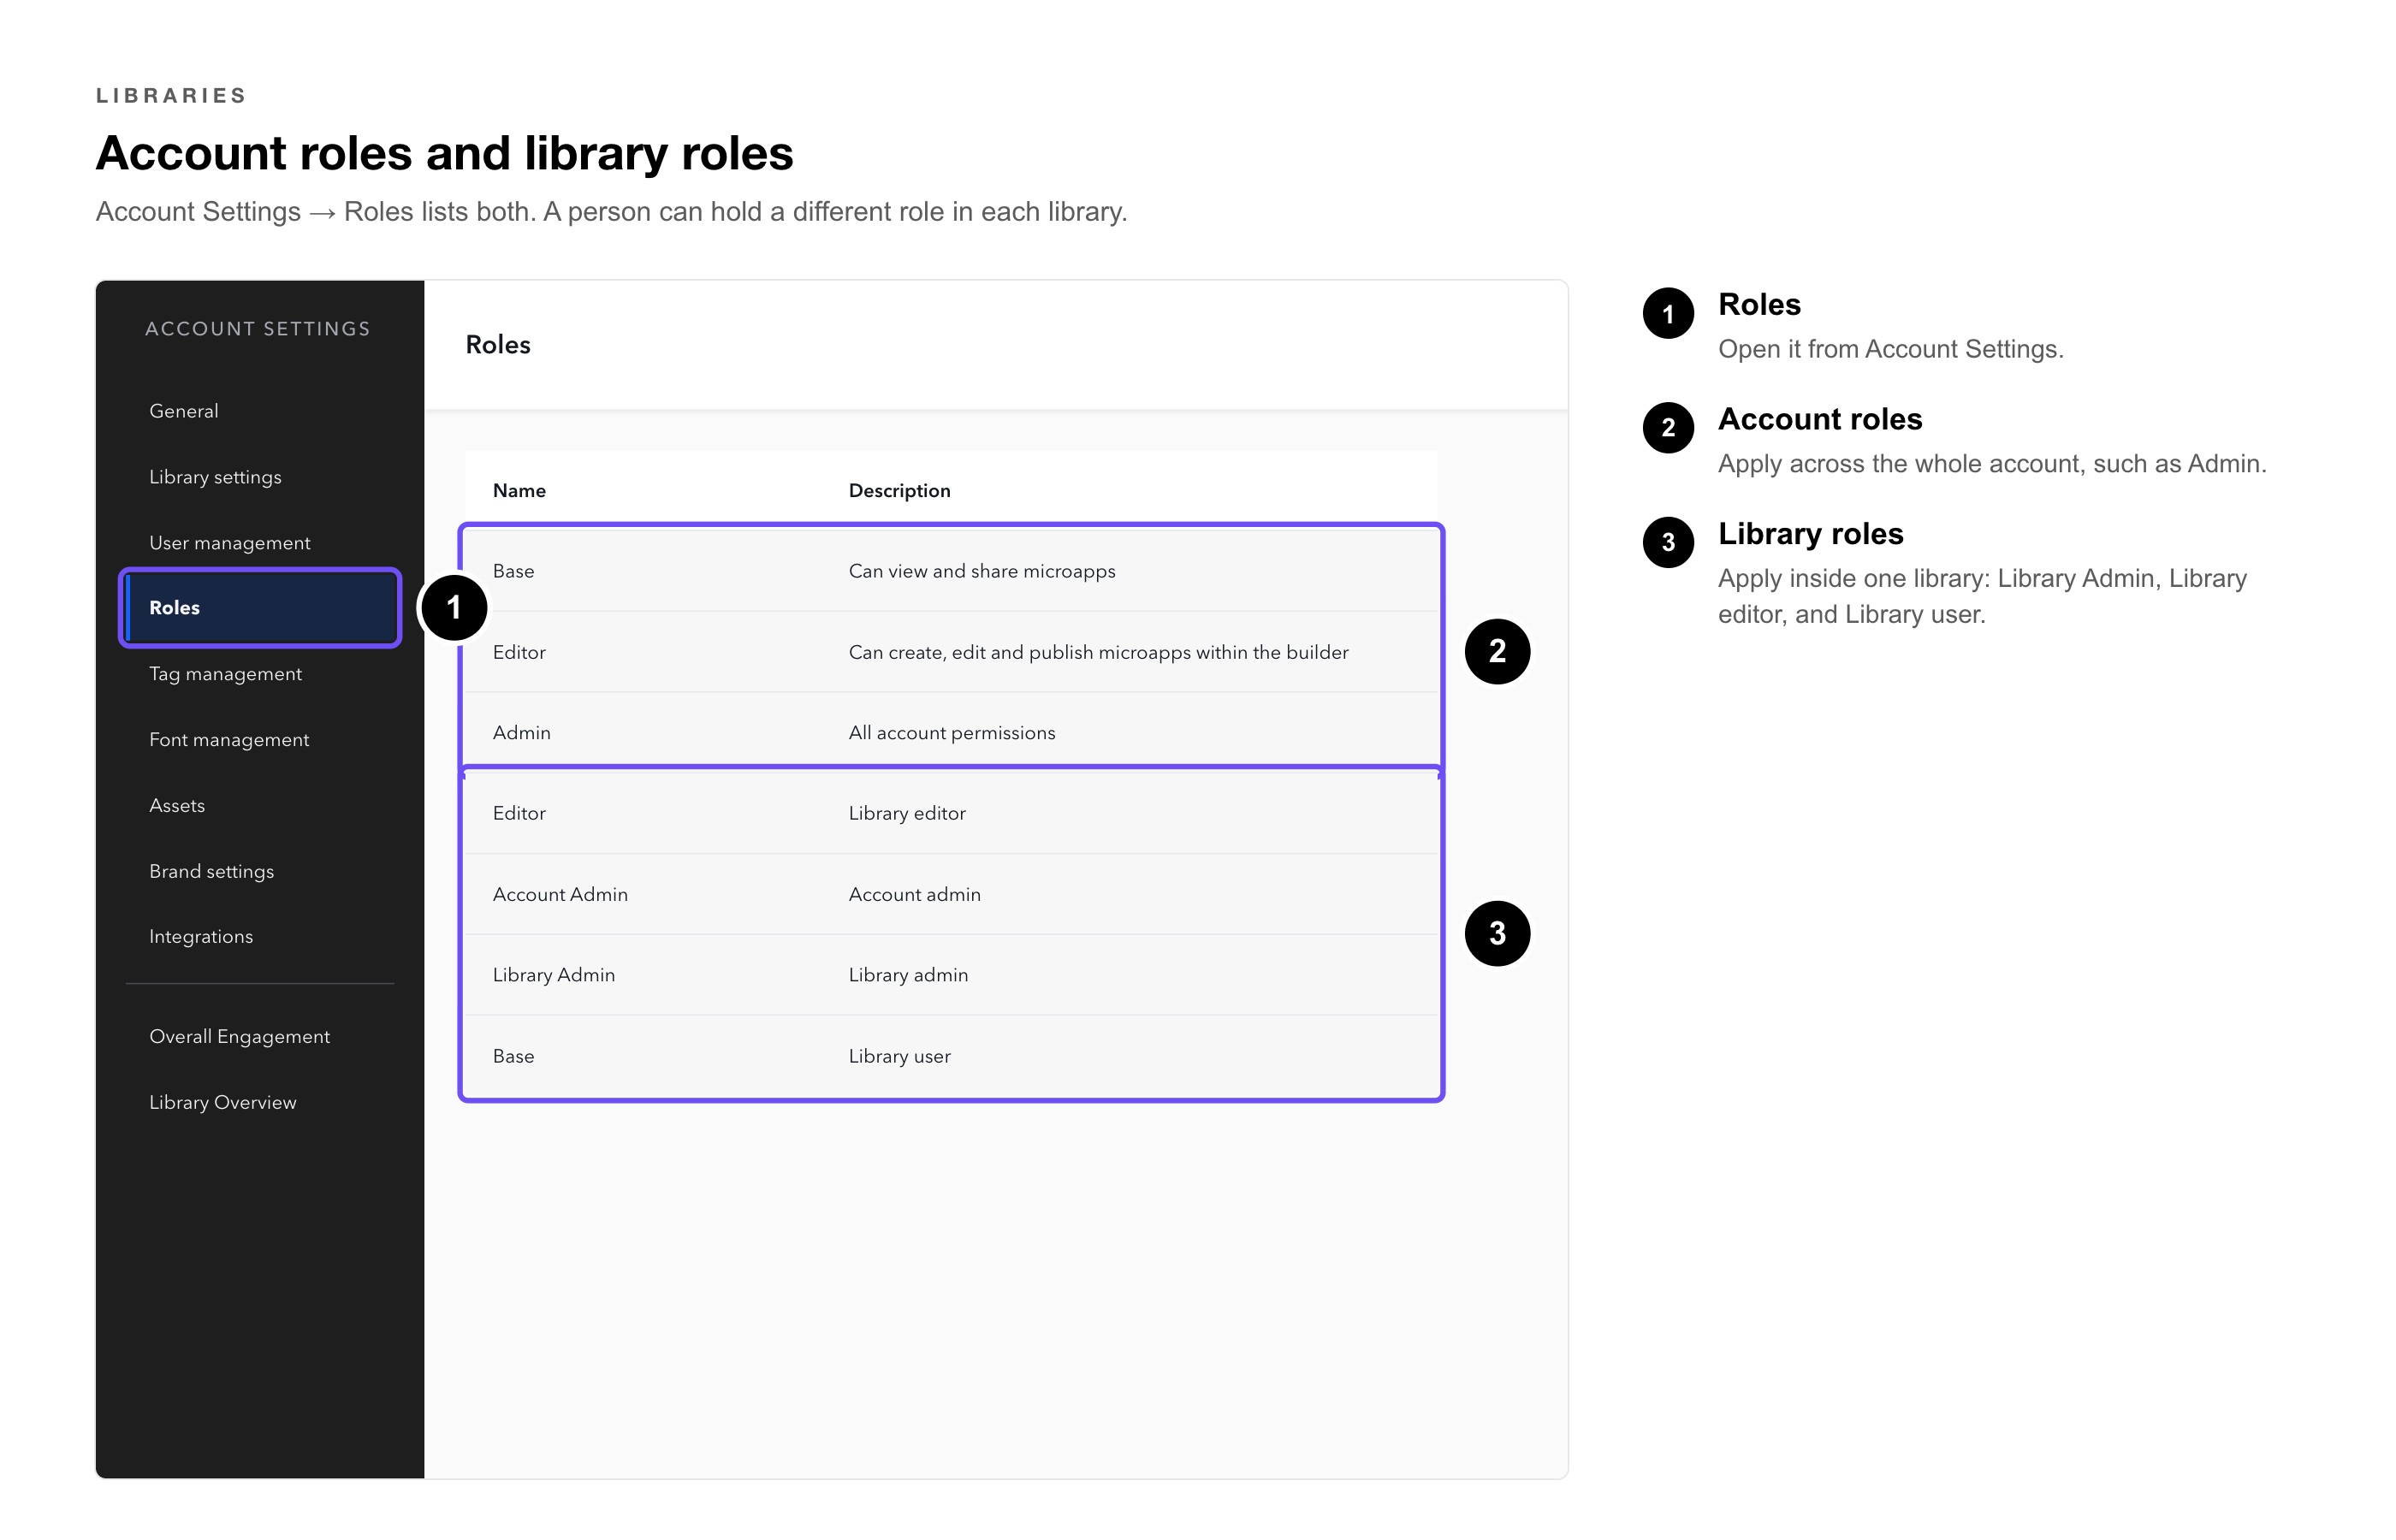
Account Settings → Roles lists account roles and library roles, such as Library Admin, Library editor, and Library user. |
|
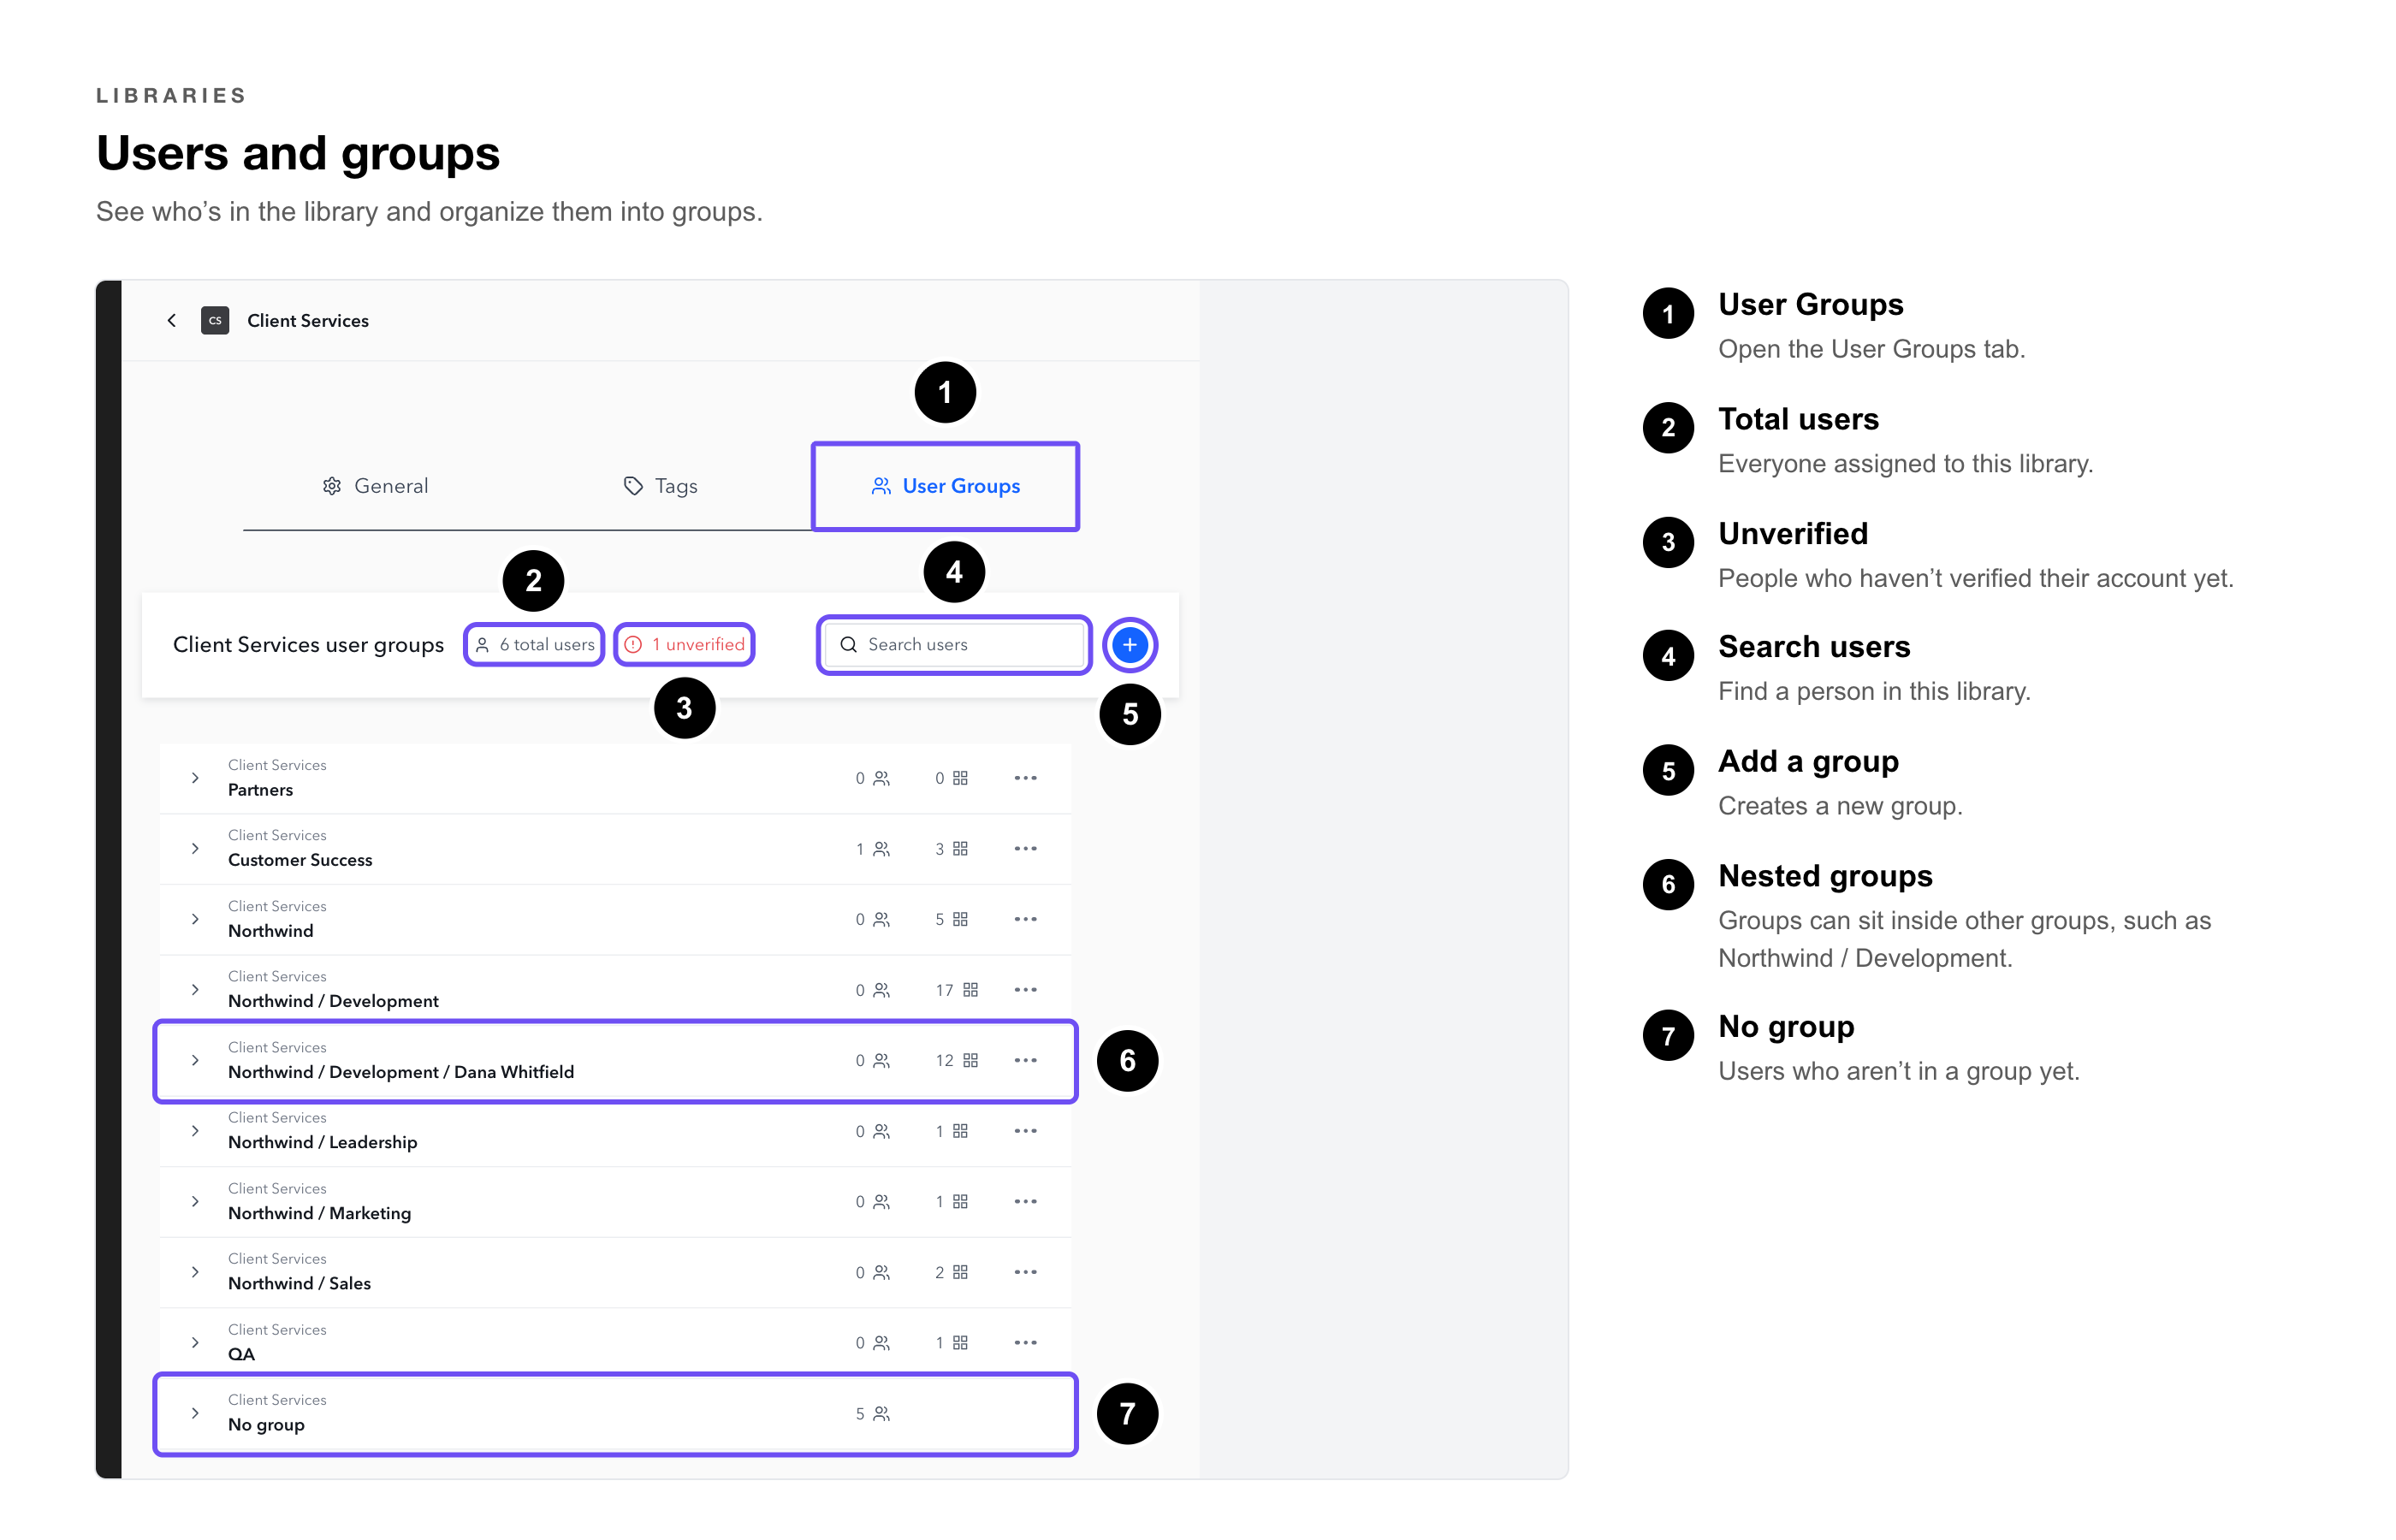
User groups |
Each library has its own groups, which can be nested, such as Sales / East. |
|
Tags |
Each library has its own tags, plus tags inherited from the account. |
|
Shared across libraries |
Custom fonts, account tags, and brands assigned to more than one library. |
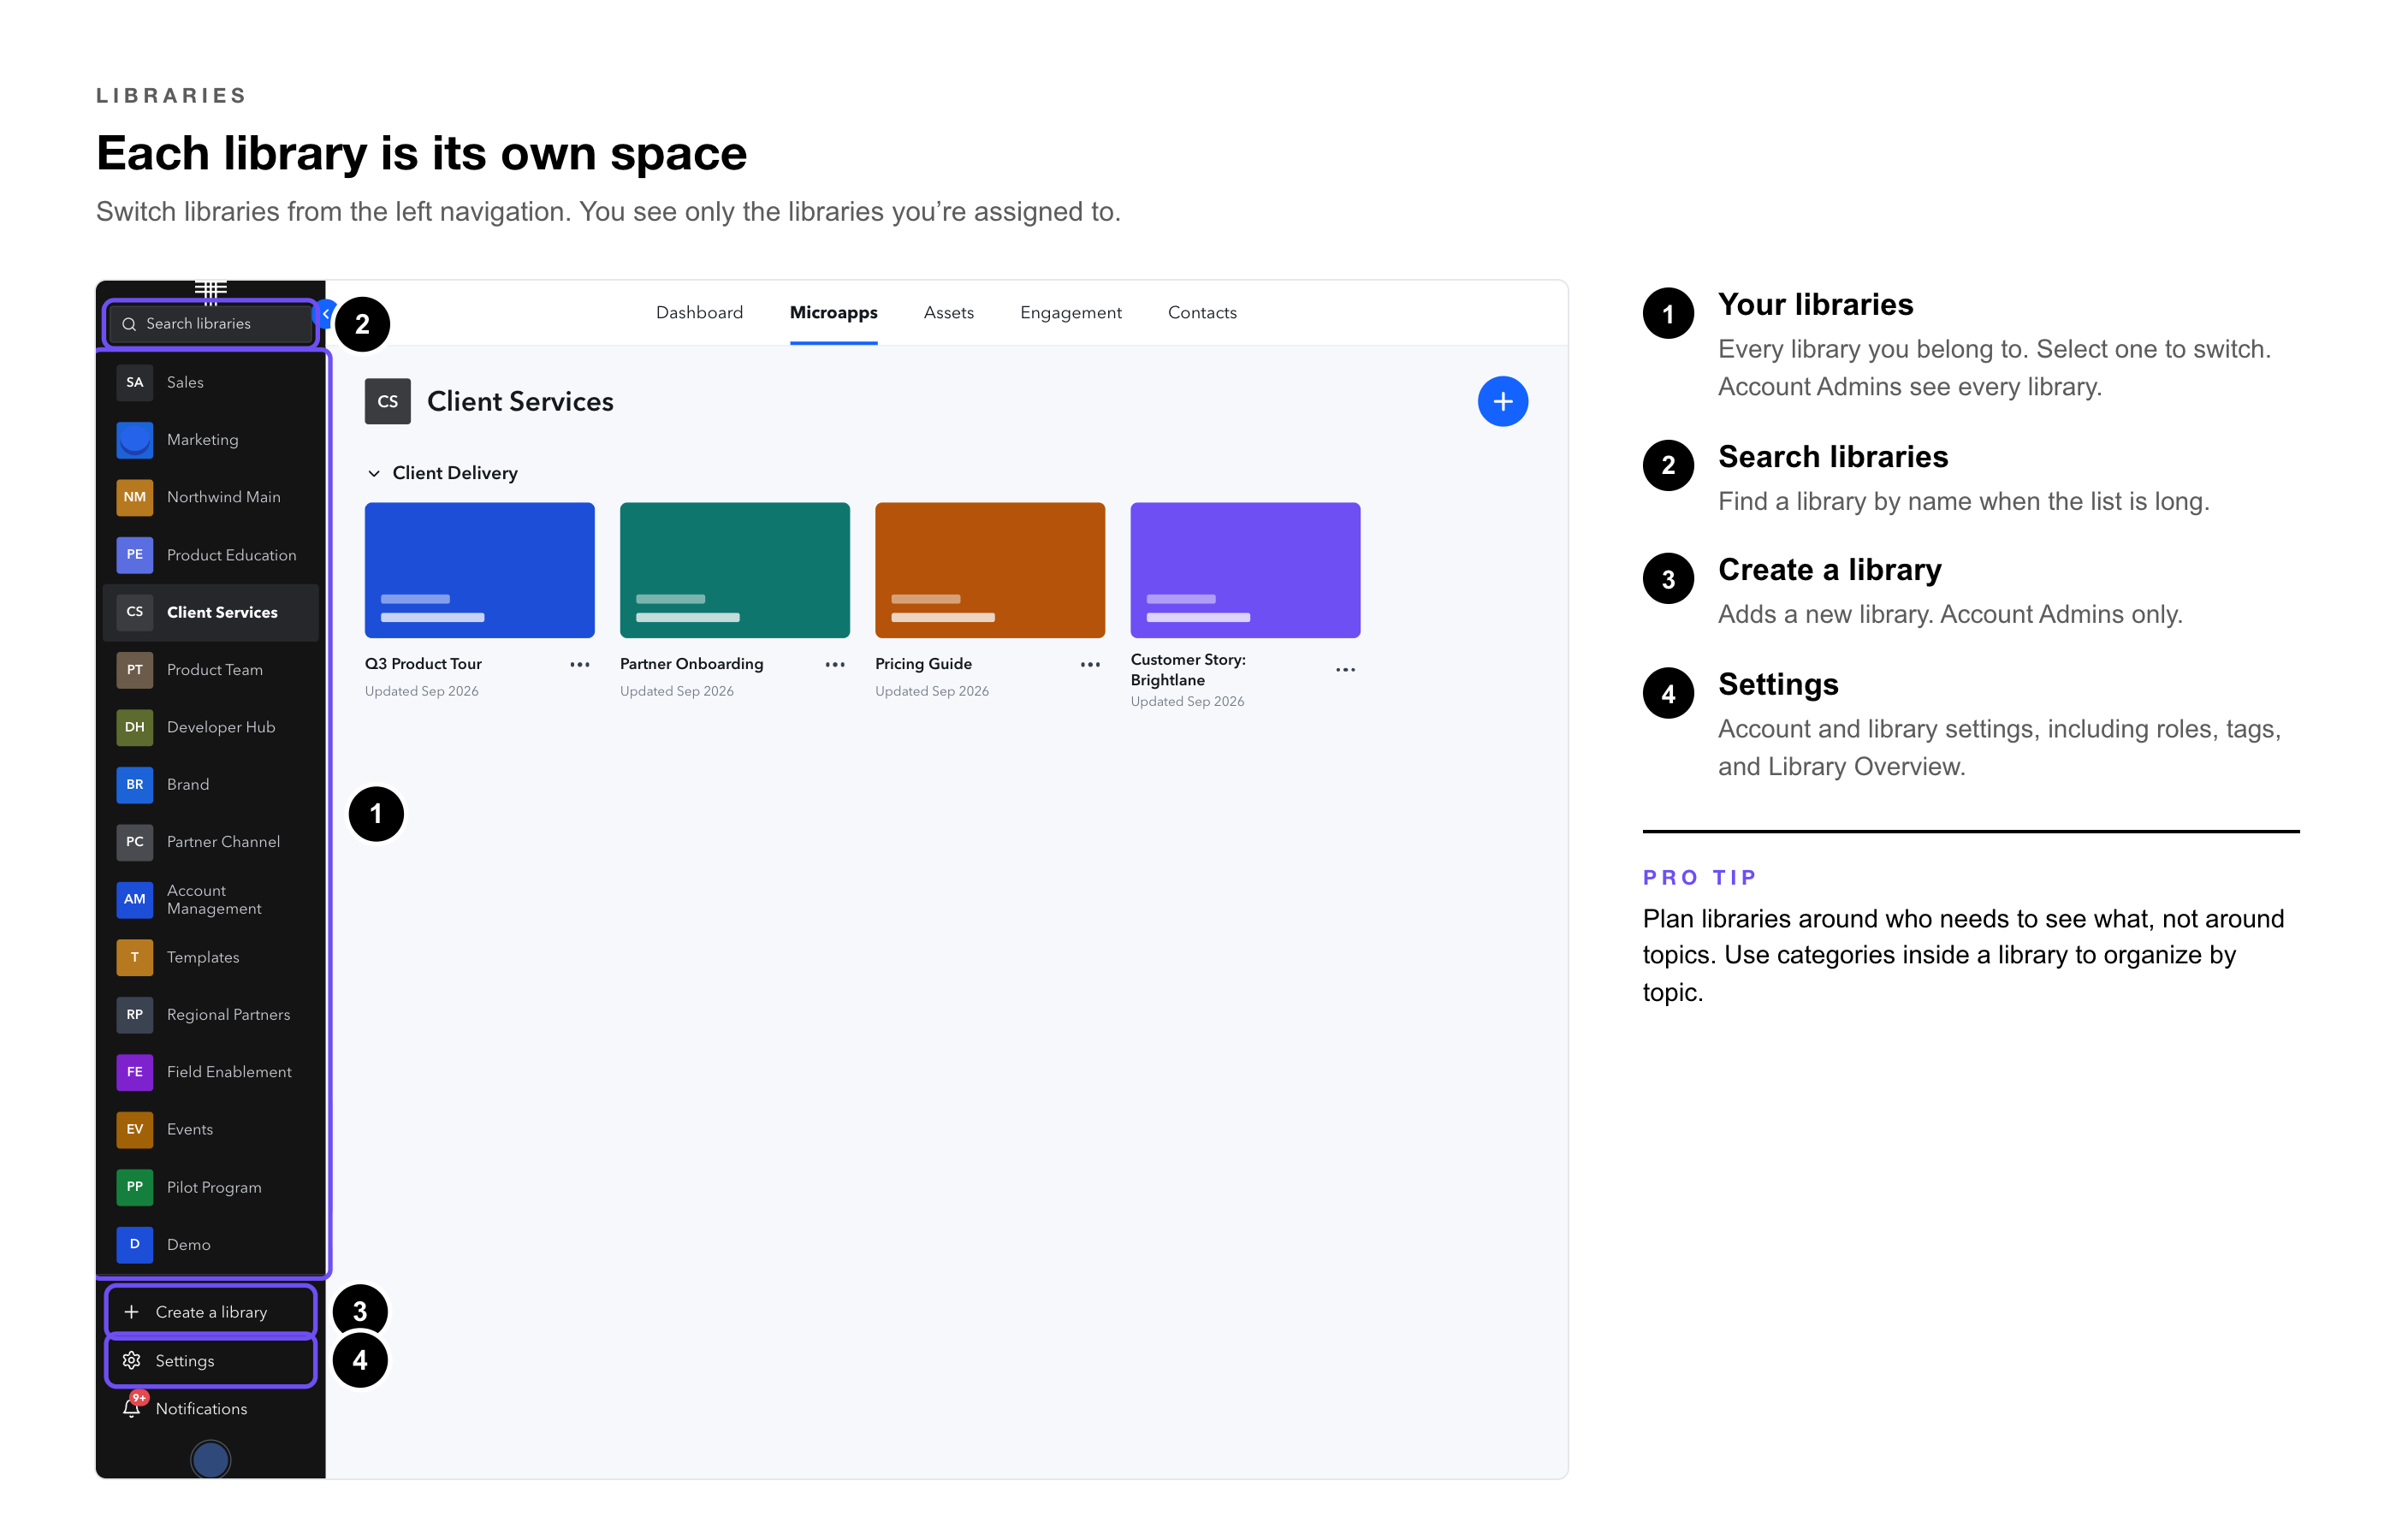 When to use more than one library
• Separate teams — sales, HR, and marketing each keep their microapps to themselves.
• Different rules — an internal-only library for confidential content alongside one that can be shared externally.
• Shared builders — a designer or enablement team belongs to several libraries and builds for each of them.
|
Pro Tip: Plan libraries around who needs to see what, not around topics. Use categories inside a library to organize by topic, and add a library only when a group of people needs its own space or its own settings. |
Multi-Library is a great feature for companies that have different teams or departments that use Tiled, but may not need to access other departments' microapps. In other cases, a designer may need access to multiple departments' libraries in order to create microapps for the teams they work with. In other words, Tiled users can be apart of multiple Tiled libraries with different permission sets in each library. Multi-library is a great solution for both scenarios.
Adding a Library
Only Account Admins can add libraries.
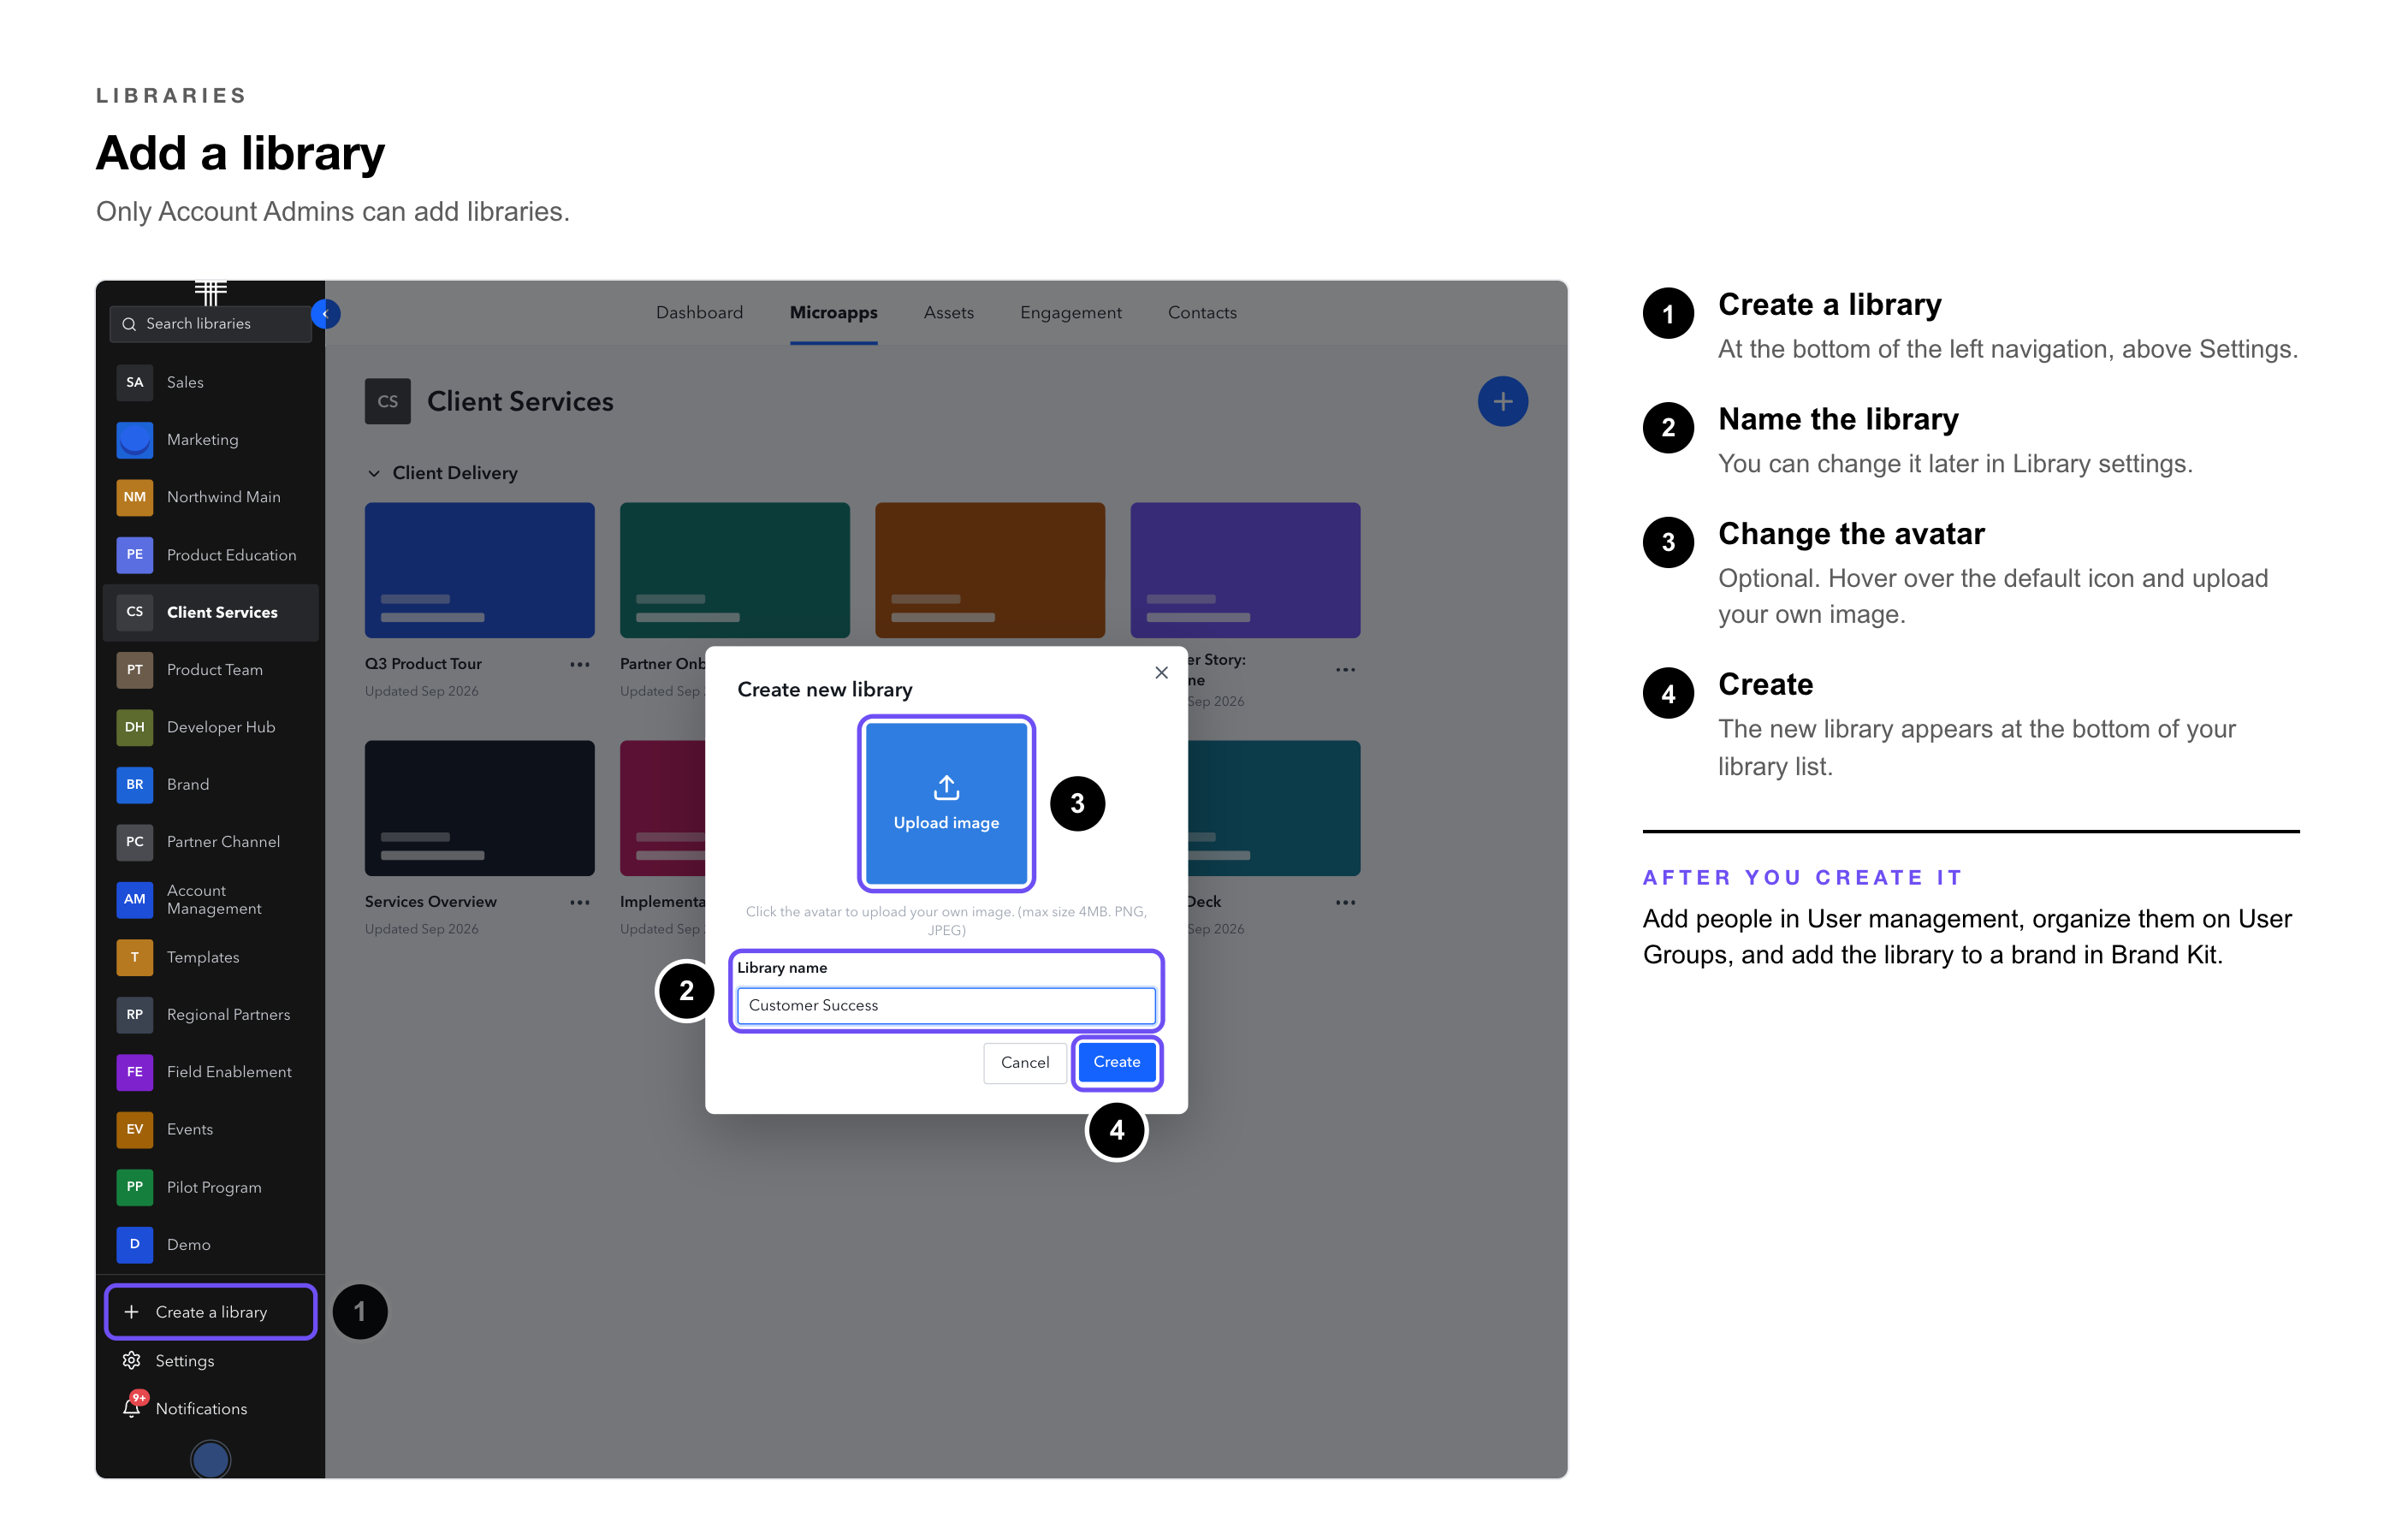
1. Select Create a library — at the bottom of the left navigation, above Settings.
2. Name the library. — You can change it later in Library settings.
3. Change the avatar, — if you like, by hovering over the default icon and uploading your own image.
4. Select Create. — The new library appears at the bottom of your library list.
After you create it
• Give people access — add users in User management, then organize them on the library’s User Groups tab.
• Configure its settings — set its reply-to address, security, broadcasting, landing experience, and welcome email on the General tab.
• Add tags — create library-specific tags on the Tags tab. Account tags are already there.
• Assign a brand — in Brand Kit, add the library to the brands its editors should use. Builder 2.0.
• Set it as the SSO default — if auto provisioning is on, you can make it the Default Library for new users in Account Settings → General.
|
Heads Up: Turning on Security makes new microapps in the library internal only. Set it before your team starts building if the library is meant for confidential content, since microapps that already exist keep their current sharing settings. |
Library Settings
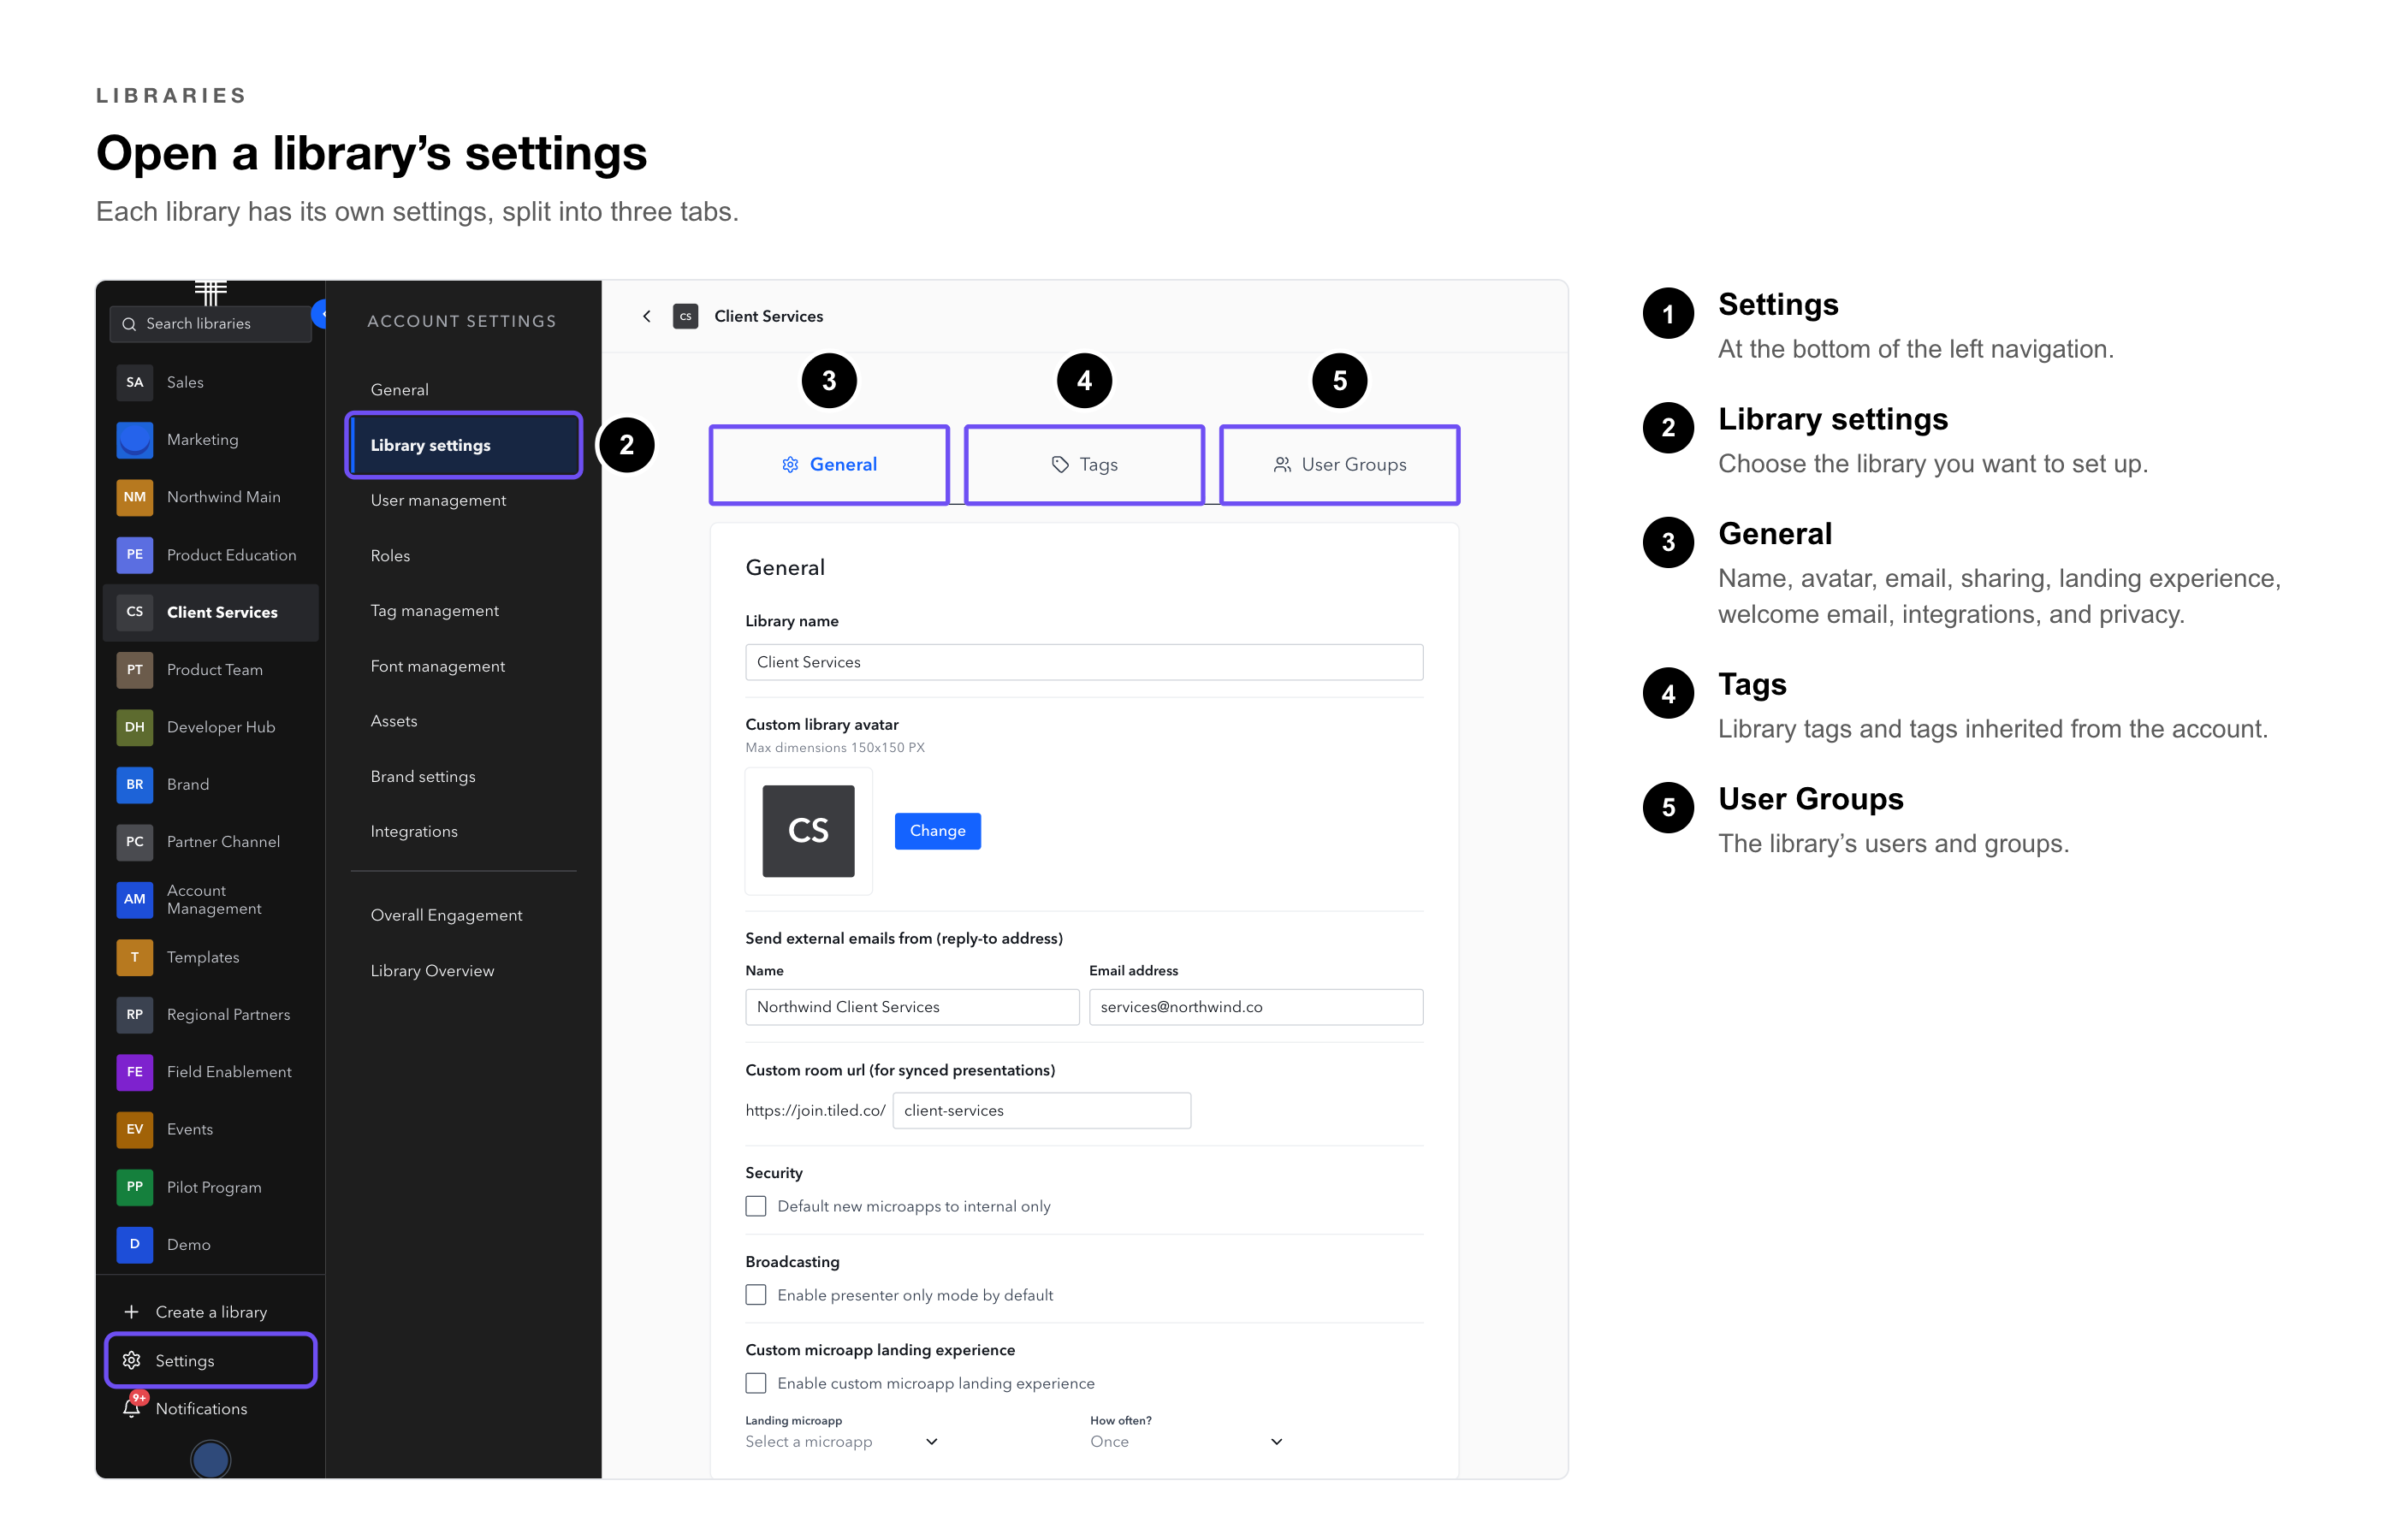
Each library has its own settings. Go to Settings at the bottom of the left navigation, select Library settings, and choose the library. Settings are split into three tabs:
|
Tab |
What You Can Do |
|
General |
Name, avatar (up to 150 × 150 px), reply-to address, custom room URL for broadcasts, security, broadcasting, custom landing experience, welcome email, integrations, privacy (GDPR consent banner), and Archive Library. |
|
Tags |
Add tags for this library and see the tags it inherits from the account, with how many microapps use each. |
|
User Groups |
See the library’s users and groups, find unverified users, search users, and add or manage groups. Users who aren’t in a group are listed under No group. |
|
Pro Tip: Set the welcome email subject and message before you invite people to a new library. It’s the first thing they see from Tiled. |
Seeing all your libraries at once
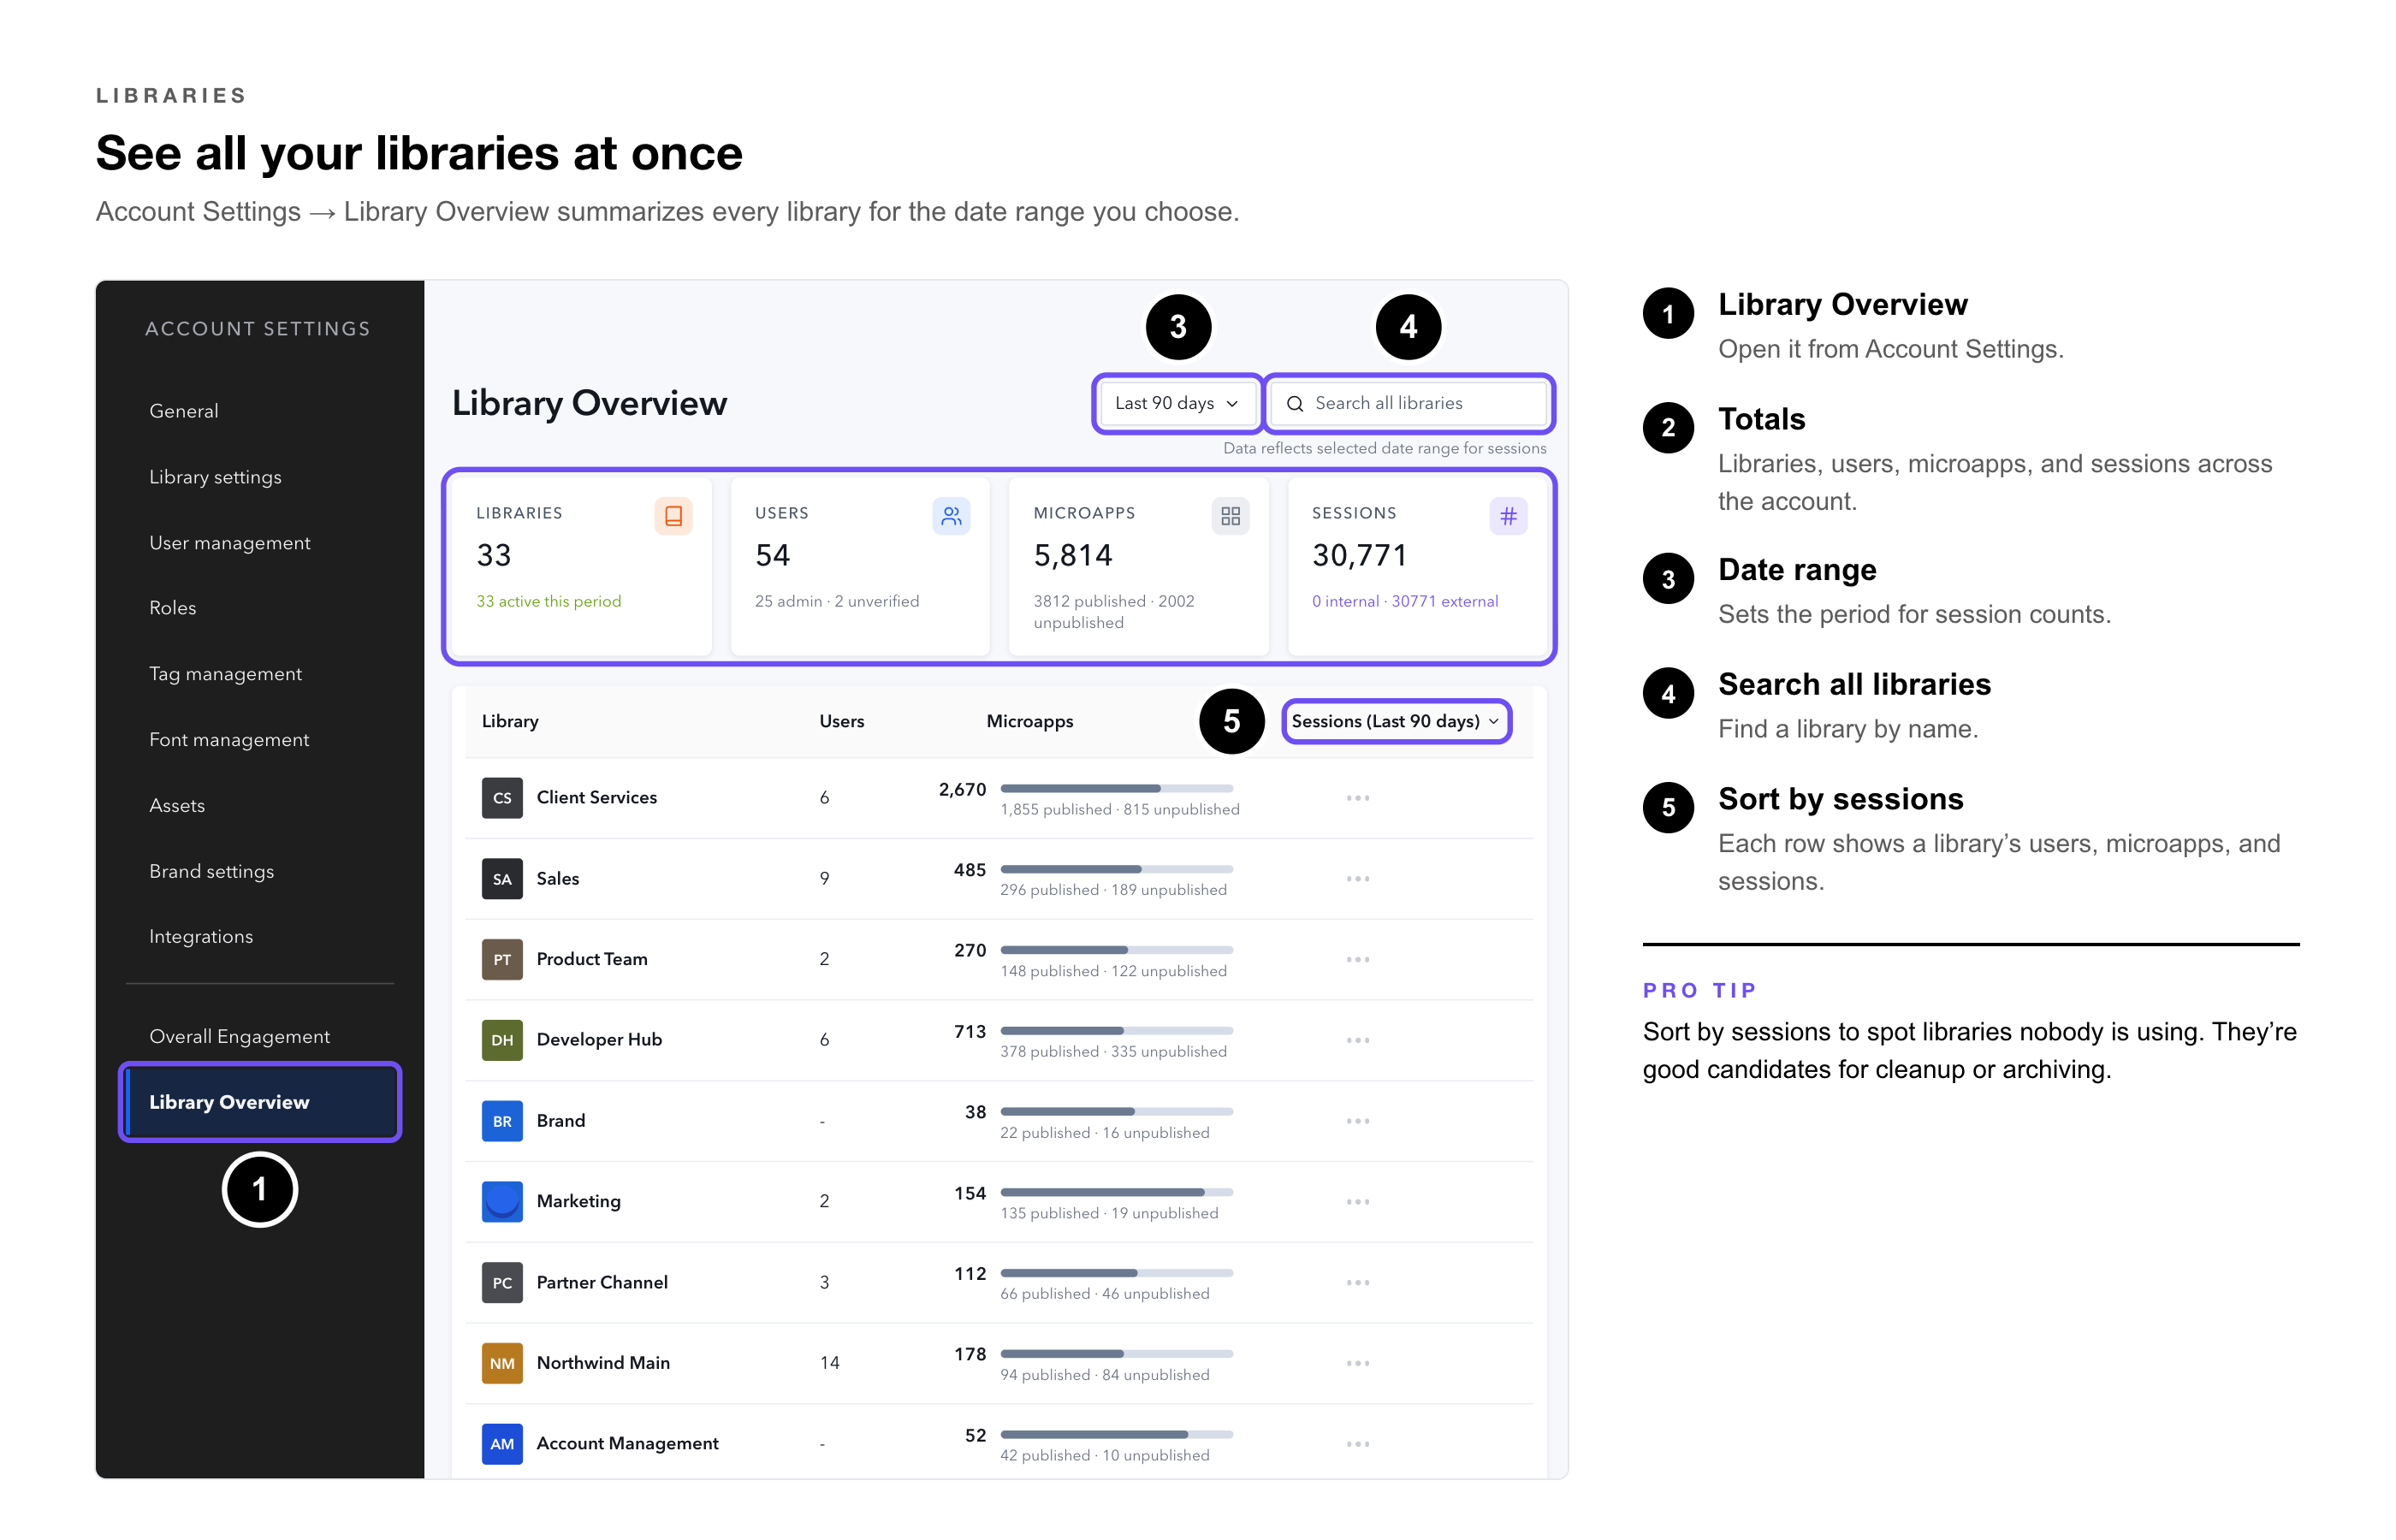
Account Settings → Library Overview summarizes every library: the number of libraries, users (including admins and unverified users), microapps (published and unpublished), and sessions (internal and external) for the date range you choose. Each library’s row shows its users, microapps, and sessions, and you can search across all libraries.
|
Pro Tip: Sort Library Overview by sessions to spot libraries nobody is using. They’re good candidates for cleanup or archiving. |
Moving a Microapp to Another Library
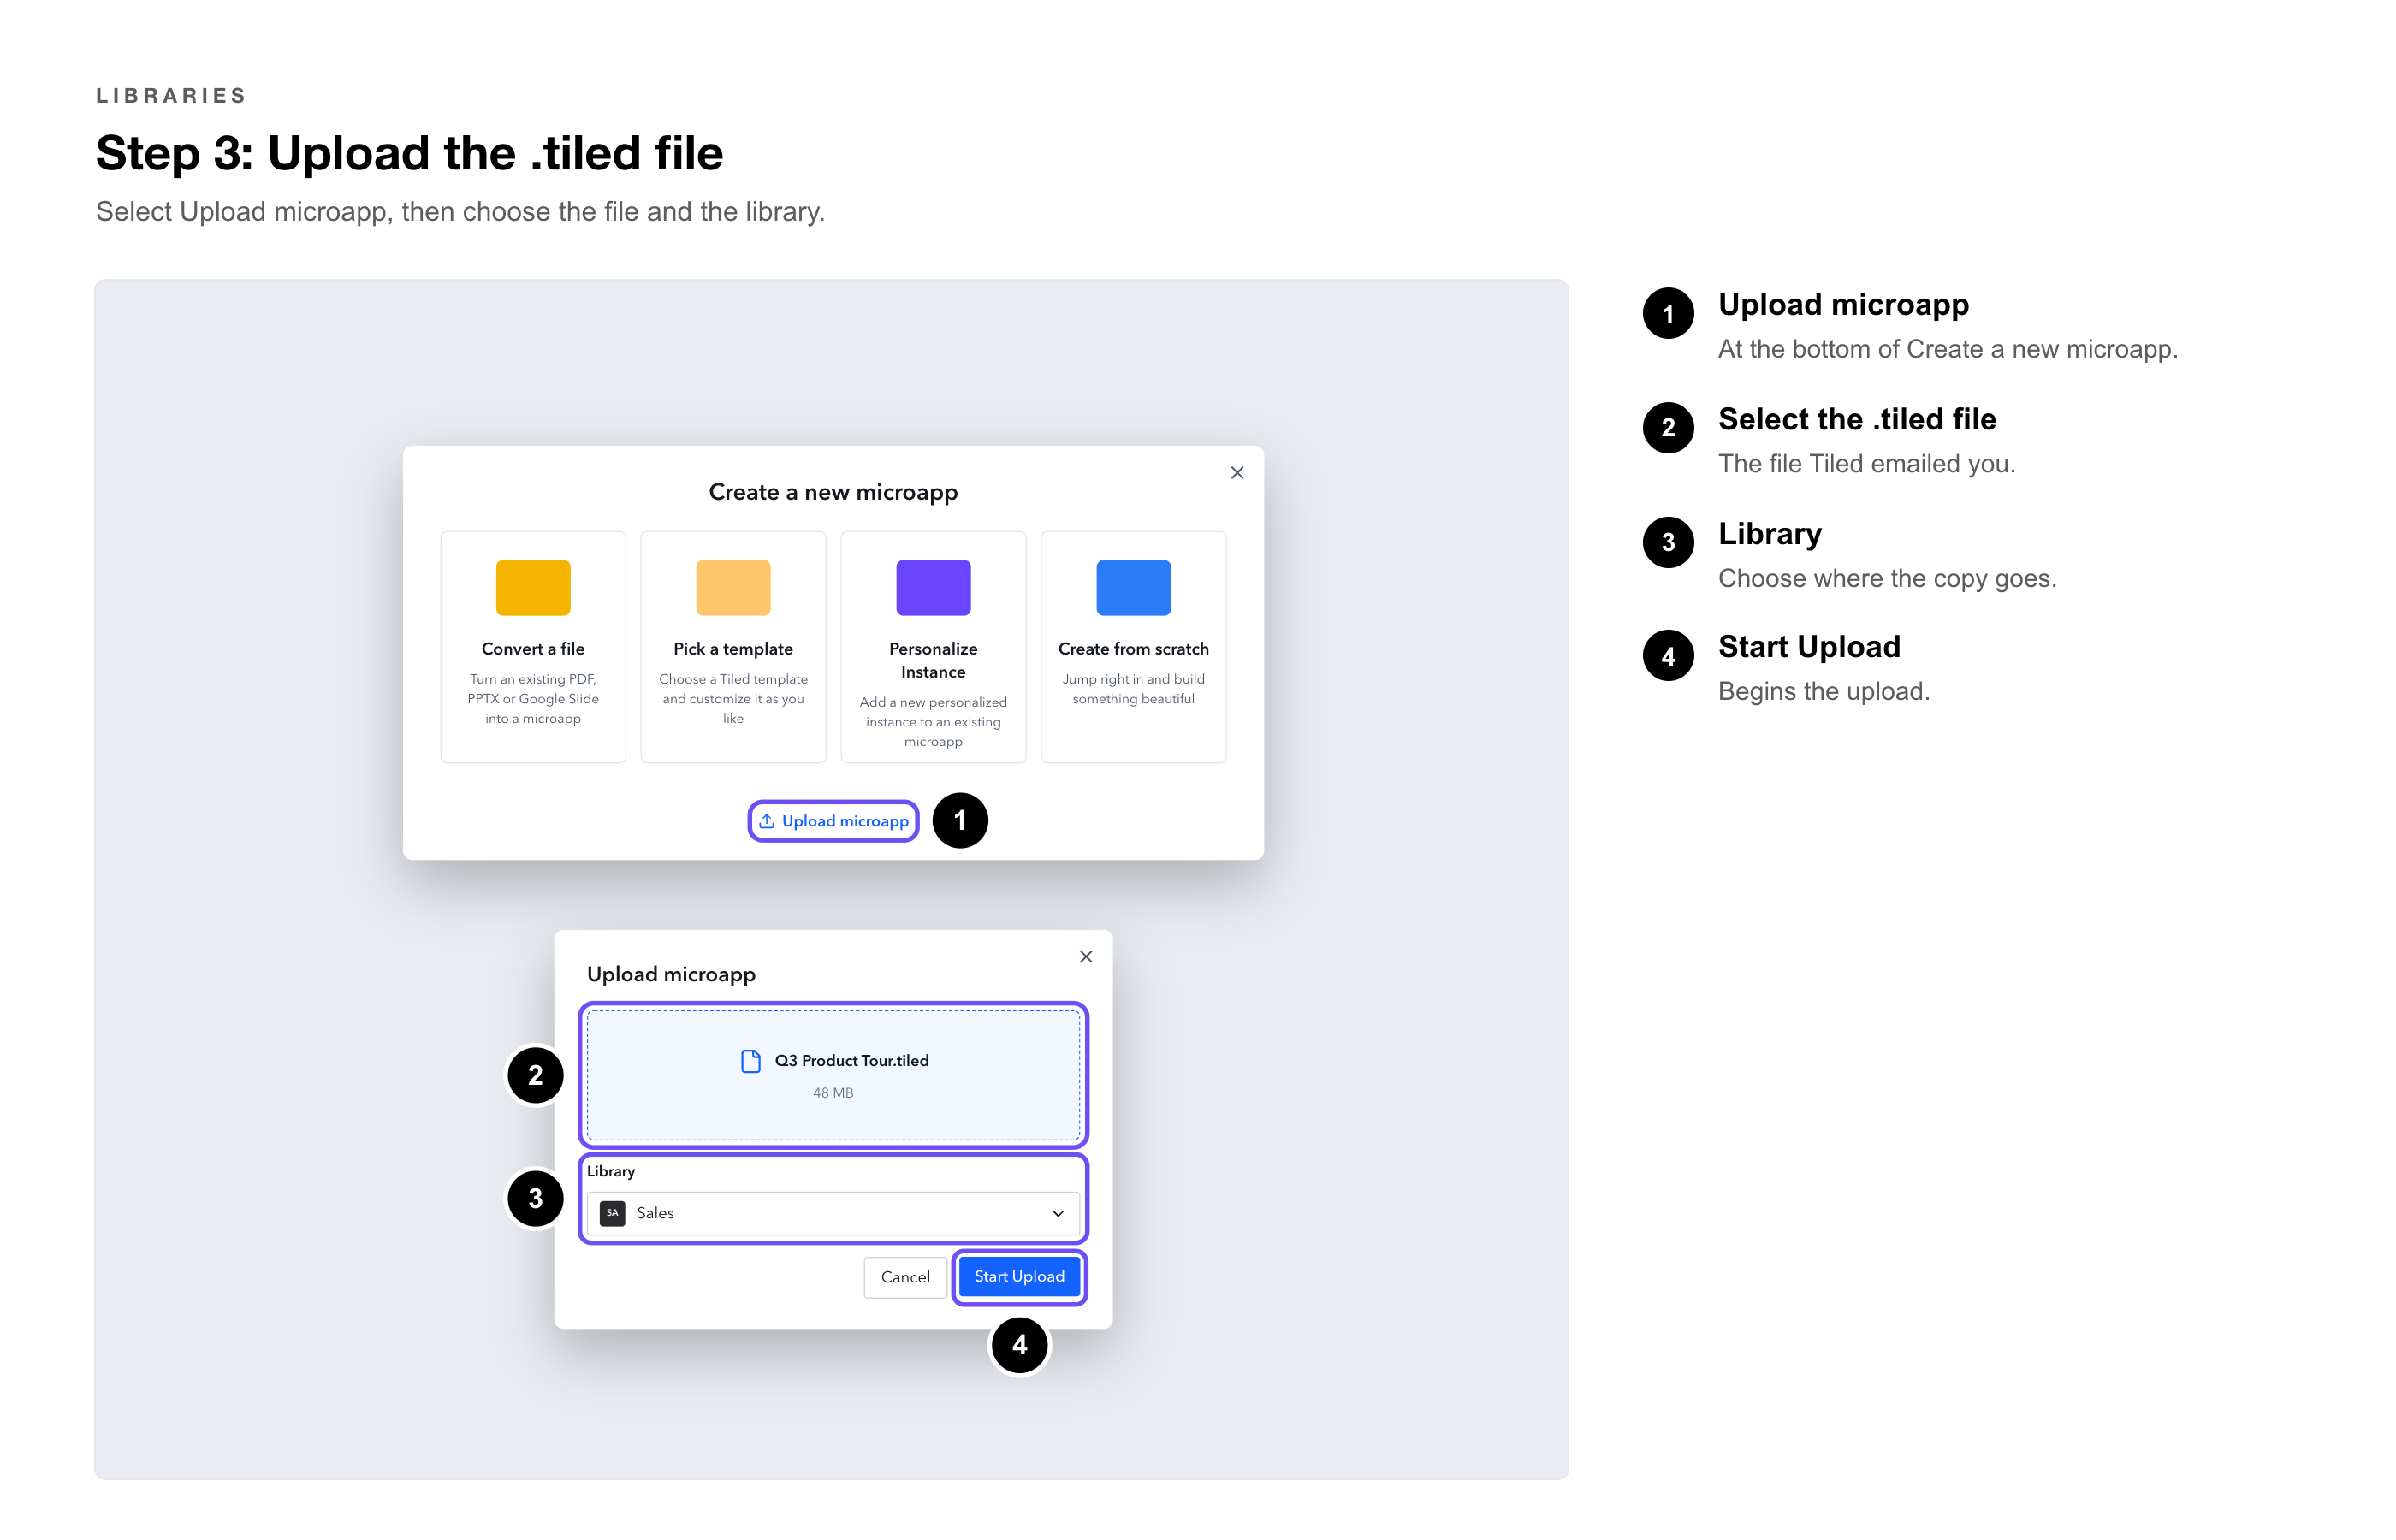
To put a copy of a microapp in another library, download it and upload it there. Admins and Editors can do this.
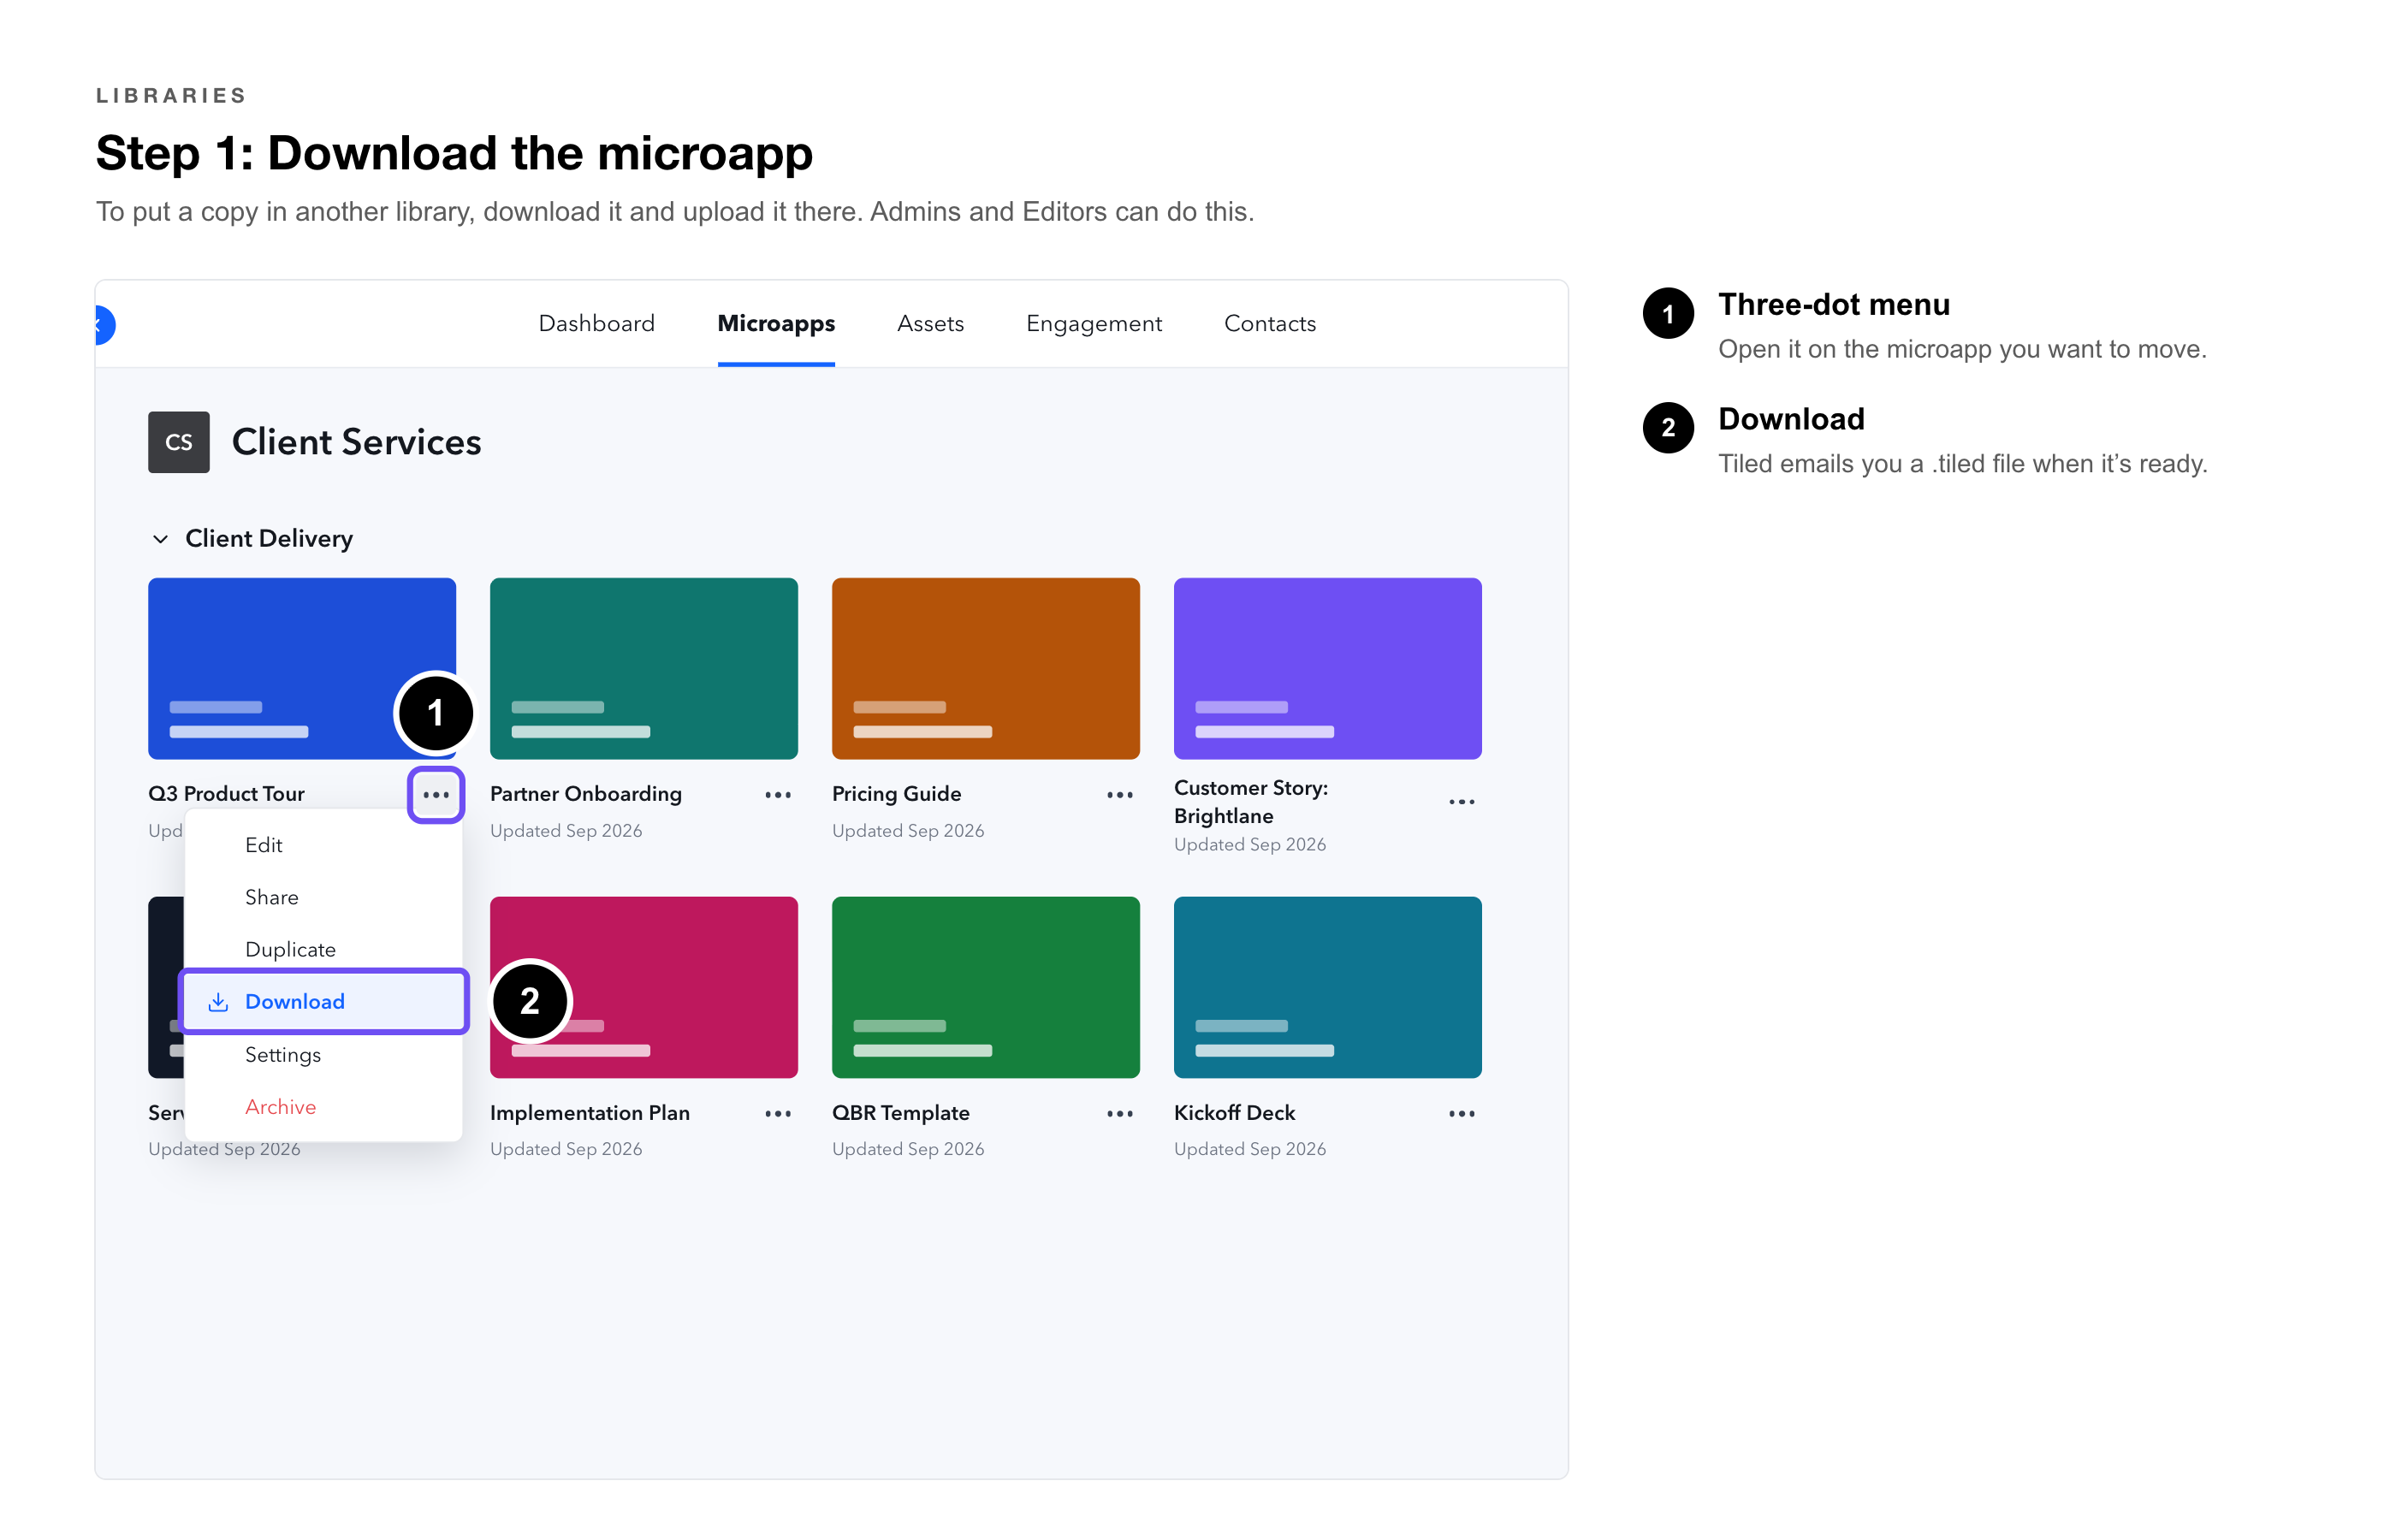
1. Download the microapp. — In the library, open the microapp’s three-dot menu and select Download. Tiled emails you a .tiled file when it’s ready.
 2. Switch to the other library — and select + New Microapp, then Upload Microapp.
3. Select the .tiled file, — choose the library, and select Start Upload.
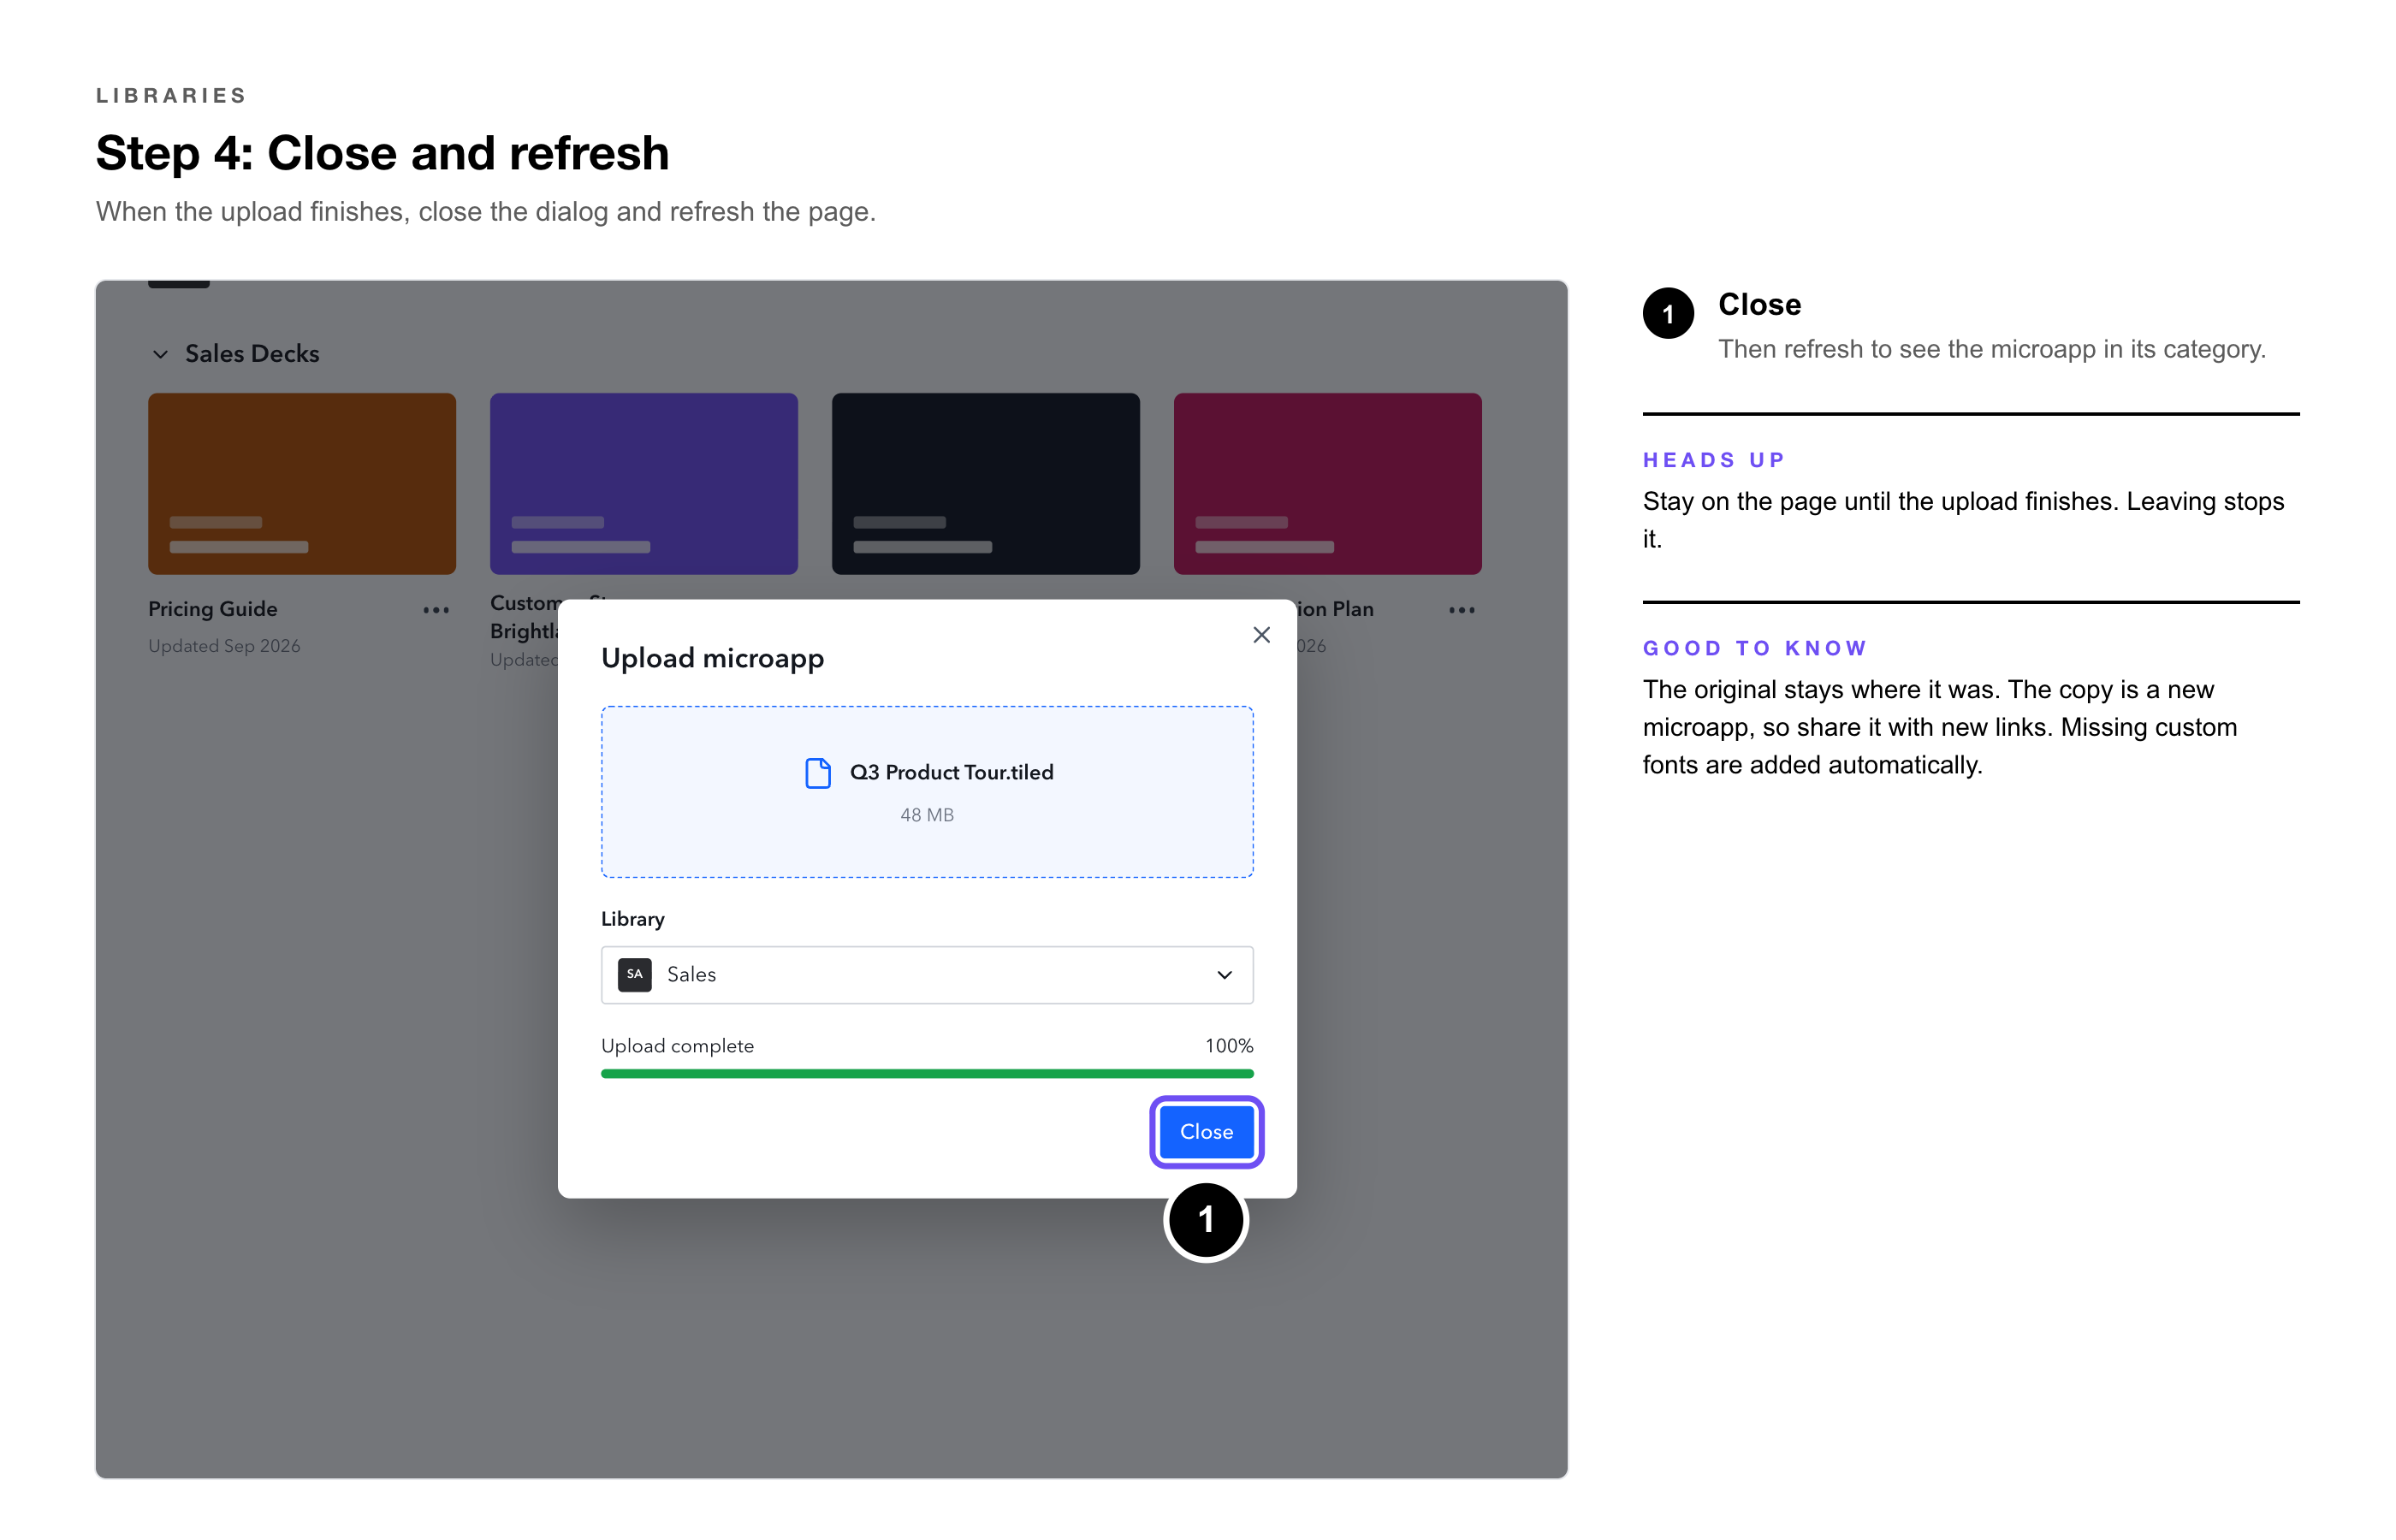
 4. Select Close when it finishes, — then refresh the page to see the microapp in its category.
|
Note: Stay on the page until the upload finishes; leaving stops it. The original microapp stays where it was. The uploaded copy is a new microapp, so share it with new links. Any custom fonts it uses are added automatically if they’re missing. |
Archiving or Deleting a Library
You can archive a library you no longer use. Libraries can’t be deleted from Tiled.
Archiving a library
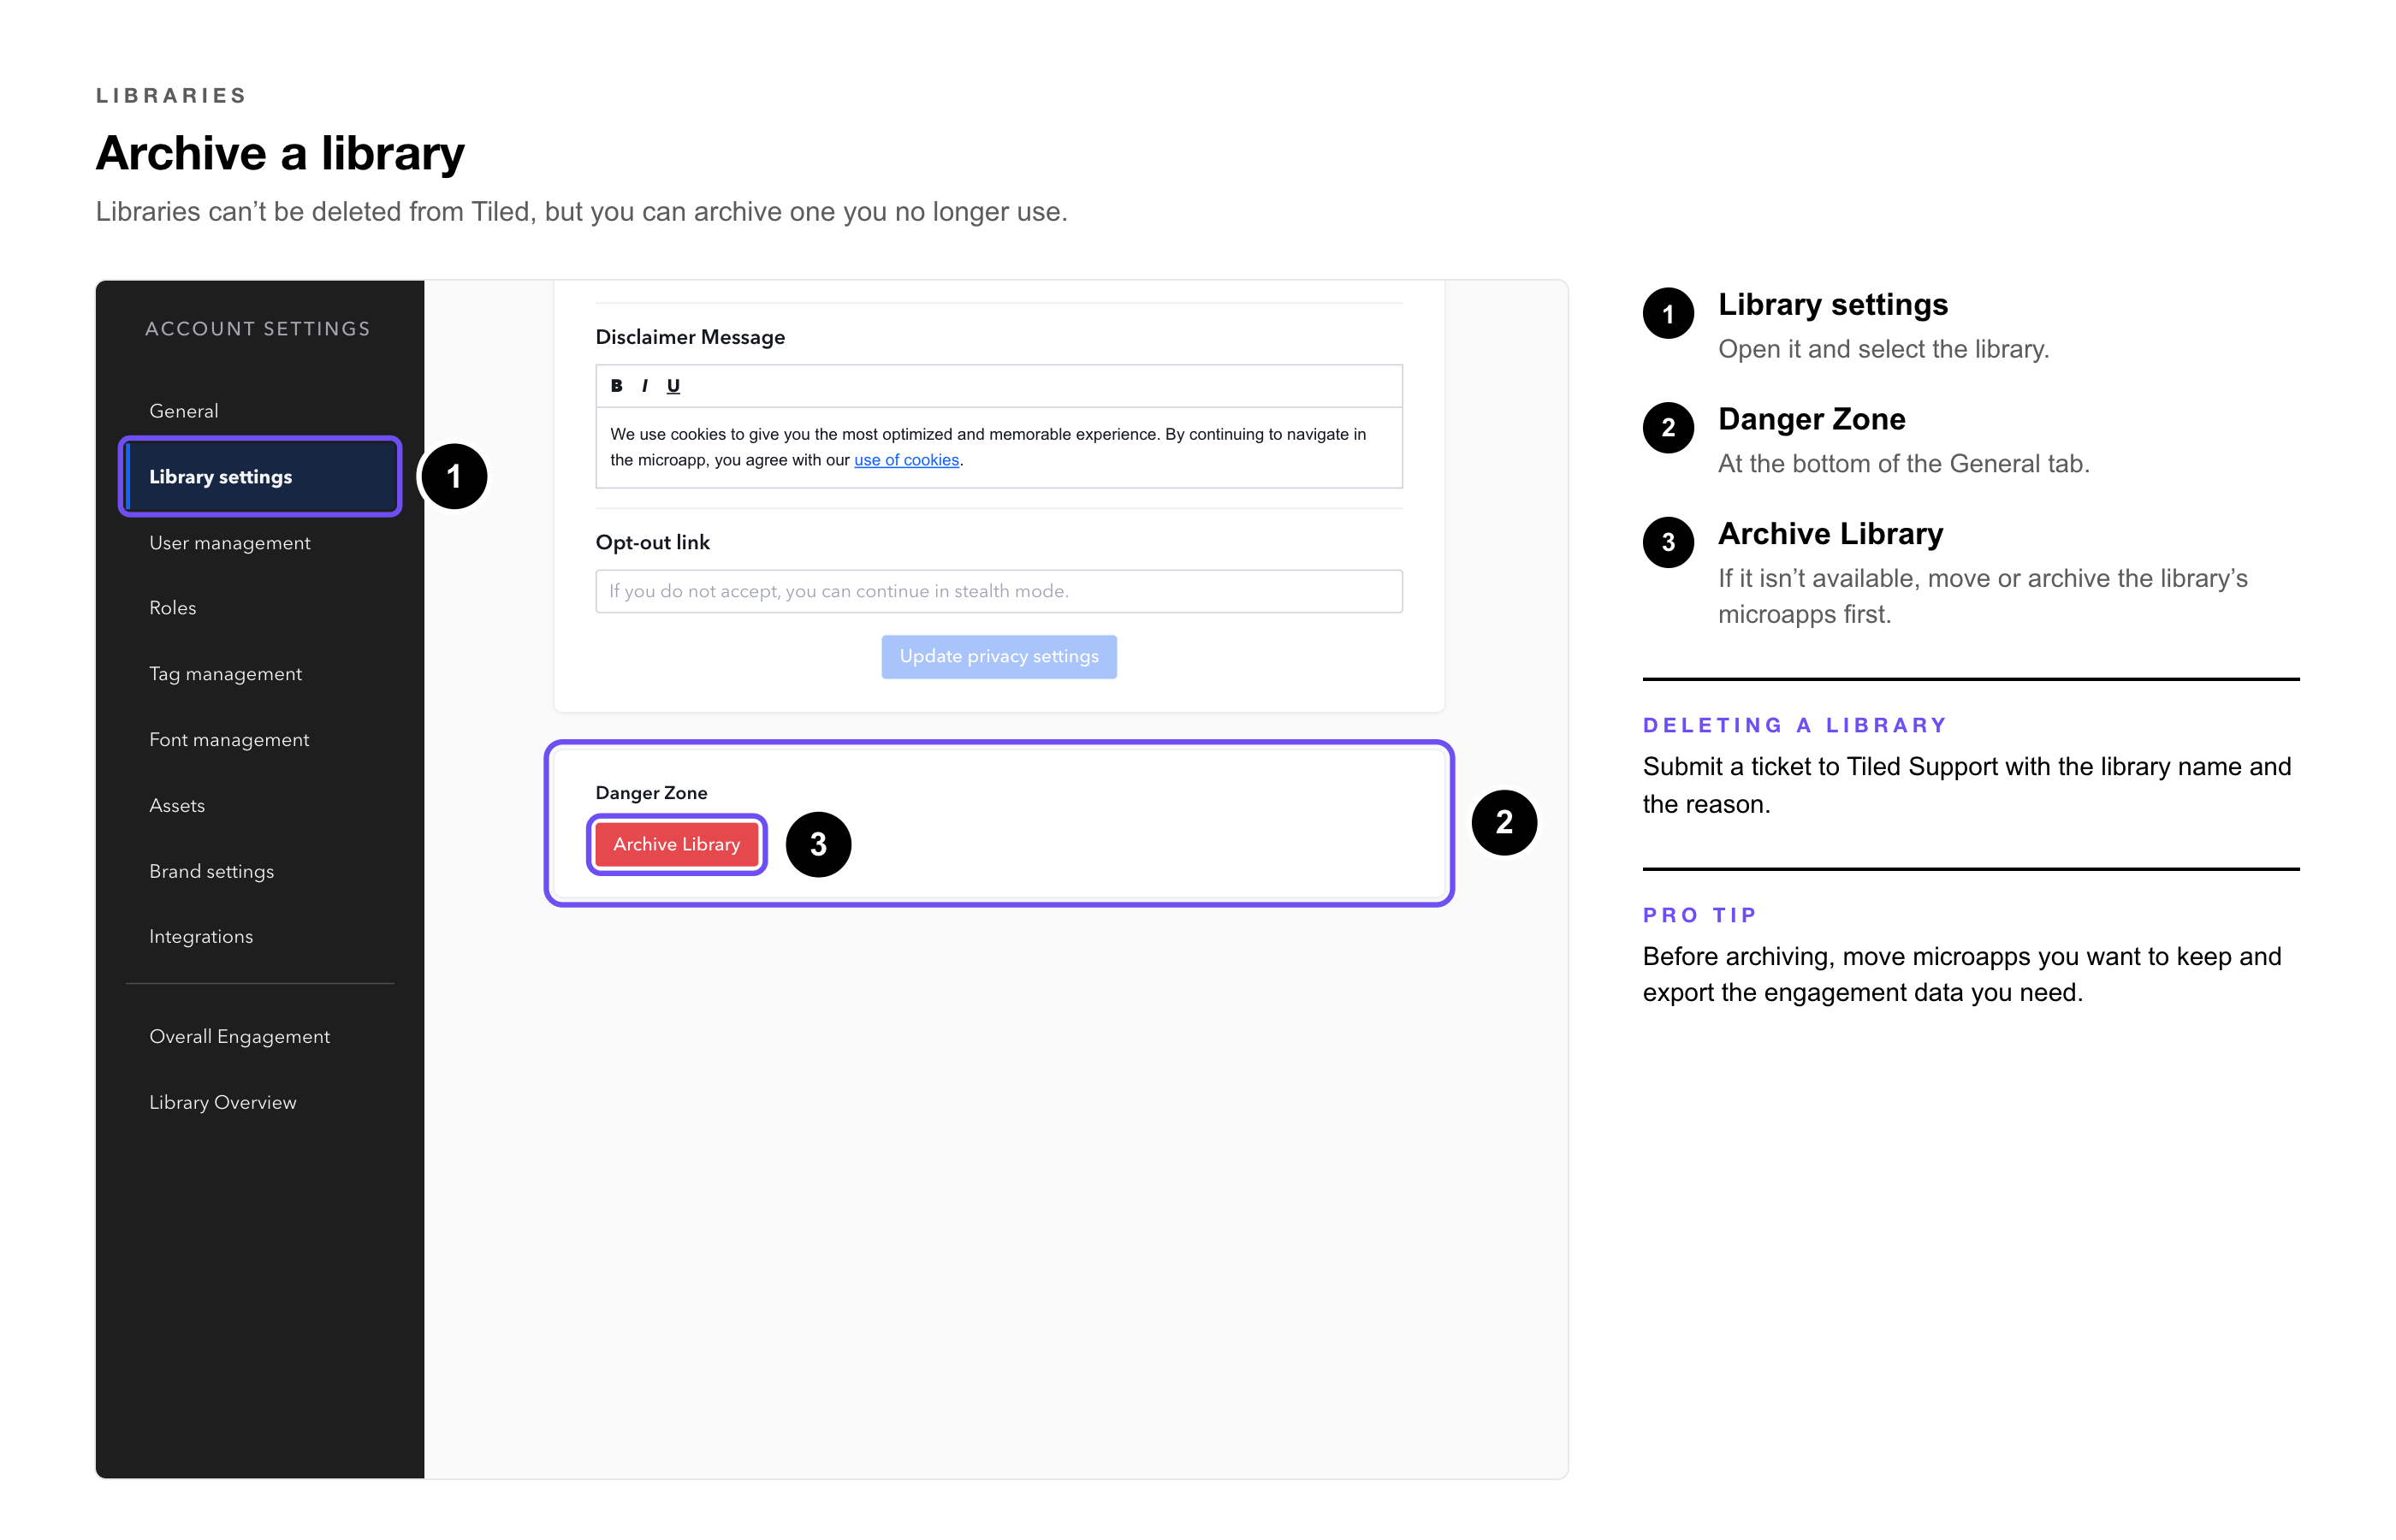
1. Open Settings → Library settings — and select the library.
2. Scroll to Danger Zone — at the bottom of the General tab.
3. Select Archive Library. — If the button isn’t available, move or archive the microapps in the library first.
Deleting a library
If you need a library removed completely, submit a ticket to Tiled Support with the library name and the reason, and the team will help.
|
Pro Tip: Before archiving or asking for a library to be removed, move any microapps you want to keep to another library and export the engagement data you need. |
|
Try It Yourself: Create a test library, assign one teammate to it, and upload a copy of an existing microapp. Ask your teammate to sign in and confirm they see only the libraries you expect. |
Common Questions
|
Question |
Answer |
|
Who can create a library? |
Account Admins only. |
|
Can someone belong to more than one library? |
Yes. Assign them to each library in User Management. Account Admins can see every library automatically. |
|
Someone can’t see a microapp. Why? |
They probably have the right role but aren’t assigned to the library it’s in. Check their library access in User Management. |
|
Can I rename a library or change its avatar? |
Yes, on the library’s General tab in Library settings. Avatars can be up to 150 × 150 px. |
|
Can I delete a library? |
Not from Tiled. Archive it from the Danger Zone on its General tab, or submit a ticket to Tiled Support to have it removed. |
|
Where’s Create a library? |
At the bottom of the left navigation, above Settings and Notifications. Only Account Admins can create libraries. |
|
How can I compare libraries? |
Use Account Settings → Library Overview for users, microapps, and sessions by library, or the Library view in the Engagement dashboard. |
Related Articles
• Library Settings: General — Every setting on a library’s General tab.
• Account Settings: Roles — Roles, library access, and groups.
• Account Settings: User Management — Adding users and assigning libraries.
• Import and Export Microapps — Downloading and uploading .tiled files.
• Brand Kit — Assigning brands to libraries.
• Account Settings: General — Auto provisioning and the Default Library.