![logo-horizontal_w.png]](https://support.tiled.co/hs-fs/hubfs/logo-horizontal_w.png?height=30&name=logo-horizontal_w.png)
This article covers every export path — by library, by user, by microapp page, and by share link — plus how to set a custom date range for reproducible period-close reporting, and the full list of fields you get in each file.
Who Can Export
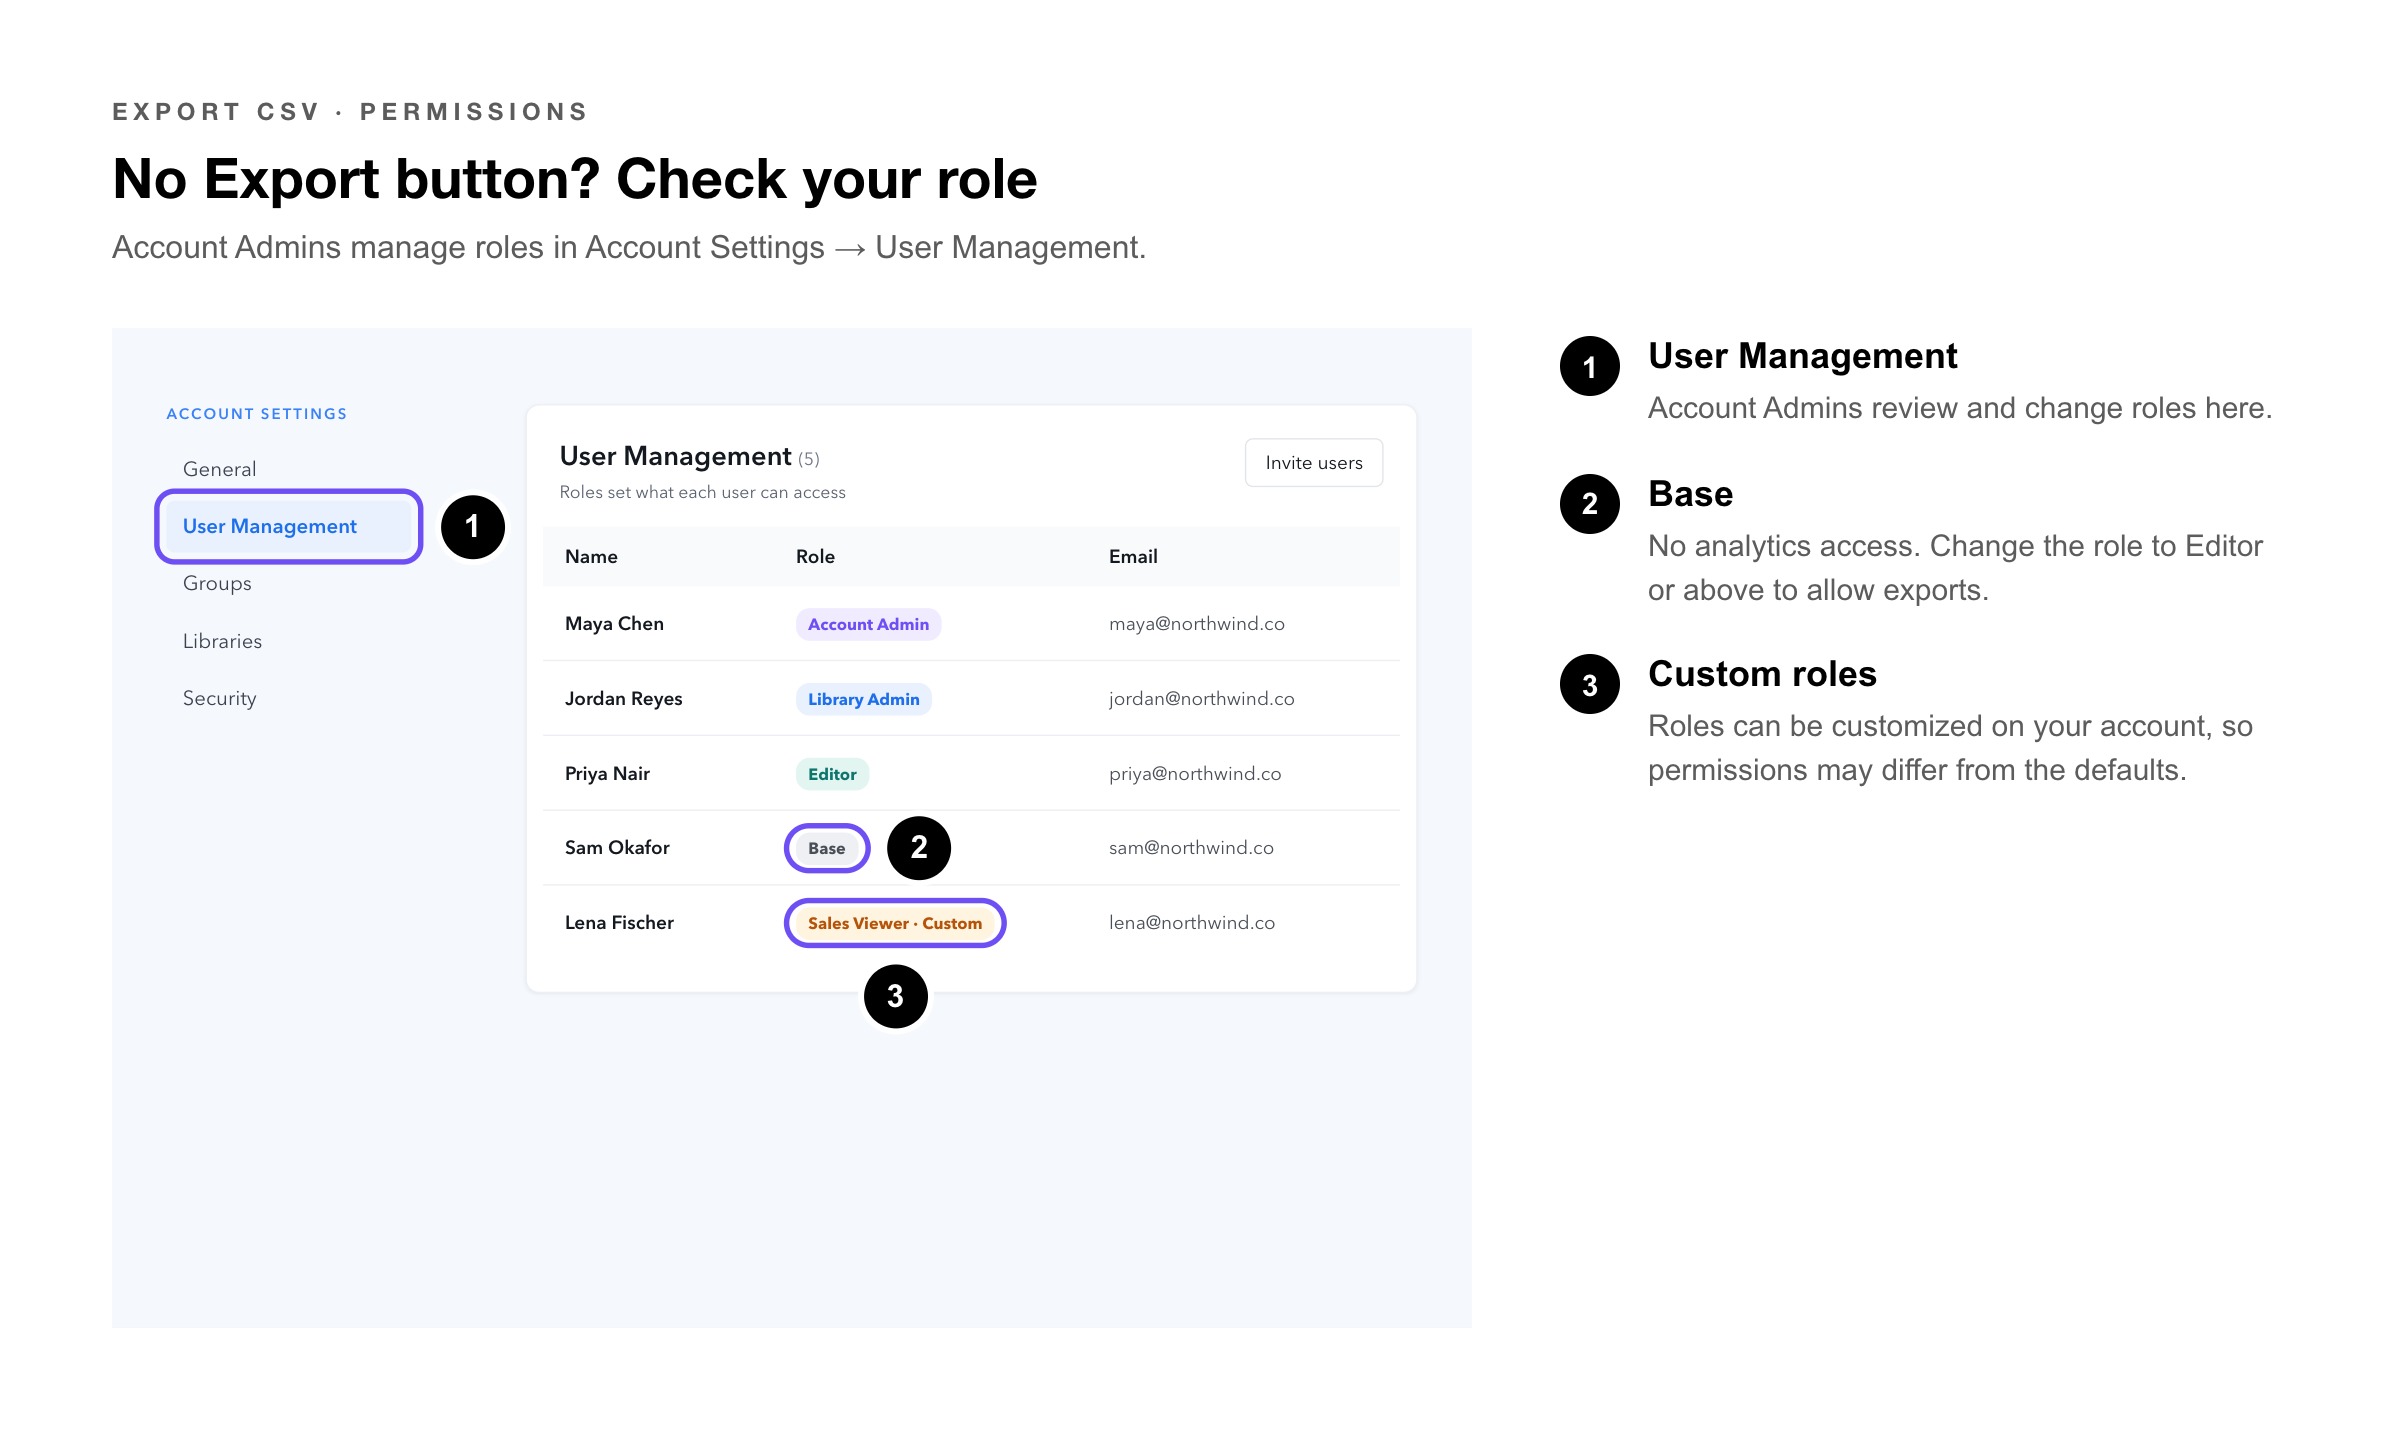
Exporting engagement data requires analytics access, which is granted at the role level. Every role above Base can export; Base users cannot.
|
Role |
Export access |
|
Account Admin |
Yes. Account Admins hold every permission available to lower roles, across all libraries on the account. |
|
Library Admin |
Yes. Library Admins inherit all Editor permissions, including analytics, for the libraries they are assigned to. |
|
Editor |
Yes. Editors can access microapp analytics and export from any view they can reach. |
|
Base |
No. Base users can view, share, and personalize microapps, but have no access to analytics — so no export path is available to them. |
Because Base users have no analytics access at all, the restriction is broader than the export button alone: the Engagement section is not available to them, so there is no view to export from in the first place.
|
Heads Up: If you don’t see the Export CSV button, your role is most likely Base. Ask your Account Admin to review your role in Account Settings → User Management. Note that roles and their permissions can be customized on your account, so the defaults described here may not match how your organization has configured them. |
CSV files are mostly used for importing and exporting information, such as customer data, between databases. You can learn about microapp analytics by viewing the Engagement Analytics article.
Export by Library (Overall Activity)
The most common export path gives you all engagement sessions across your account for a selected date range, with optional filters for microapp, group, and timezone.
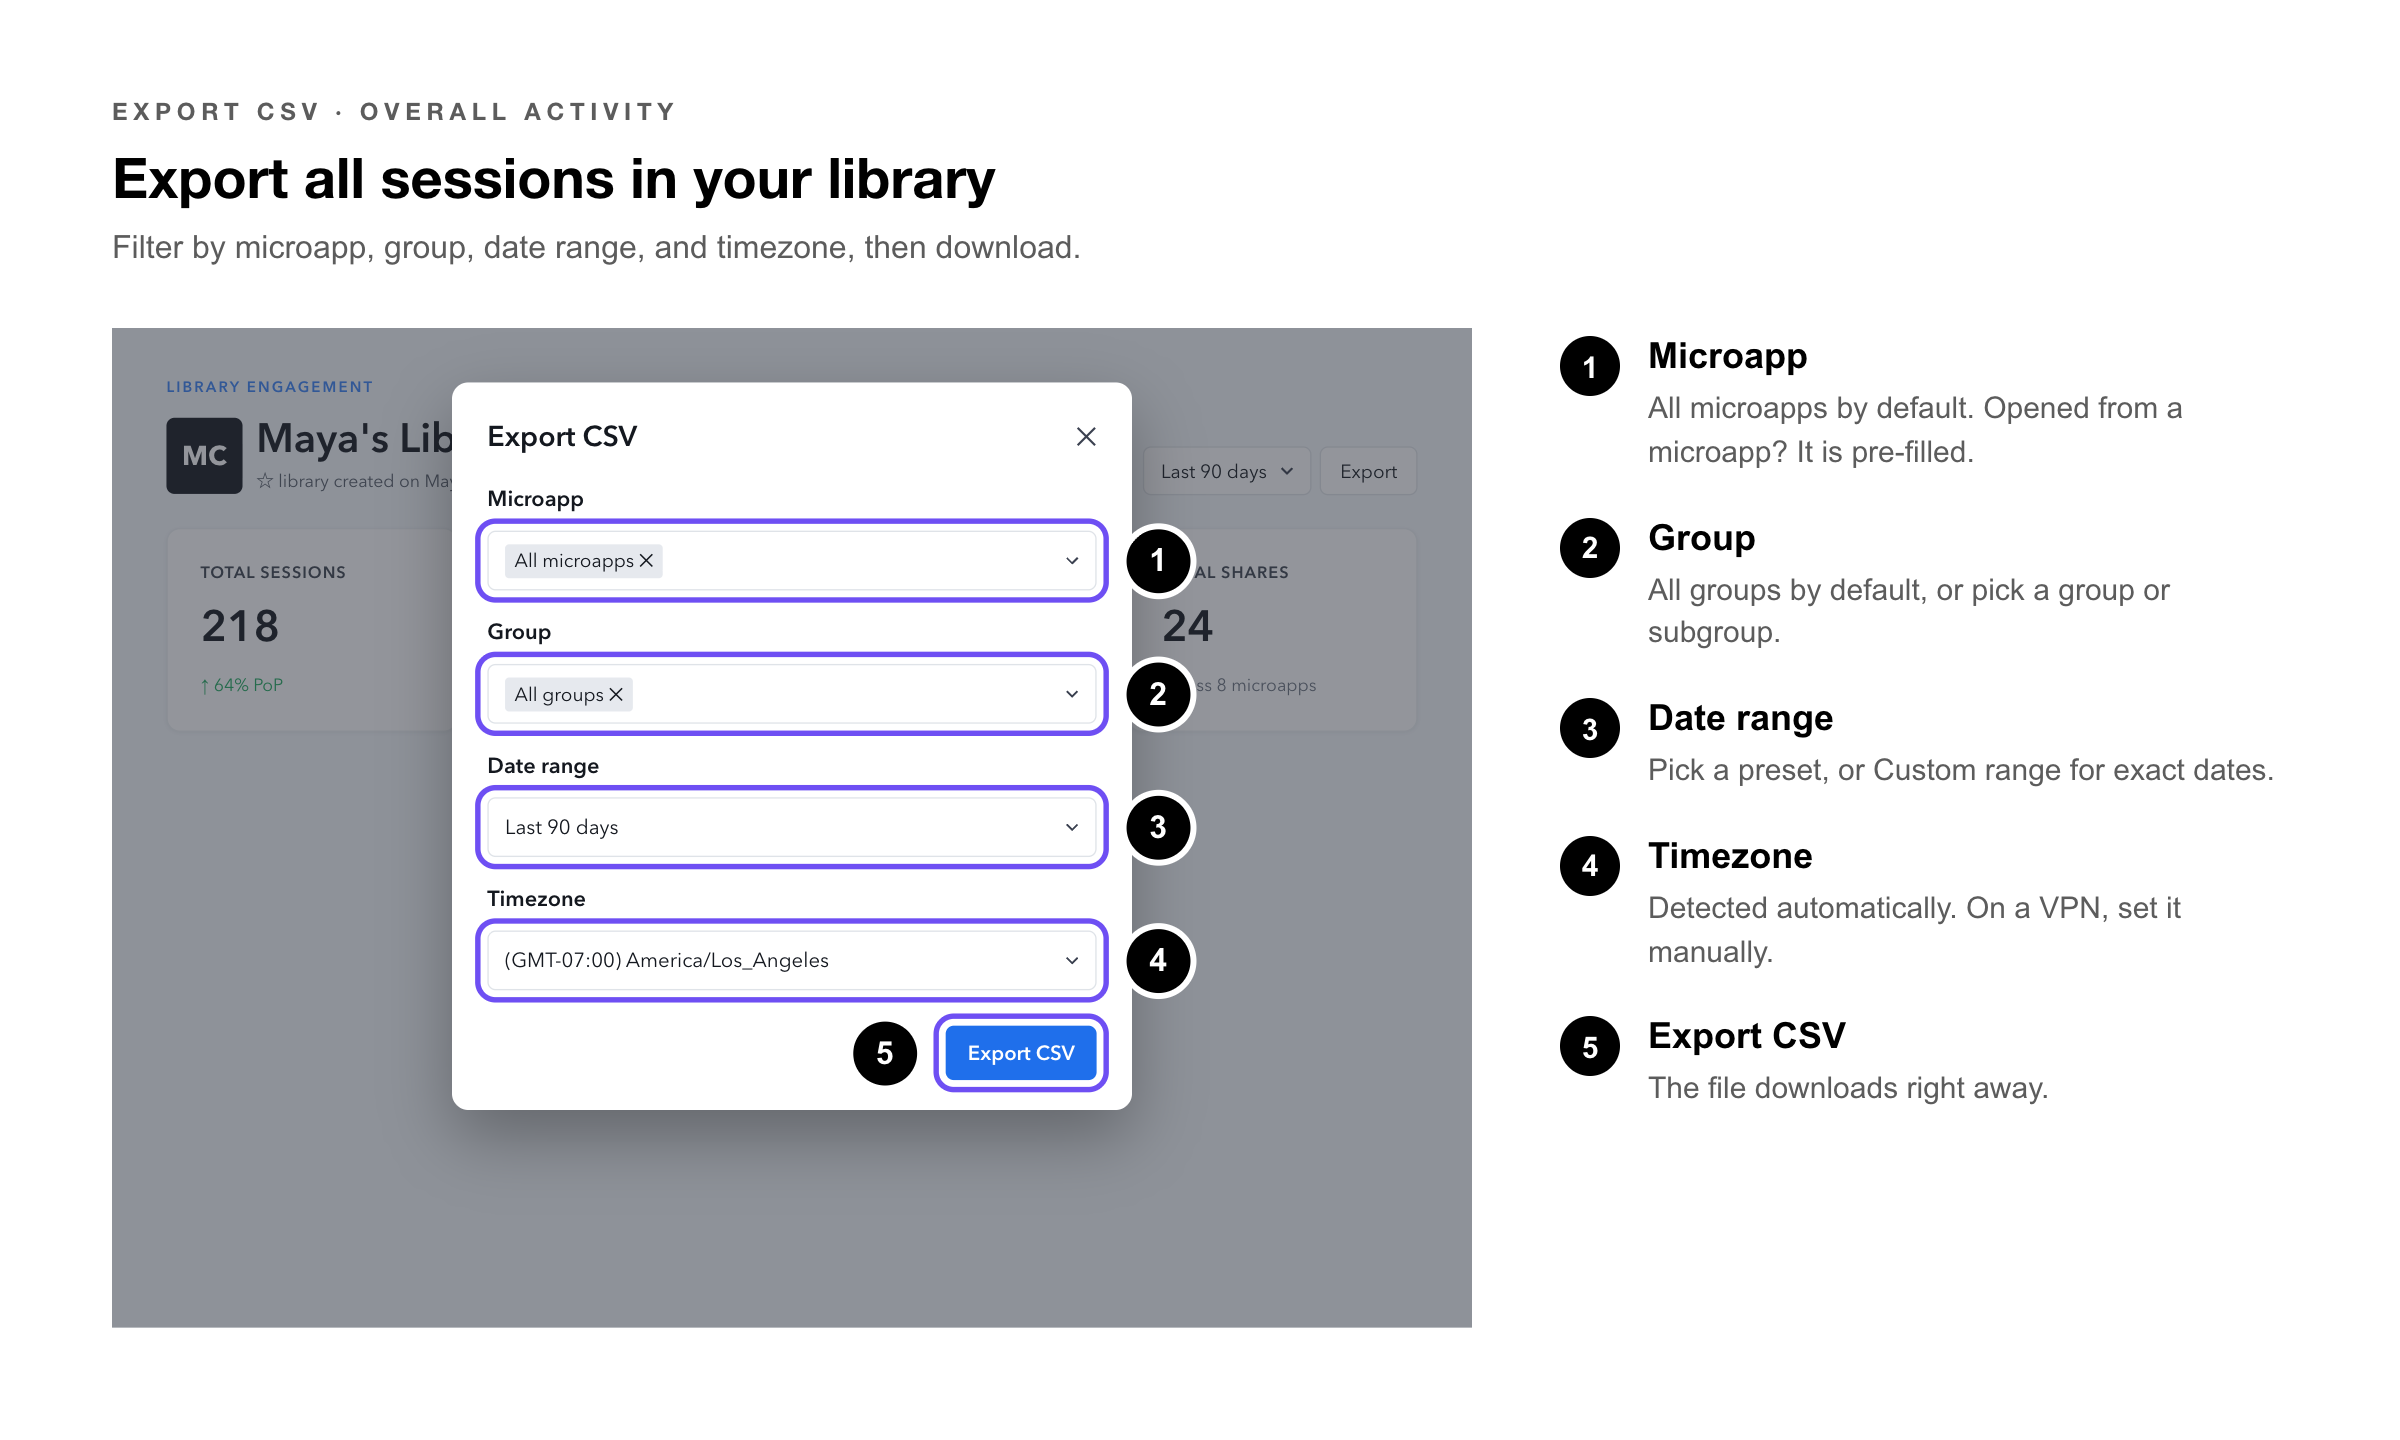
1. Go to — Engagement in the left navigation. You land on the Overall Activity page.
2. Click — Export CSV in the top-right corner of the page. A modal appears.
3. Filter by microapp — (optional) — search and select one or more microapps. All Microapps is selected by default. If you clicked Export CSV from within a specific microapp’s analytics view, that microapp is pre-filled.
4. Filter by group or subgroup — (optional) — search and select a group. All Groups is selected by default.
5. Select a date range — — choose a preset time frame, or select Custom Range to set an explicit Start Date and End Date (see Using a Custom Date Range below).
6. Select your timezone — — defaults to your detected local timezone. Note: if you are on a VPN, timezone detection may be inaccurate; select your timezone manually.
7. Click — Export CSV. The file downloads automatically.
|
Heads Up: You can select an End Date up through today, but engagement from the last few days (3 days) may still be settling. For the most recent sessions, check the Recent Activity feed in Microapp Analytics rather than relying on an export. 1 year is the max date range of a CSV export. If you would like to export a larger date range you may have to export multiple times. Engagement data from today and the previous 3 days is not available for CSV exports in order to maintain data integrity. |
Using a Custom Date Range
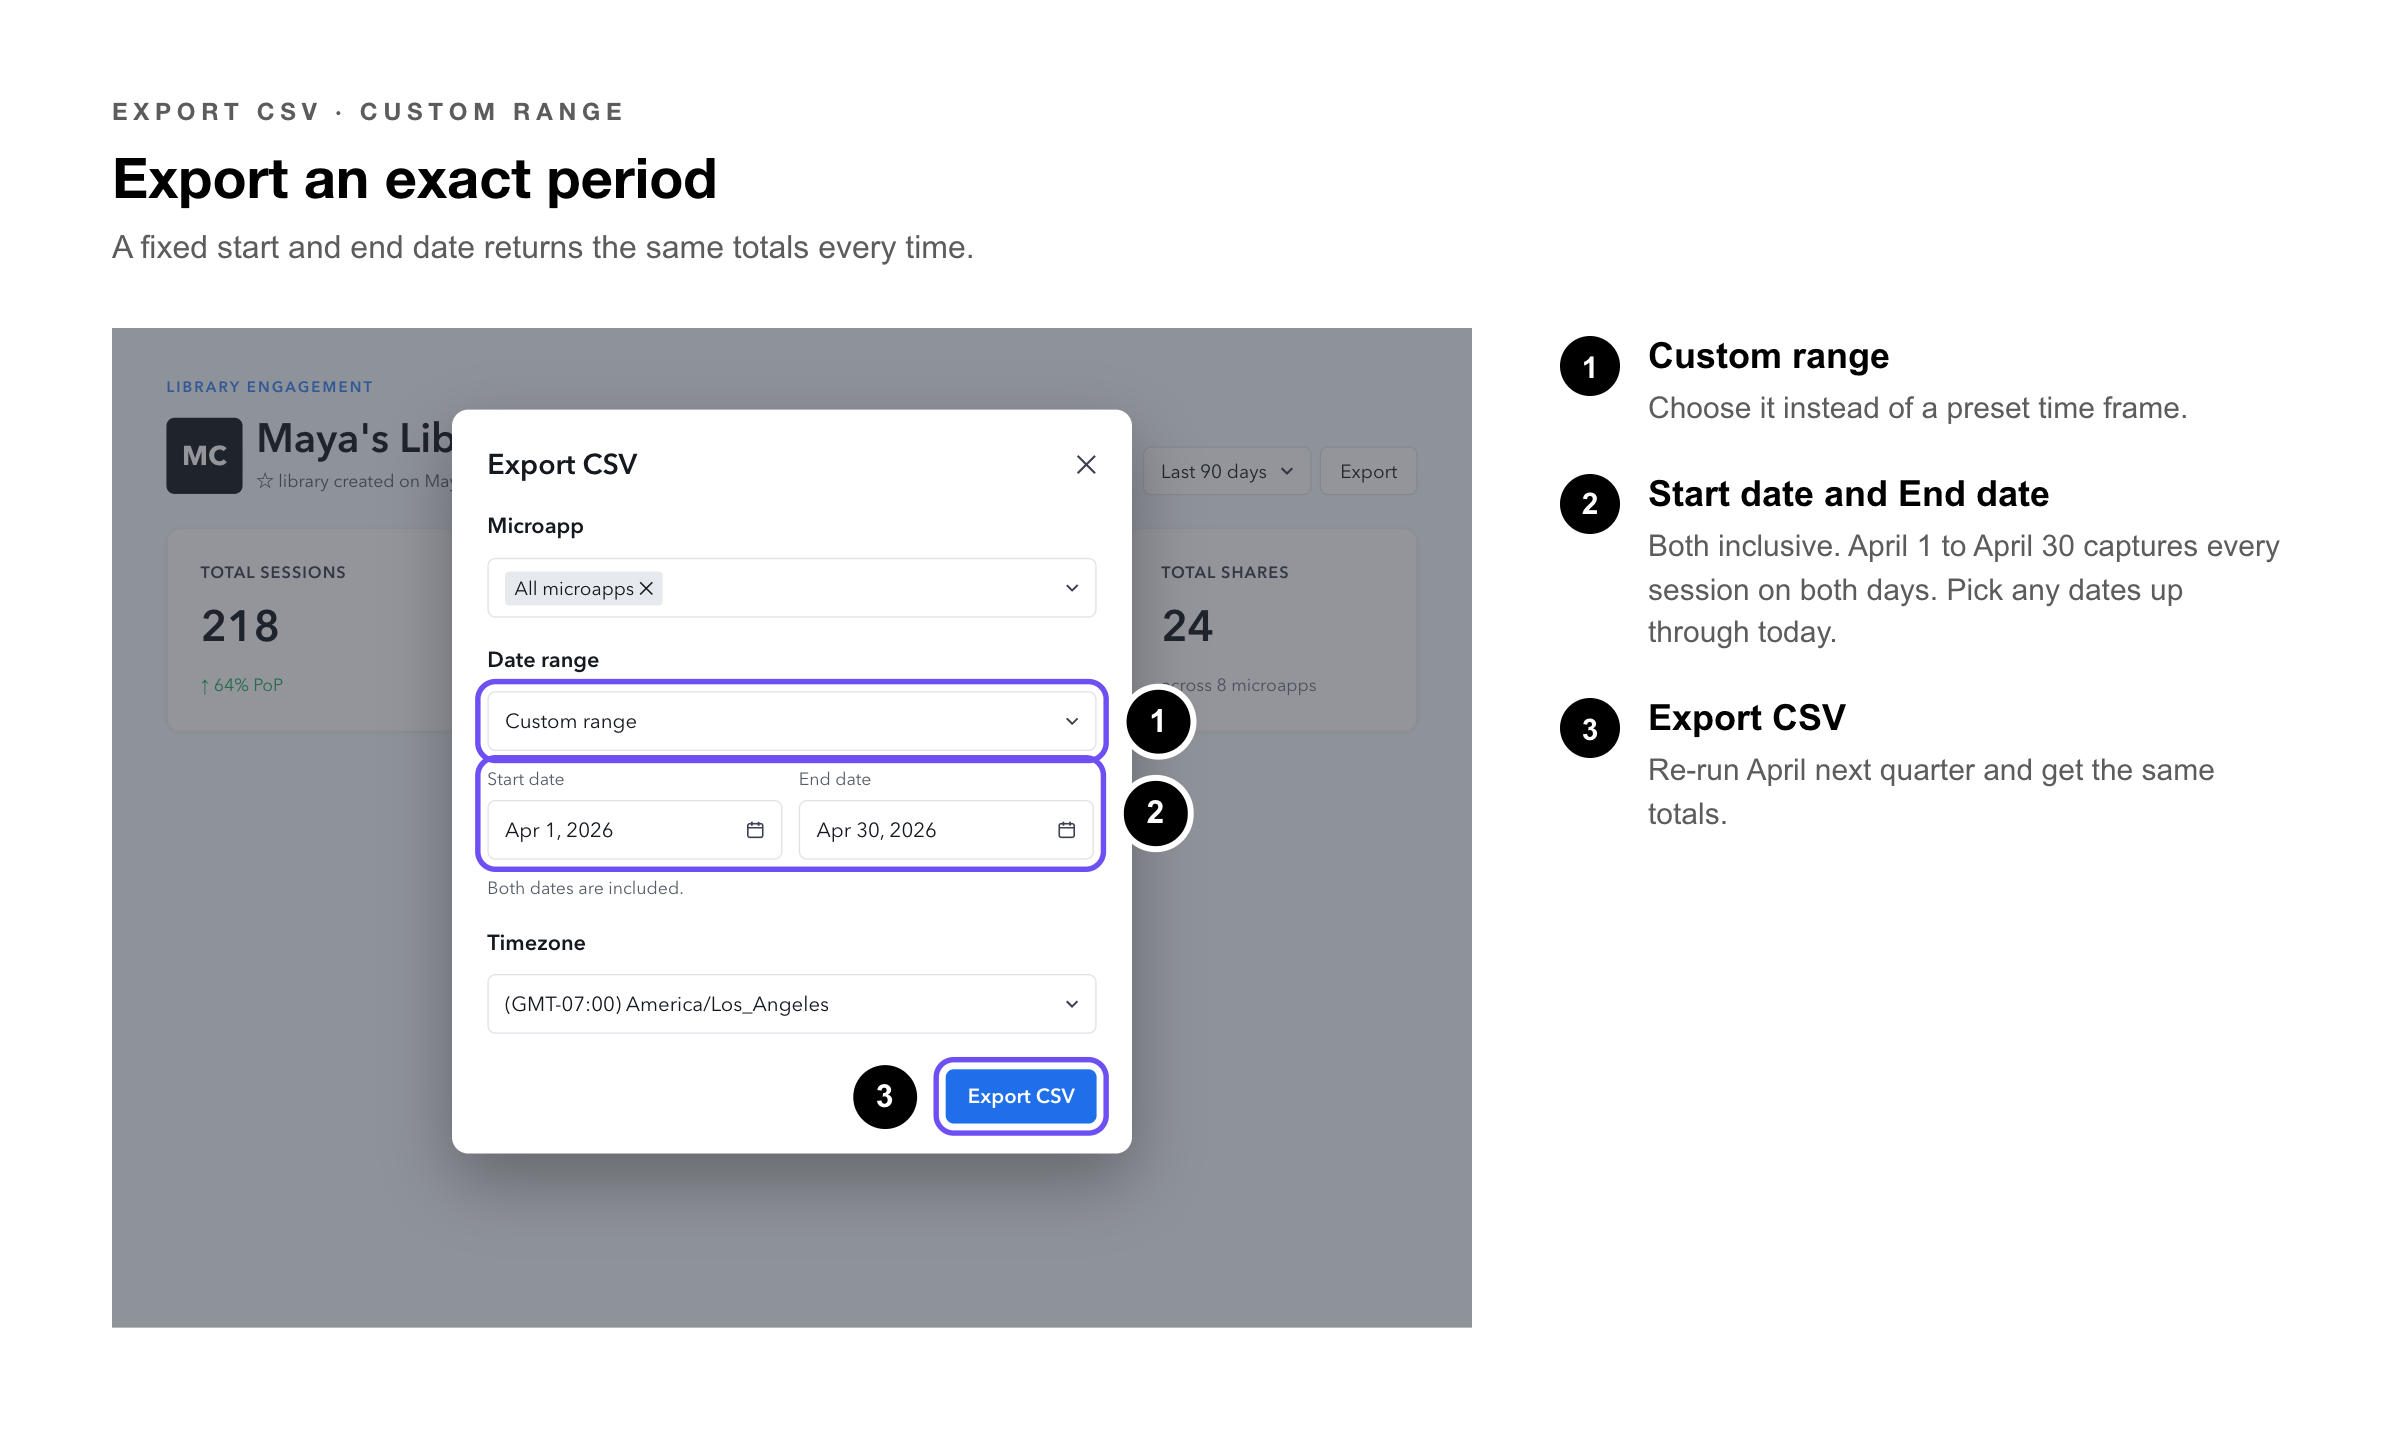
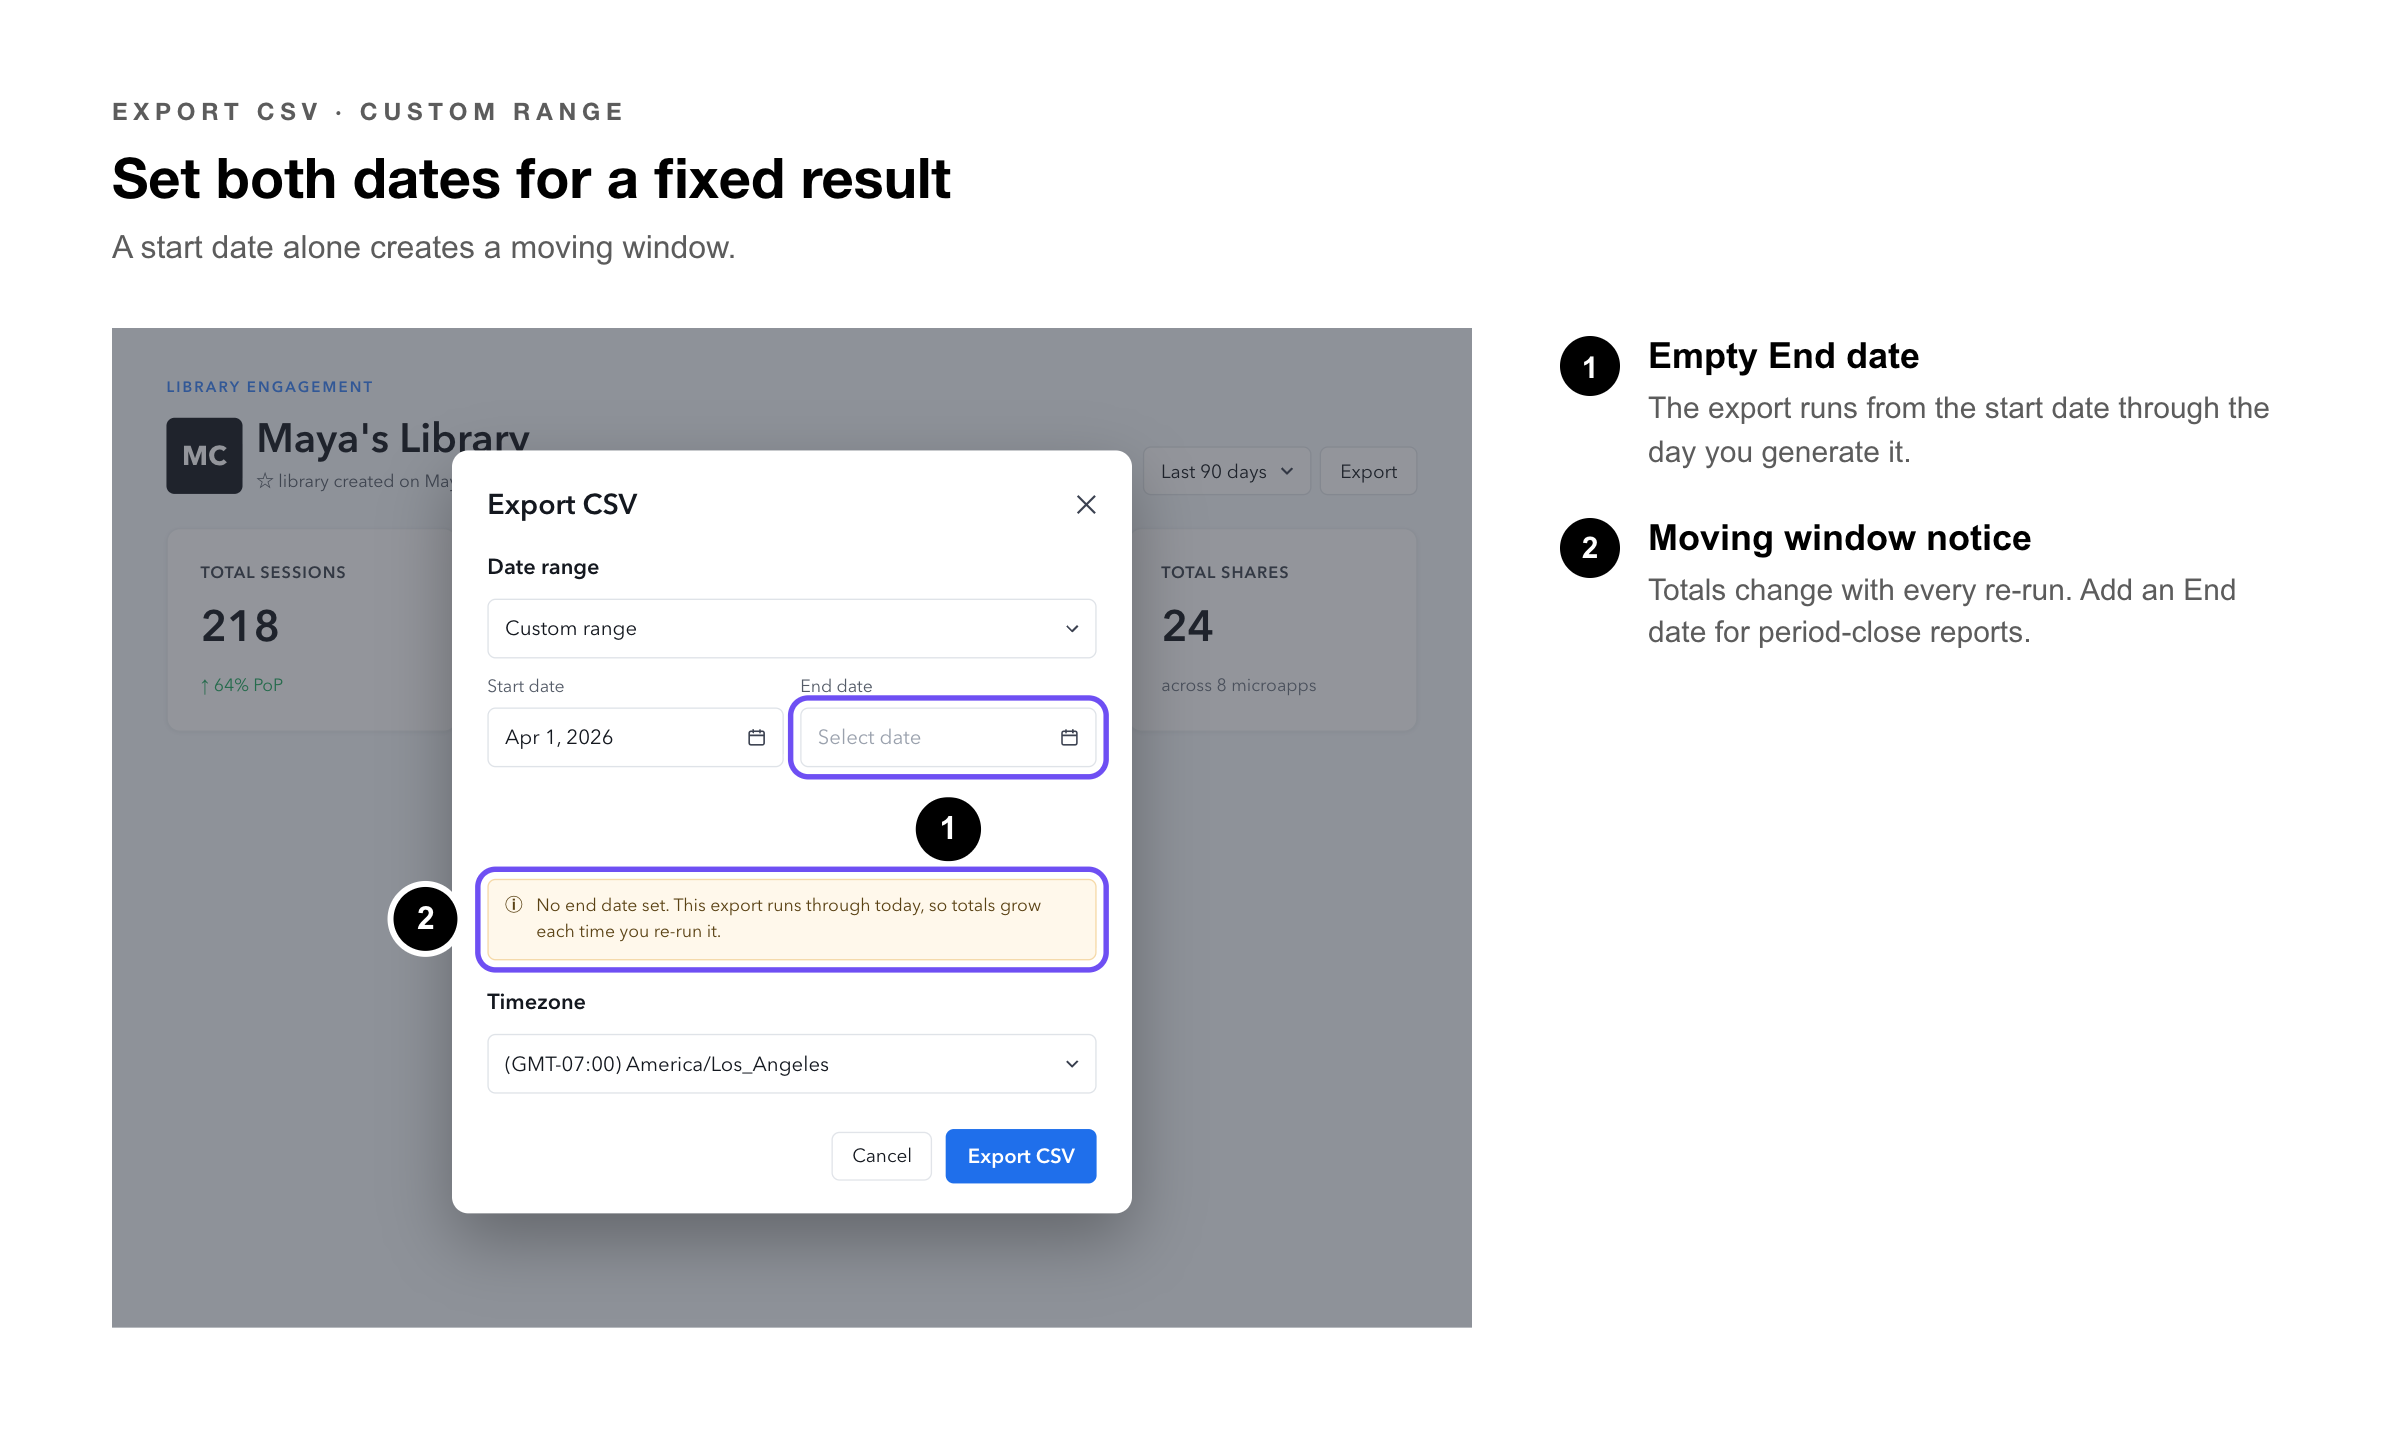
Alongside the preset time frames, exports support a Custom Range with an explicit Start Date and End Date. Setting both makes an export deterministic — a report for April always returns April data, no matter when you run it.
Before Custom Range, an export either used a preset window or ran through the day you happened to generate it, so a report meant to represent a fixed past period could return different totals each time. A closed Start Date / End Date pair removes that drift.
1. Open — the microapp’s three-dot menu from the Tiled Library and select Insights — or open the Engagement tab and select the microapp.
2. Choose — Custom Range in the filter options instead of a preset time frame.
3. Set — your Start Date and End Date. Both dates are inclusive — April 1 to April 30 captures all sessions on both April 1 and April 30.
4. Click — Export to download the CSV for that exact period.
|
Heads Up: If you set only a Start Date, the export runs from that date through the day you generate it — the same way the preset filters behave — and the totals will grow each time you re-run it. Always set both dates when you need a fixed, reproducible result. |
When to Use a Custom Range
|
Use case |
Why it helps |
|
Recurring reporting cadence |
Running the same monthly or quarterly export on a schedule — a closed date range means each re-export of a past period returns the same totals rather than growing over time. |
|
Period-close engagement reports |
Exporting a monthly or quarterly summary — define the exact period so the export is accurate and repeatable. |
|
Sharing consistent figures |
When several people export the same period at different times, a fixed date range ensures everyone works from identical numbers. |
Custom Range is offered alongside the preset filters, not in place of them. The presets remain available for quick, informal checks.
|
Pro Tip: The analytics export date range was extended in v61.0.1 — you can now select any Start Date and End Date up through today, with no fixed maximum lookback window. Long historical exports for period-close and retrospective analysis no longer need to be split into multiple runs. |
Export Analytics Data by Tiled User
You can pull a CSV scoped to a single Tiled user’s activity across any microapps in your account.
1. Go to — Engagement in the left navigation.
2. Find the Users column — on the Overall Activity page and click the name of the user you want to export data for.
3. You land — on the user’s individual analytics view.
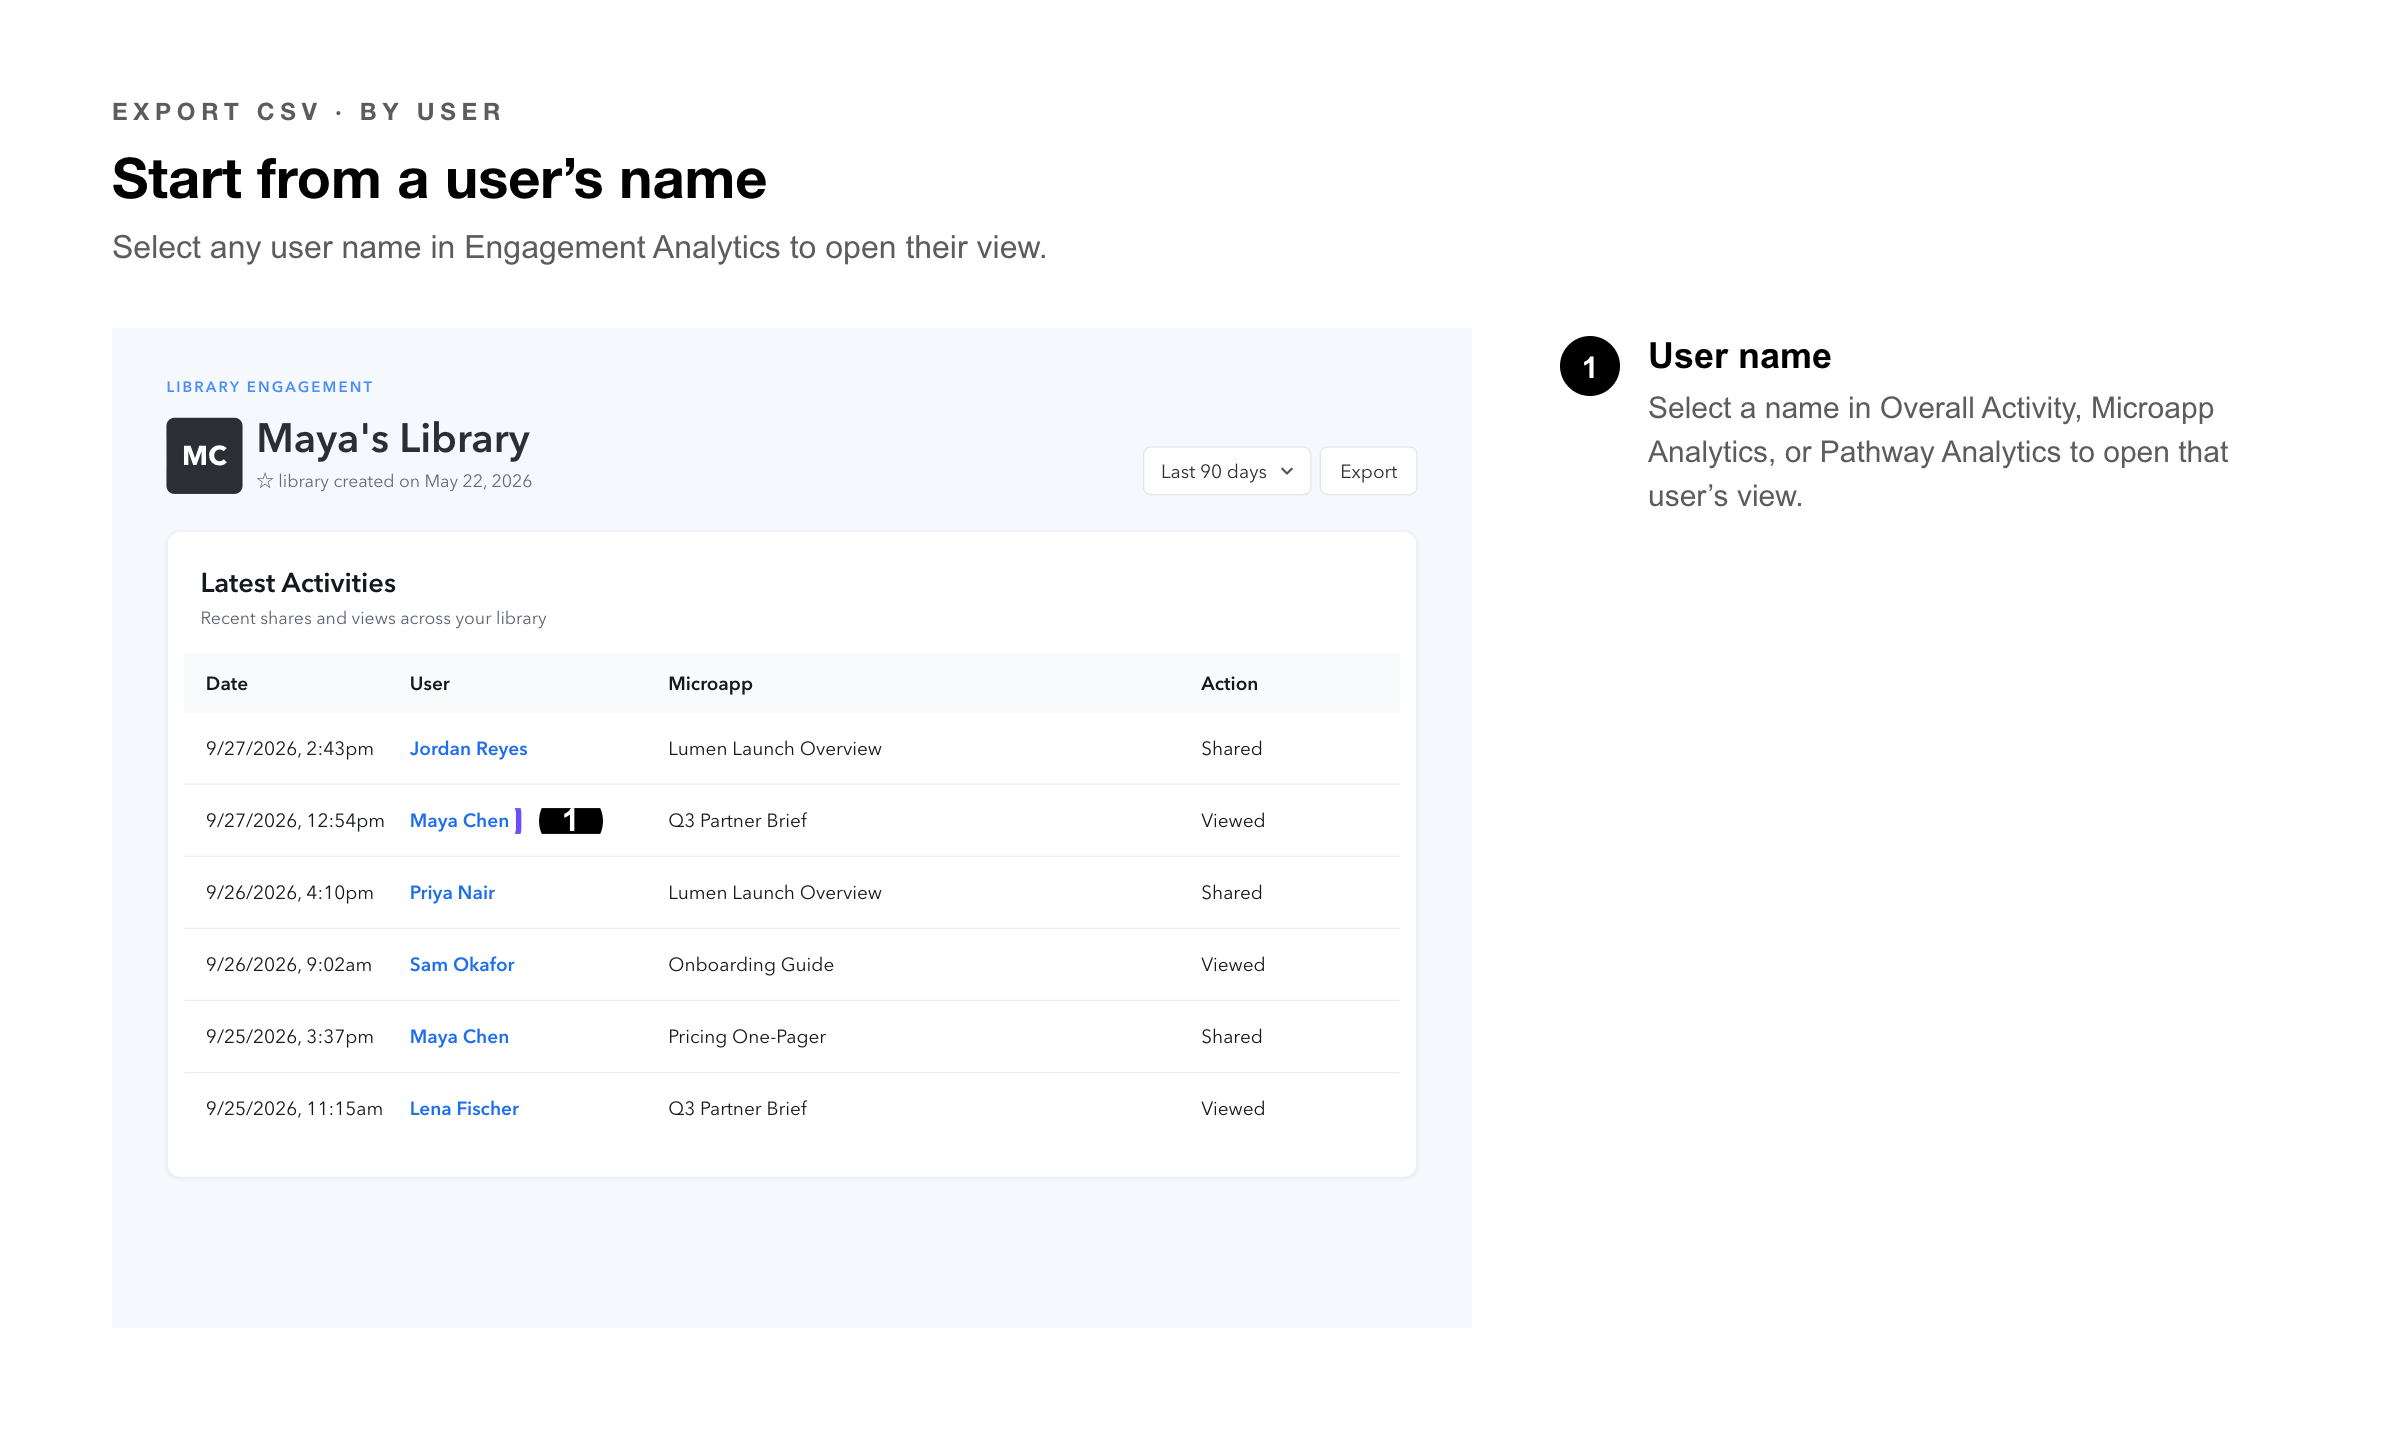
4. Click — Export CSV at the top of the page.
5. Apply filters — — select one or more microapps, a date range, and your timezone.
6. Click — Export CSV. The file downloads with all session activity for that user, filtered by your selections.
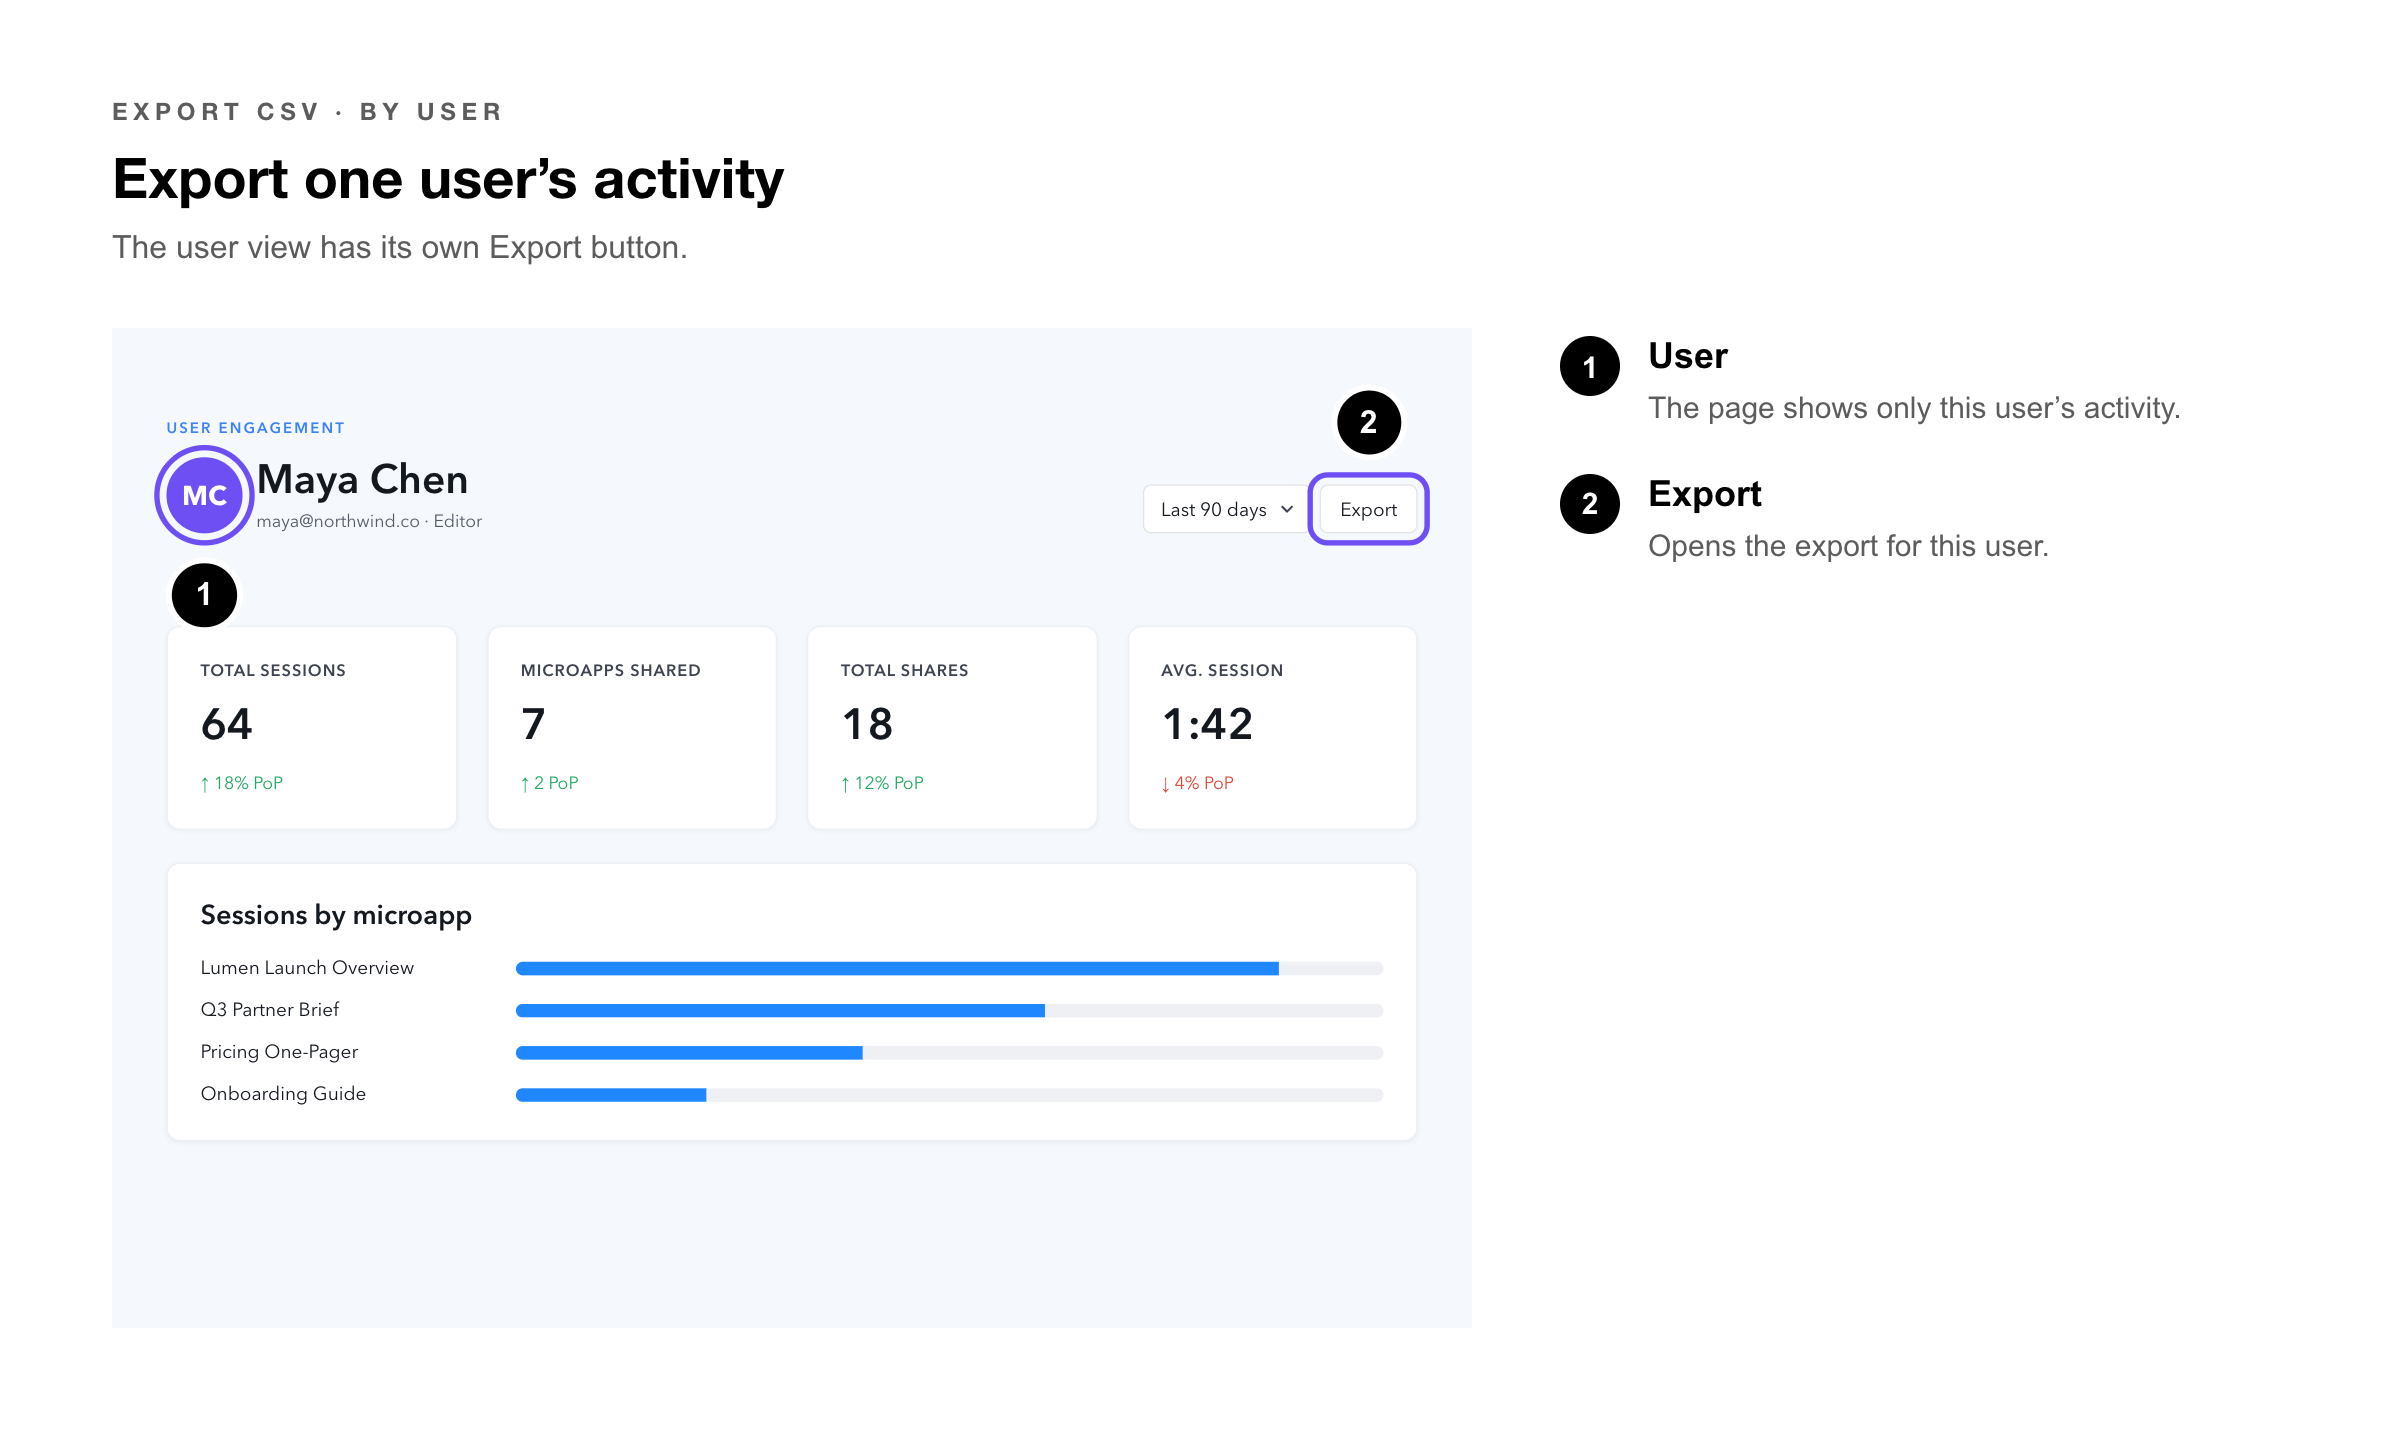 You can also reach the per-user export from any page within Engagement Analytics: click a user’s name wherever it appears (Overall Activity, Microapp Analytics, Pathway Analytics) to land on their individual view, then export from there.
Export by Microapp Page
Added in v64, the page-level export breaks session engagement down to the individual page level within a microapp. Because this export can be large for high-traffic microapps, Tiled generates it asynchronously and sends the file to your account email address rather than triggering an instant download.
1. Go to — Engagement and open the Microapp Analytics view for the microapp you want to export.
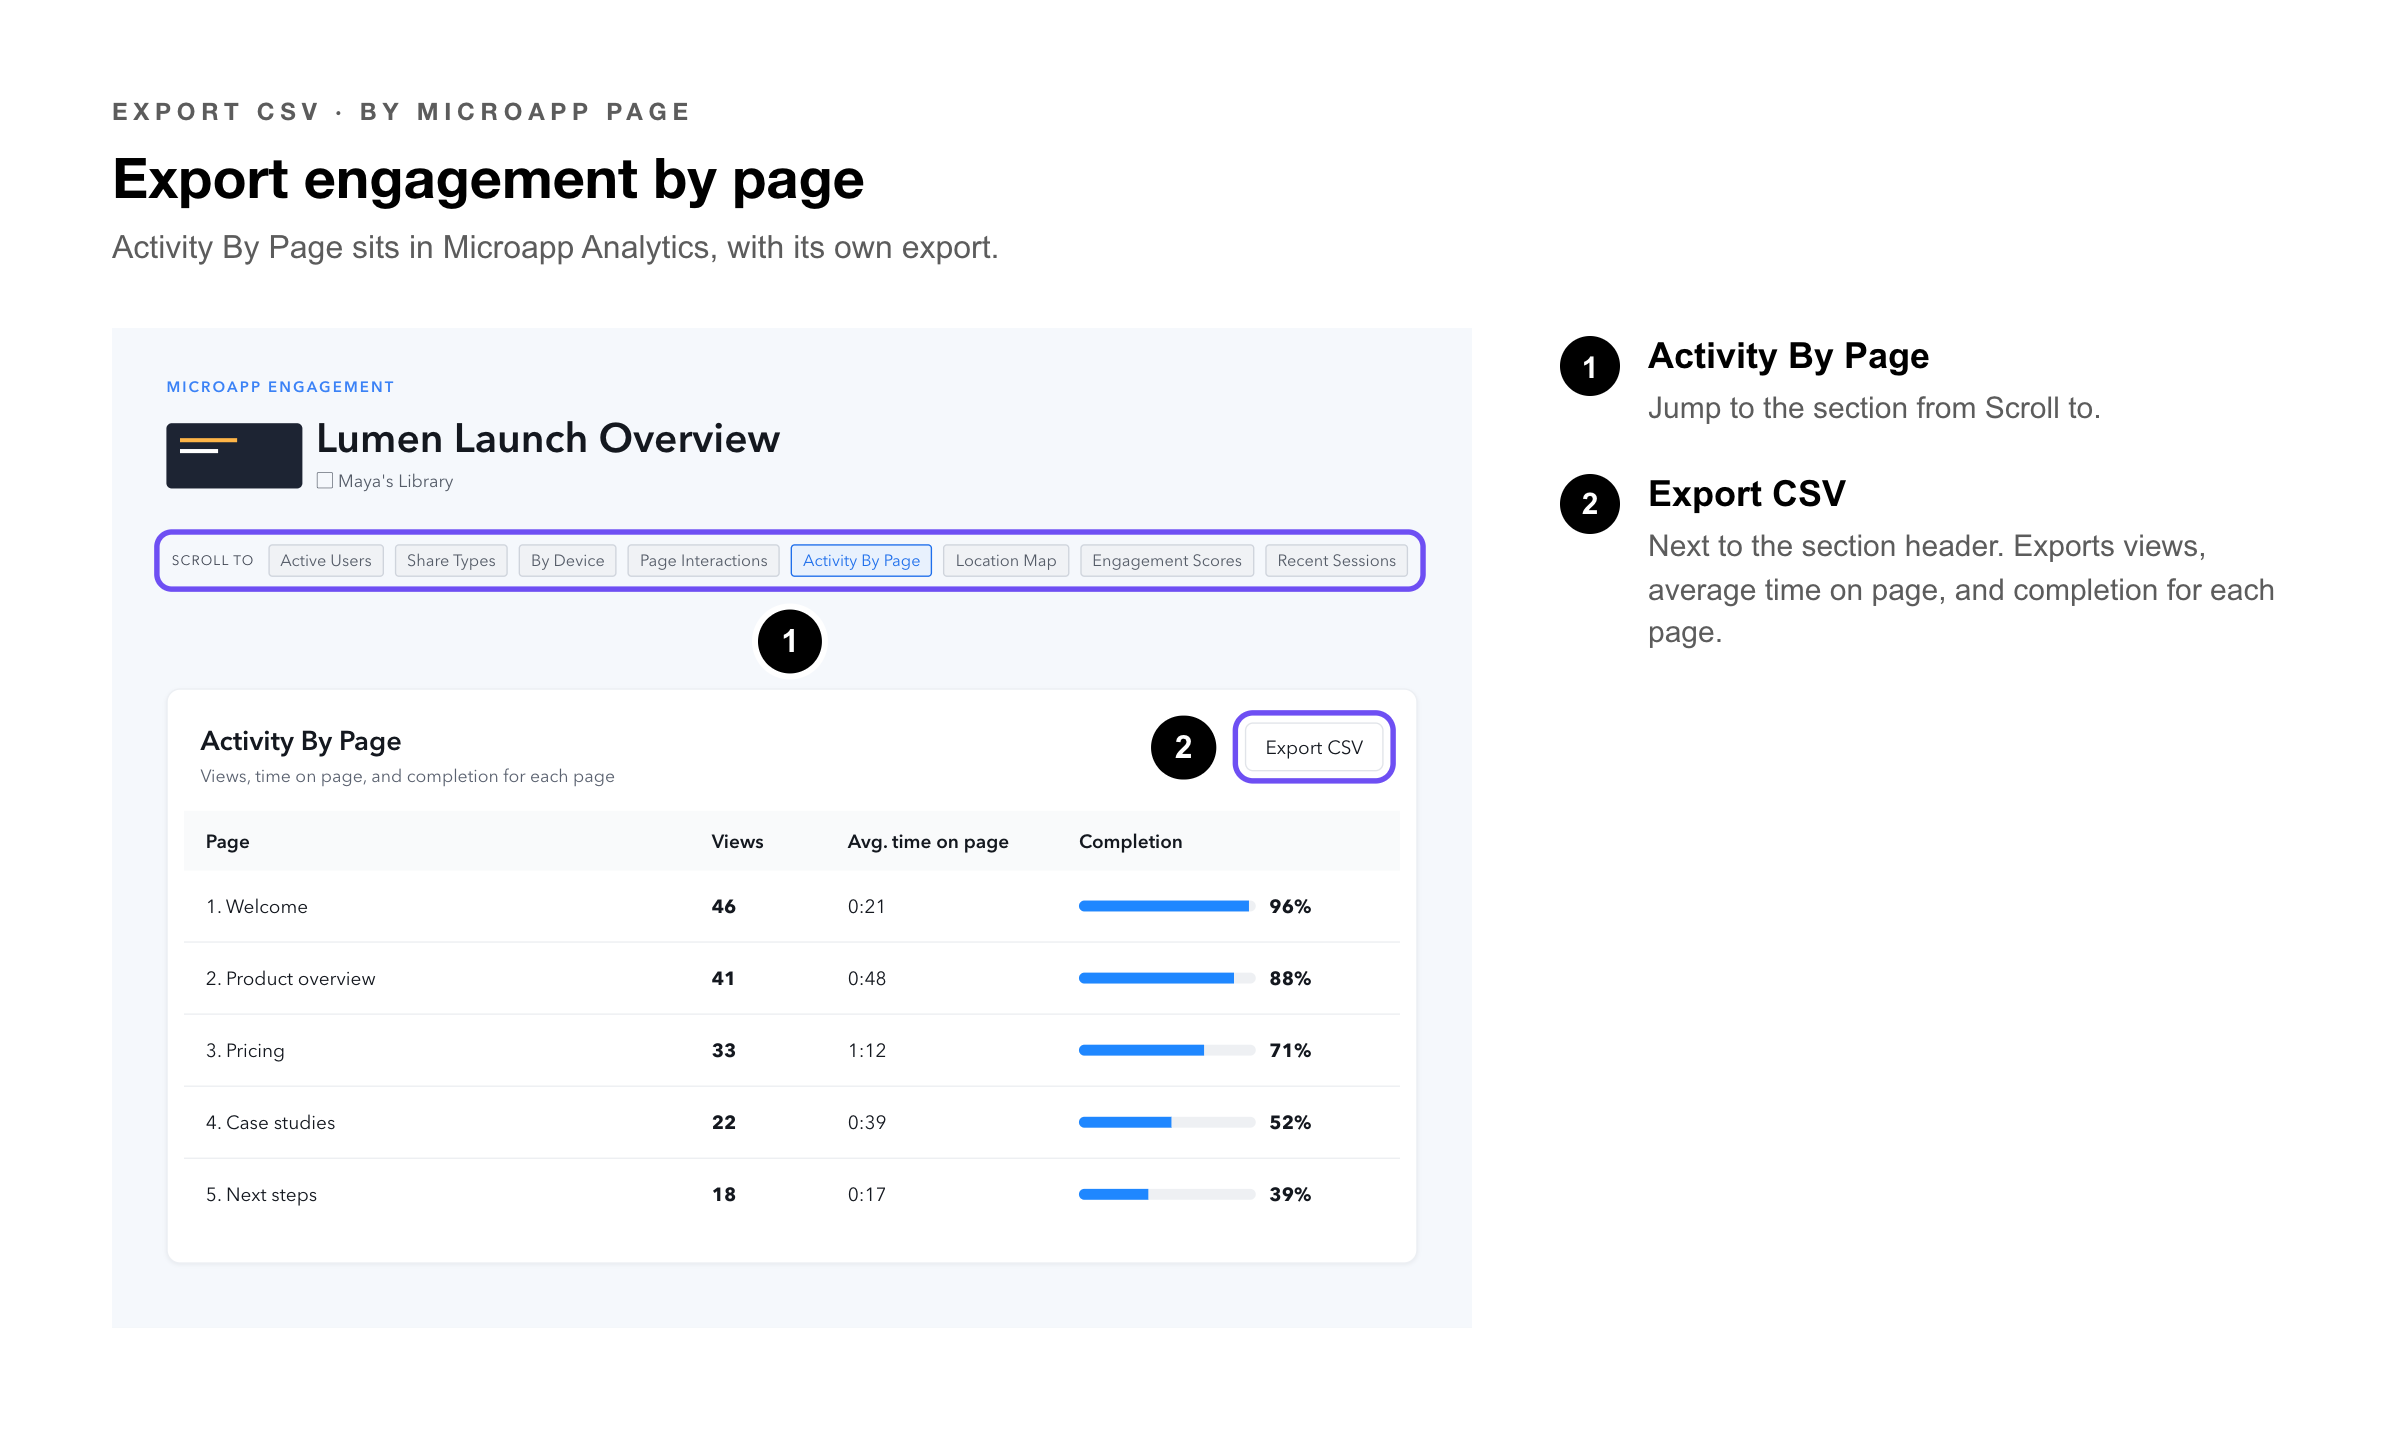
2. Scroll to — the Activity By Page section.
3. Click — Export CSV next to the Activity By Page header.
4. Select a date range — in the date picker that appears. This range can differ from the global date filter at the top of the page.
5. Click — Send Report. Tiled emails the CSV to your account email address.
|
Heads Up: Check your spam folder if the email does not arrive within a few minutes. Emails come from notifications@tiled.co. Large microapps with high engagement volumes may take up to 15 minutes to generate. |
Share Links Export
Share Links section to the bottom of the Overall Engagement page. This section shows share-link-level performance data and includes its own export.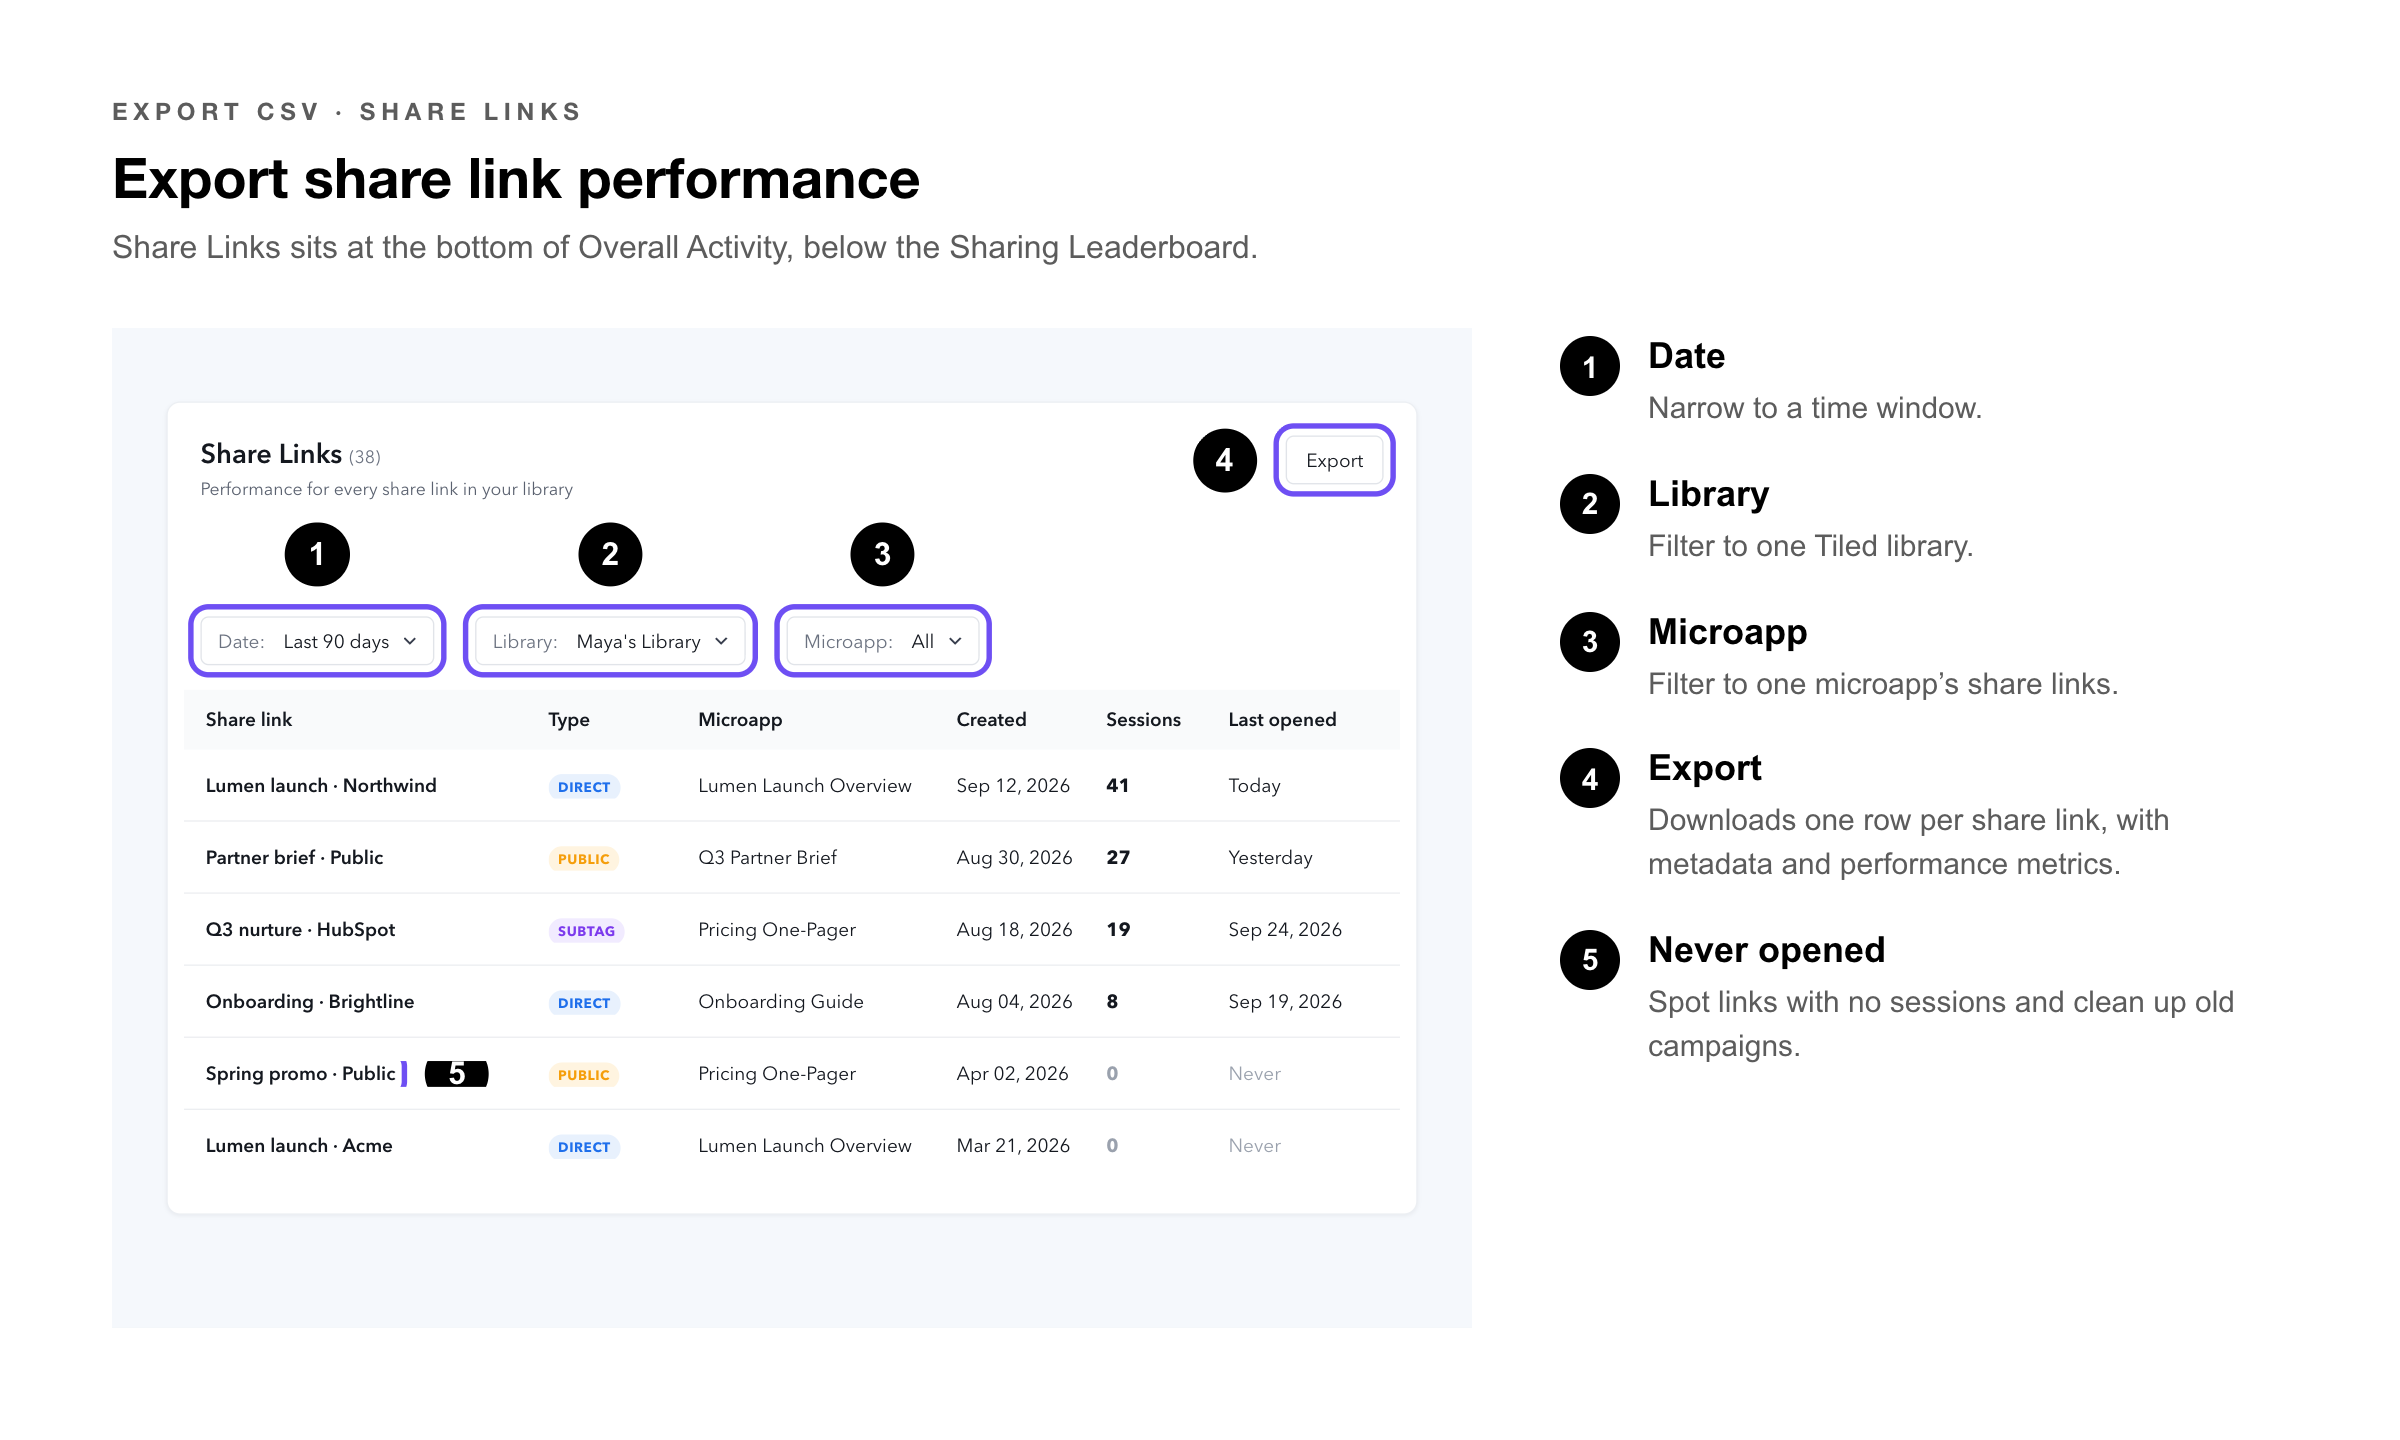
Finding the Share Links Section
Navigate to Engagement → Overall Activity and scroll below the Sharing Leaderboard. The Share Links table appears at the bottom of the page.
Filtering Share Links Data
Before exporting, filter the Share Links table to the data you need:
• Date — narrow to a specific time window
• Library — filter by a specific Tiled library
• Microapp — filter to a single microapp’s share links
Exporting Share Links Data
1. Apply — the desired Date, Library, and Microapp filters to the Share Links table.
2. Click — Export in the top-right of the Share Links section.
3. Download — the CSV file from the prompt. The file includes one row per share link with all metadata and performance metrics.
|
Pro Tip: The Share Links export is useful for auditing which links are driving the most traffic, identifying links that have never been opened, and cleaning up stale share links from old campaigns. |
Exporting Users via the Public API
The exports above all cover engagement data — who viewed what, and for how long. If you need to export the list of users on your account instead, use the public API endpoints for that.
|
Capability |
Details |
|
List all users |
Fetch the full list of users on an account. Supports pagination for large accounts. |
|
Fetch a specific user |
Target a single user by their ID. |
|
Export as CSV |
Both endpoints can return results as a .csv file instead of JSON. |
|
Heads Up: These are account-level endpoints and require an API key with the appropriate account permissions. See the Tiled API article for authentication details. |
|
Pro Tip: On larger accounts, page through the user list rather than requesting it all in one call — it keeps individual requests fast and avoids timeouts. |
CSV Export Fields
The following fields are included in the standard engagement CSV export (by library and by user). Not all fields are populated for every session — availability depends on the share link type and whether personalization is enabled.
|
Field |
Description |
|
Session Viewer |
Direct: email address associated with the share link. Subtag: email from the connected marketing tool. Public: system-generated email for public links. |
|
Viewer Name |
Direct: name of the contact created by the Tiled user. Subtag: contact name from the marketing tool. Public: name assigned to the public share link. |
|
Microapp Name |
Name of the microapp viewed during the session. |
|
Instance Name |
Name of the personalized instance viewed (only populated for microapps with Personalization). |
|
Start Time |
Date and time the session began. |
|
Duration (seconds) |
Total time spent in the microapp during the session, in seconds. |
|
Engagement Score |
Tiled Score for the session. See the Tiled Score article for scoring methodology. |
|
Sender Name |
Name of the Tiled user who generated the share link. |
|
Share Link Created Date |
Date and time the share link was generated. |
|
Share Link Type |
Type of share link: Direct, Public, Subtag, etc. |
|
Share Link |
The full share URL for the session. |
|
Library Name |
Name of the Tiled library from which the share link was generated. |
|
Microapp ID |
Unique system-generated identifier for the microapp. |
|
Session ID |
Unique system-generated identifier for the session. |
|
Instance ID |
Unique system-generated identifier for the personalized instance (only populated when Personalization is active). |
|
Completion Events |
Number of completion events successfully triggered during the session. |
|
Completion Name |
System-generated name of each completion event triggered during the session. |
The page-level CSV (from Activity By Page) contains a different field set focused on per-page engagement: page name, views, average time on page, and completion percentage per page.
Export Limits & Caveats
|
Limit |
Detail |
|
Date range |
There is no fixed maximum lookback window. You can select any Start Date and End Date up through today. (Earlier versions capped exports at 1 year per run.) |
|
Recent data |
Engagement from the last few days may still be settling when you export. For up-to-the-minute activity, use the Recent Activity feed in Microapp Analytics. |
|
Open-ended ranges |
Setting only a Start Date produces a moving window that runs through the day you export. Set both dates for a reproducible result. |
|
Personalization columns |
Instance Name and Instance ID columns appear in all exports but are only populated for microapps using Personalization. |
|
VPN and timezone |
Timezone auto-detection does not work over a VPN. Select your timezone manually in the export modal when on a VPN. |
|
Page-level export delivery |
Page-level exports are sent by email, not downloaded instantly. Delivery can take up to 15 minutes for large datasets. |
|
Permissions |
Only Admin and Editor roles can export. Base users see no Export CSV button. |
Common Questions
|
Question |
Answer |
|
How far back can I go when exporting analytics? |
There is no fixed maximum lookback window — you can select any Start Date and End Date up through today. Earlier versions capped each export at a 1-year range, which required splitting long periods into multiple runs. |
|
What happens if I only set a Start Date? |
The export returns data from that Start Date through the day you run it, and the totals will change each time you re-run it as new sessions land. Set an End Date whenever you need a fixed, reproducible result. |
|
Are the Start Date and End Date inclusive? |
Yes. A range from April 1 to April 30 includes all sessions on both April 1 and April 30. |
|
Does Custom Range replace the preset time frames? |
No. Custom Range is offered alongside the presets (Last 7 days, Last 30 days, Last 90 days, Last Year), not in place of them. Use the presets for quick checks and Custom Range for reporting you need to reproduce. |
|
My timezone is wrong in the export. What happened? |
If you are connected to a VPN, timezone auto-detection is disabled. Open the export modal, clear the auto-detected timezone, and select your actual timezone manually before exporting. |
|
What’s the difference between the library export and the page-level export? |
The library export (Overall Activity) gives one row per session across the whole microapp. The page-level export (Activity By Page) gives one row per page per session, so you can see exactly which pages each viewer visited and for how long. |
|
I didn’t receive the page-level CSV email. What should I do? |
Check your spam folder first — the email comes from notifications@tiled.co. If it’s not there after 15 minutes, try the export again. Very large datasets occasionally time out; if the problem persists, contact support. |
|
I’m a Base user — can I export engagement data for my own shares? |
No. Base users have no analytics access, so there is no export available even for microapps you shared yourself. If you need engagement data on your own shares, ask your Account Admin about an Editor role, or ask an Editor or Admin on your account to run the export for you. |
|
Can roles be changed so a Base user can export? |
Roles and their permissions are configurable in Account Settings → User Management → View Roles & Permissions, where Account Admins can edit existing roles or create new ones. Whether export can be granted independently of full analytics access depends on how your account is configured — check with your Account Admin. |
|
Can I export share link data separately from session data? |
Yes. The Share Links section at the bottom of the Overall Engagement page (added in v65) has its own Export button that downloads share-link metadata and performance metrics as a separate CSV. |
Related Articles
• Engagement: Microapp Analytics — Per-microapp engagement report with page-level data and viewer activity.
• Engagement Overview — Account-wide engagement metrics and the sharing leaderboard.
• Sharing a Microapp — How share links work and how to create them.
• Tiled Score — How Tiled calculates the engagement score shown in CSV exports.
• Analytics for Personalization — How to track engagement on personalized instances of a microapp.
• Account Settings: Roles — What each role can do, including which roles have analytics access.
• Tiled API — Authentication and general usage for the public API, including user export endpoints.
• Account Settings: User Management — Managing account users directly in the Tiled interface.