If you want to add one or more users to a single library, you can do so from the Account Settings, Library Settings or via SSO.
- Add users to a Library
- Remove user(s) from a Library
- Add a Group to a Library
- Edit or Delete a Library
- Bulk Edit Users
User search will only show results that match the Name of the user.
Add user(s) to a Library
⚠️ Important Note
Before a user is added to a Library they must be added to the Tiled Account.
Option 1: From Account Settings
- Navigate to Account Settings -> User Management.
- Click the blue plus icon in the top right to add users to the account.
- This will bring up the Create New User Modal. The admin will need to specify a name, an email, and one or more libraries to add the user to. (Note: at least one library is required, and users will be added initially as base users. This can be modified later from the same User Management Screen.)
There is also the option to make the user an Account Admin, only select this if you want the user to have full account access and administration rights and see all libraries. - Click Create new user.
Option 2: From Library Settings
- Navigate to Users in the Library Navigation.
- Click the blue plus icon in the top right to add users to the library.
- A list of users will be shown that have Tiled account but are not in this current library.
- Select a user (or users) and click Next.
- Choose a group and role for the user(s).
- Click Add users.
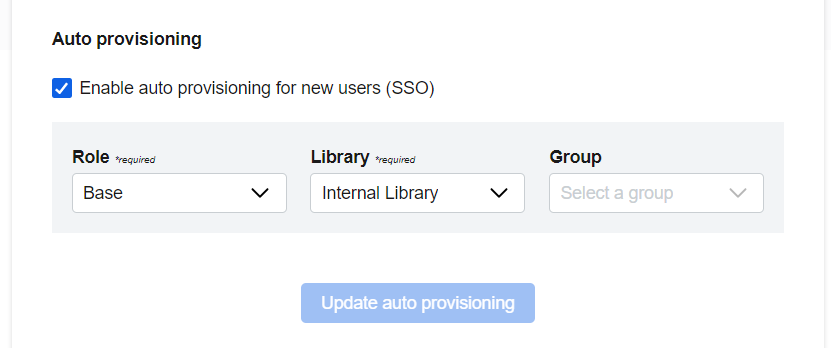
Option 3: From SSO
- The other option is for users to be created automatically via SSO.
- First you will need to enable SSO on the Account General Settings:
- Once you enabled SSO, make sure all the relevant SSO info is filled out.
- Next, make sure you have enabled Auto Provisioning new users (down the page slightly)
- This will ensure that new users will be placed into a default library if one is not specified in your externally SSO directory
Remove user(s) from a Library
Add a Group to a Library
Groups help to maintain appropriate permissions for users within libraries. By adding users to groups you can ensure users in groups only have access to microapps that are published to those respective groups.
- Select the blue plus icon and select Create Group.
- Give the Group a name. Choose a name that best describes the type of users of this group.
- You can choose to nest a croup by selecting the checkbox.
- Click Create. Your group has been created and you can start adding members to the group.
Edit or Delete a Group
- Navigate to the Users page from the Library Navigation.
- Identify the Group you wish to delete.
- Select the three dot menu.
- Click Edit or Delete.
- Clicking Edit will give you the ability to rename the Group or nest it in another group.
Bulk Edit Users
You can move multiple users to a different group or update the role of the users using bulk edit.
- Navigate to Library Settings > Users.
- Select the users you which to move into a group or change the user role.
- Select Modify.
- Update the group and/or the role.
- Click Done.