Bring motion to your microapp through the Video Tile. Use video from your Tiled Asset Library or a public video with a URL.
Before using the Video Tile consider how the video should be displayed in the microapp. Will it take up the entire canvas or one small part. Will the video be apart of a scroll? Think about the other elements in the microapp and how they work together to create the ideal user experience.
There are several options for embedding videos in microapps:
- Public URL's from sites like YouTube, Vimeo, or other video hosting services.
- Videos hosted by Tiled in the Assets Library.
Add a Video Tile
- From the Tiled Builder, drag and drop the Video Tile onto the canvas.
- Resize and reposition the video tile.
- Add a video to the video tile. There are 2 ways add a video:
- Drag and drop a video asset (.mp4 or .mov) from the Assets panel to the Video Tile on the page or the outline section of your Video toolbar. For more information about assets, see Adding Assets to your Microapp.
- When the video tile is selected a flyout modal will allow you to link to a Video URL from Youtube, Vimeo, or similar video hosting platform. Be sure the URL begins with https://
Note: To confirm that you have specified the correct asset or url, click the Preview button.
Video Settings
The Video settings allows you to configure the following options for your video.
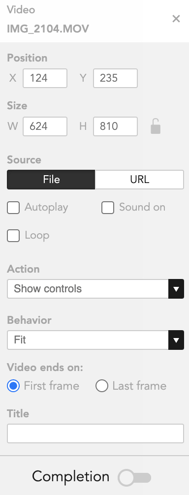
Behavior
You can change how your video is displayed in the Video settings.
|
Fill |
The video is positioned so it fills the entire Video Tile, even if the entire video is not displayed. Fill is selected by default. |
|
Fit |
The video is sized so that all of the image can be seen in the Video Tile, even if that creates a lot of whitespace. |
Video options
You can specify the following options for your video:
|
Loop |
Specify if the video should start again when it is finished playing.
|
|
Autoplay |
Specify if the video should automatically play when the viewer opens the page.
|
|
Sound on |
Specify if the video should autoplay audio.
Note: To accommodate web browser requirements, you cannot configure your video to automatically play audio. The user must manually enable audio. |
|
First frame |
Specify whether you want the video to end on the first frame, which would display an image of the first video frame. |
|
Last frame |
Specify whether you want the video to end on the last frame, which would display an image of the last video frame. |
Action
Specify how viewers should be able to interact with the video when they access the page. Click the Actions dropdown list, and select the desired action. Accessibility & the Video TileYou can add a Title and alt text to the video tile for viewers who use screen readers to better understand the contents of the video.
|
Do Nothing |
When selected, the viewer cannot interact with the video in the Video Tile. |
|
Play/Pause |
When selected, the viewer can click the Video Tile to play the video, and then click it a second time to pause the video. This option is selected by default. |
|
Fullscreen |
When selected, the viewer can click the Video Tile to enlarge the video so that it is as large as the microapp page. When finished viewing the video in full screen, they click the X icon in the upper left corner to return to standard view. |
|
Show controls |
When selected, the viewer can user the video controls to play/pause, go fullscreen, fast forward or rewind, and control the volume. |
Accessibility & the Video Tile
You can add a Title and alt text to the video tile for viewers who use screen readers to better understand the contents of the video.
Create a completion event
You can configure the Video Tile as a completion event, so that when the video is played, Tiled records it as a completion event for the microapp. To set the Video Tile as a completion event, move the Completion slider to the right.
Delete a Video Tile
To delete a Video Tile, ensure that the tile is selected and press the DELETE key.
Note: Once a video is placed in a Video Tile, you cannot remove it from the tile, leaving it empty.
Note: While Tiled does not natively support audio, if you want to include an audio file in your microapp, you can do so by converting your audio file to a movie format and utilizing the Video Tile as detailed above.
Videos that are uploaded to Tiled can be configured to show controls. This way viewers can dictate their experience with the video without missing a thing.
Configure multiple videos to play simultaneously
You can leverage the video tile to create a highly interactive experience for your microapps by configuring multiple videos to play simultaneously.
Note: The mobile app supports auto-playing multiple videos, however, you may experience differences for video URLs depending on your device type (ios and android).
- Add more than one video tile to the same microapp page.
Note: Your videos can be a mix of uploaded video assets or URL links (Youtube and Vimeo) - Add an uploaded video or video URL link to your video tiles.
- Select the 'Autoplay' setting from the video flyout.
Note: You can also select additional settings and actions depending on your needs like 'Sound on'. - Preview your microapp to ensure your microapps are playing simultaneously (with or without sound).
Note: You can also have multiple videos playing on a page, page state, scroll tile, scroll state, or overlay.
Note: If you have single or multiple videos configured with sound, the browser will dictate whether the video will play with sound.