![logo-horizontal_w.png]](https://support.tiled.co/hs-fs/hubfs/logo-horizontal_w.png?height=30&name=logo-horizontal_w.png)
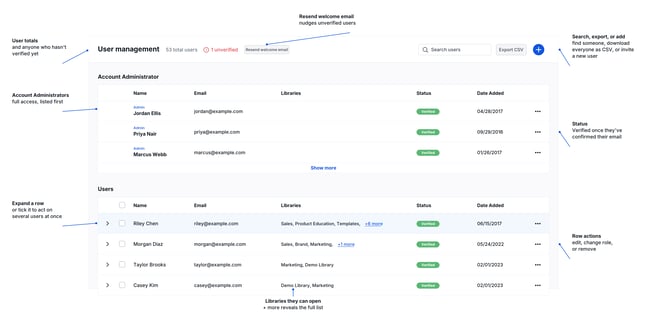
Tiled manages user access in two places, and it’s worth knowing the difference before you start; the Account Settings and the Library Settings. Users must be added to a Tiled account from the Account Settings (or by being auto-provisioned via SSO) to have access to Tiled. Users can be added to a library once they have been granted access to the account. Tiled’s User Management feature allows Account Admins to manage user groups, user roles and user permissions. In order to add users to Tiled Libraries, they must first be added to the Tiled account. The following guide will instruct you to add a user to an account through User Management in the Account Settings.
|
Setting |
What It Controls |
|
Account Settings |
Whether a person can log into Tiled at all, and which libraries they can access. A user must exist here before they can be granted access to any library. |
|
Library Settings |
Access within one specific library, for a user who already exists in the account. See Library Settings: Users. |
|
Heads Up: User search in Account Settings only matches against a user’s Name, not their email address. Search by name if you can’t find someone. |
Accessing User Management
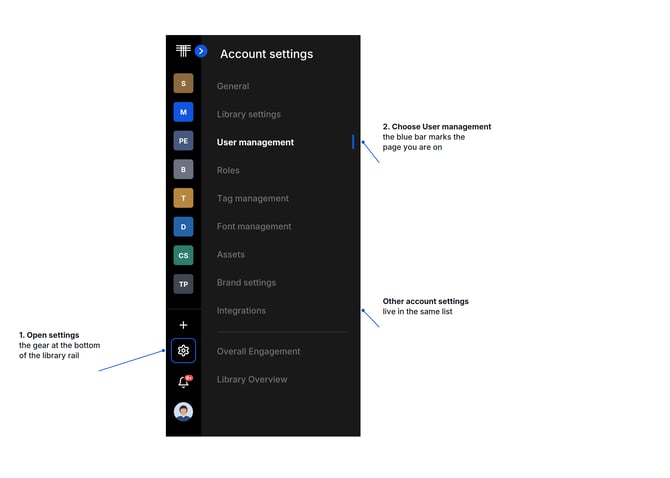
1. Open the global sidebar — select the gear icon in the bottom left corner of the screen.
2. Select User Management — from the Account Settings menu.
|
Pro Tip: This is the same Account Settings gear icon covered in Navigating the Tiled Library — the global sidebar, not the Library-level Settings icon in the top navigation bar. |
Add a new user to a Tiled account
1. Open the add-user panel — select the blue + button in User Management.
2. Enter their name and email — in the corresponding fields.
3. Set Account Admin status if needed — toggle this on if the person should manage the whole account. Account Admins get access to every library automatically.
4. Select libraries — choose which libraries to grant access to. This step isn’t needed if you toggled Account Admin on.
5. Confirm the welcome email — Send welcome emails is checked by default.
6. Select Create new user — to finish.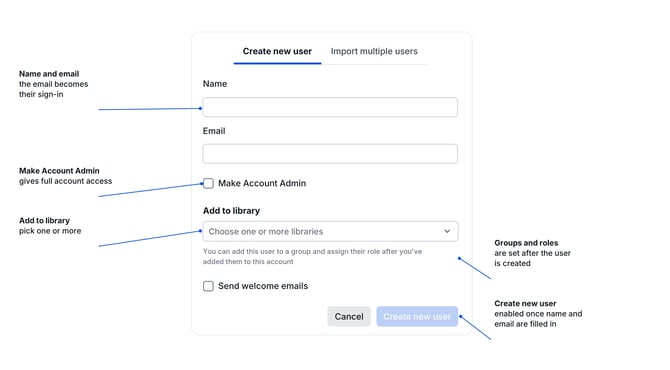
|
Pro Tip: Leave Send welcome emails enabled unless you have a specific reason to onboard someone silently. It’s the fastest way for a new user to get their first login instructions. |
Import multiple users to a Tiled account
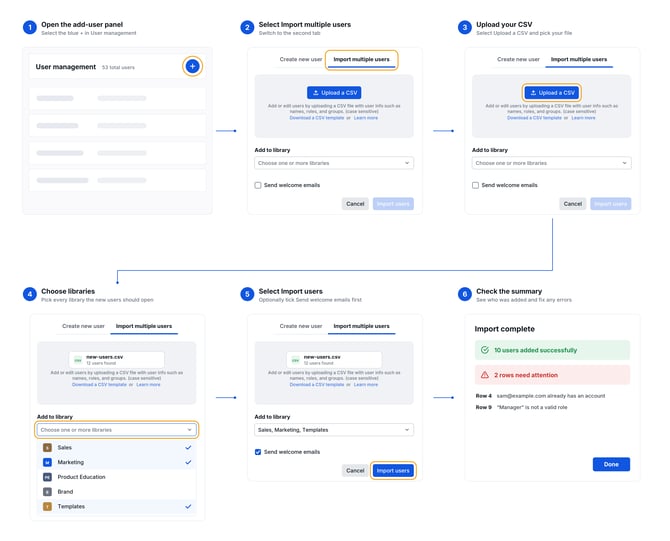
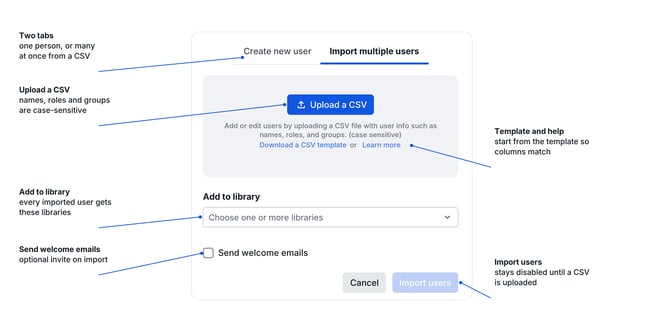
1. Open the add-user panel — select the blue + button in User Management.
2. Select Import Multiple Users — from the panel.
3. Upload your CSV — select Upload a CSV.
4. Choose libraries — select which libraries the imported users should have access to.
5. Select Import Users — a confirmation modal shows how many users were added successfully and flags any errors.
|
CSV Field |
Requirement |
|
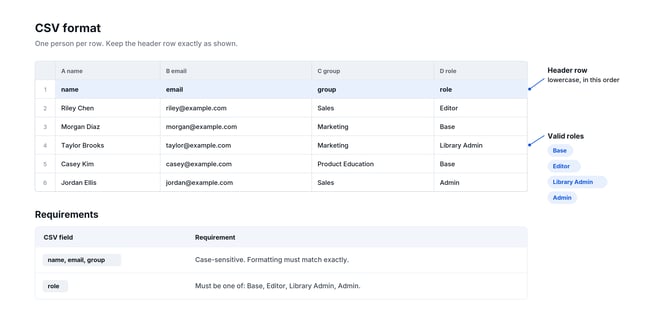
Name, email, group |
Case-sensitive. Formatting must match exactly. |
|
User role |
Must be one of: Base, Editor, Library Admin, Admin. |
|
Heads Up: A few things to know before importing: if a listed group doesn’t exist in a library, that user lands in the library’s default group instead. If a role doesn’t match one of the four accepted values, the user is added as a Base user. If an email is already associated with an existing Tiled account, that row is skipped entirely and the user is not imported. |
|
Try It Yourself: Before a large import, test with a CSV containing just two or three rows. Confirming your formatting is correct on a small batch saves you from redoing a 200-row import. |
| name | group | role | |
|---|---|---|---|
| Riley Chen | riley@example.com | Sales | Editor |
| Morgan Diaz | morgan@example.com | Marketing | Base |
| Taylor Brooks | taylor@example.com | Marketing | Library Admin |
| Casey Kim | casey@example.com | Product Education | Base |
| Jordan Ellis | jordan@example.com | Sales | Admin |
Add or remove user from Library
1. Find the user — in User Management.
2. Expand their record — select the arrow next to their name to see every library they currently have access to, and their role in each.
3. Add or remove access — select a library to grant new access, or select the X next to an existing library to remove it.
Account Admins have access to every library by default and don’t need to be added individually.
Alternative: Manage Access From the Library Itself
Library access can also be granted directly from that library’s own Users page, without going through Account Settings. See Library Settings: Users.
Delete a user from a Tiled account
1. Find the user — in User Management.
2. Open their options — select the three-dot menu next to their name.
3. Select Delete User — to confirm.
|
Heads Up: Deleting a user removes their access to the entire account, not just one library. If you only want to remove someone from a single library, use library access management above instead. |
Roles and Permissions
1. Open Roles & Permissions — from User Management, select View Roles & Permissions.
2. Review existing roles — every role currently configured on the account is listed here.
3. Create a new role — select the + button in the top left.
4. Edit an existing role — select the pencil icon next to the role you want to change.
Pro Tip: If a CSV import has errors, Tiled lets you download the unsaved users so you can fix and re-upload just the rows that failed, instead of rebuilding the whole file.
Add or remove user from a library
Once a user is added to the account, you can easily modify their library access.
- Navigate to the User management section, and identify the user you wish to modify.
- Click the side arrow next to the user's name to expand the user and see what libraries they already have access to, as well as their roles in those libraries.
- From here you can either add them to additional libraries or remove them from one or more libraries via the "X" icon on the right.
Alternative method to give library access.
Another way to add users is via the Users page in the Library Settings.
Delete a user from a Tiled account
- Navigate to the User management section, and identify the user you wish to modify.
- Click the three dots menu on the user.
- Select Delete user.
Common Questions
|
Question |
Answer |
|
What’s the difference between Account Settings and Library Settings for users? |
Account Settings controls account-wide access: whether someone can log into Tiled at all, and which libraries they can reach. Library Settings controls access within one specific library, for a user who already has an account. |
|
Do I need to add a user to the account before adding them to a library? |
Yes. A user must exist in the account first. You can grant library access at the same time you create their account, or add it afterward. |
|
What happens if I toggle someone as an Account Admin? |
They automatically get access to every library on the account. You don’t need to select individual libraries for an Account Admin. |
|
Why isn’t user search finding someone by their email? |
Search only matches against the user’s Name field. Search by name instead. |
|
What role do imported users get if their CSV role doesn’t match an accepted value? |
They’re added as Base users by default. |
|
Can I import a user whose email already exists in Tiled? |
No. If the email is already associated with a Tiled account, that row is skipped and the user isn’t imported. |
Related Articles
• Navigating the Tiled Library — The global sidebar and Account Settings entry point.
• Library Settings: Users — Granting library-level access directly from a library.
• Roles — A closer look at configuring roles and permissions.
• Login to Tiled — How a newly added user signs in for the first time.